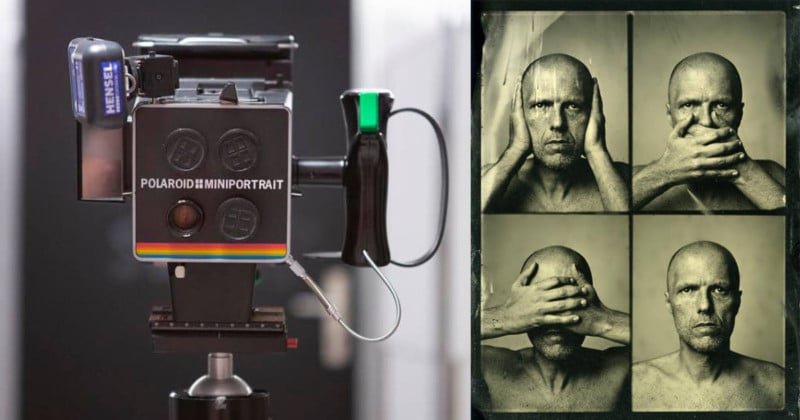
Passport photos on wet plate collodion aren’t legally compliant, but you’re guaranteed to have fun making them. I shot wet plate collodion passport photos using a Polaroid Miniportrait camera.
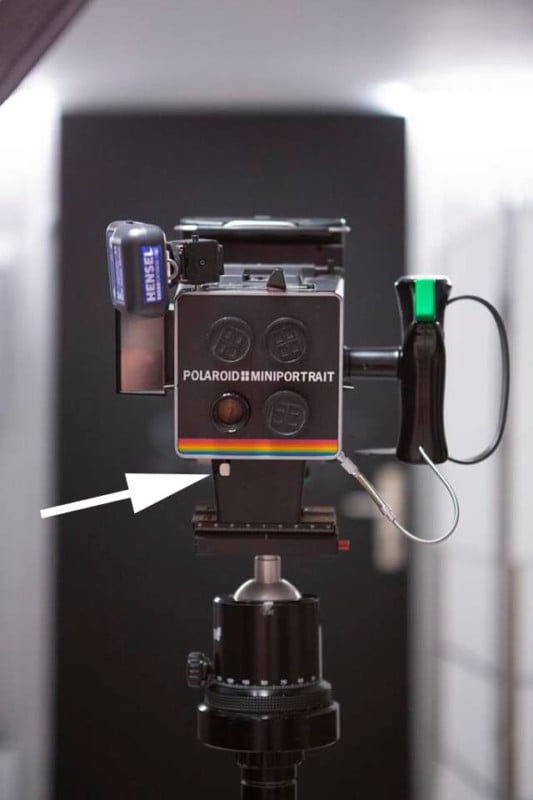
The funny thing about this camera is that it has fixed-focus lenses. You have to sit 1.2 meters (3.94 feet) away. To be sure you are sitting at the right spot, there is a tape measure integrated into the Polaroid camera. You can see a little metal thingy underneath the lens without the lens cap on.
The f/8 lenses of the Polaroid Miniportrait camera combined with a photosensitivity of about ISO 0.5 of the wet plate were a bigger challenge than expected.
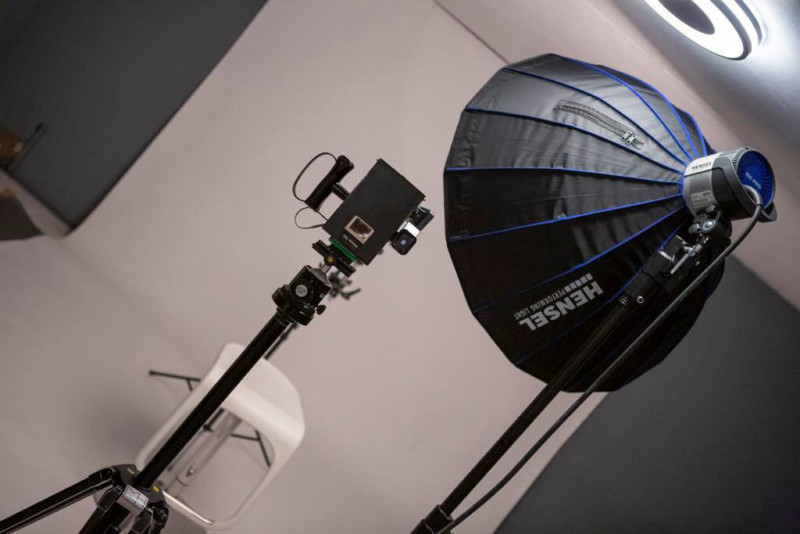
The full power of the Hensel Tria 6000 generator with the Grand Mini 85 was just enough to ensure a correct exposure. For lots of people, it sounds shocking since 6000 watts doesn’t seem to be nearly enough, but when you do the math it makes sense. ISO 0.5, f/8, and a softbox.
My Sekonic light meter showed aperture 18 at ISO 3 (unfortunately you can not set a smaller value). So that’s 2 1/3 stops more than f/8, which brings me to about 0.5.
To hold the wet plate better in position, I used the empty plastic box of the Fuji FP-100C film. A fellow wet plater, Jim Kost, told me he did it a similar way. I used the original plastic box and used the foam that is already in that box to hold the wet plate in position.
Then I put the Fuji plastic box with the wet plate inside into the film holder. It’s very easy to do, and the whole project was finished in 90 minutes.
Fortunately, in the closet is a Hensel Tria 3000, so the next passport photo should be more creative.
About the author: Markus Hofstaetter is a photographer who enjoys life and meeting people around the world. You can connect with him and find more of his work on his website, blog, Facebook, Twitter, and Instagram. This article was also published here.
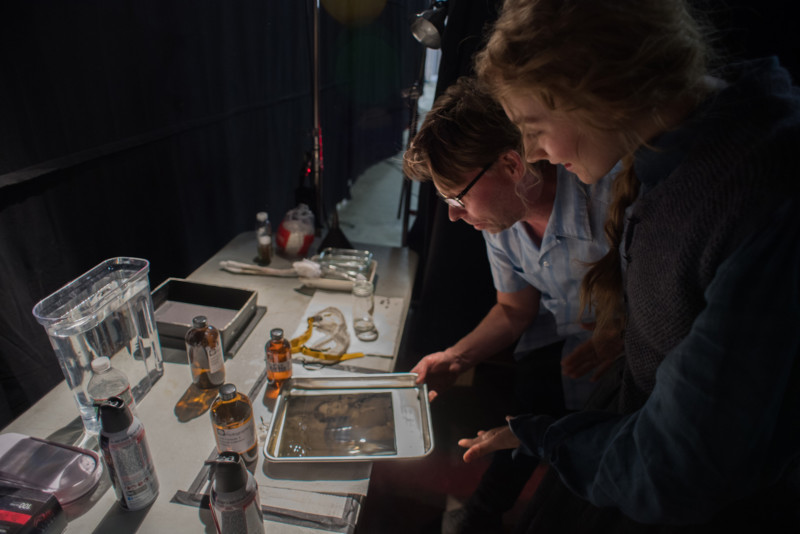
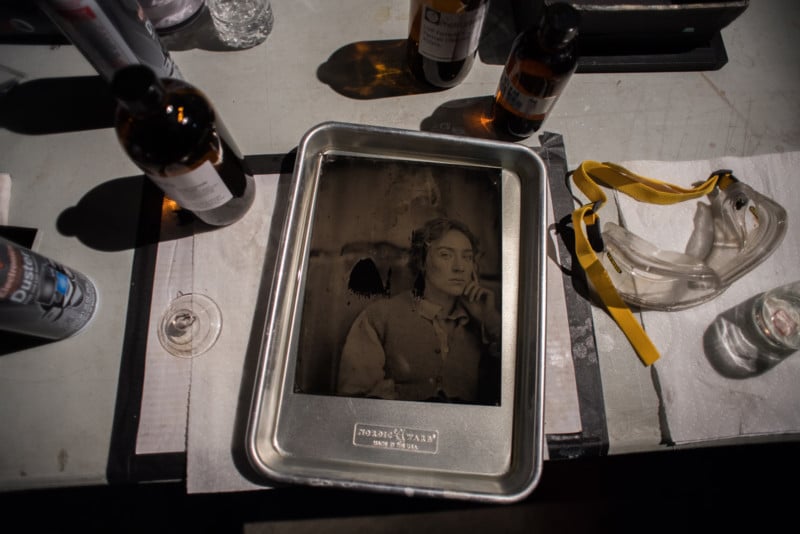
While I was visiting San Francisco, Kristy Headley, a dear friend and fellow engineer, showed me her studio. There I was lucky enough to sit for her while she did some vintage tintyping. Tintyping was one of the earliest forms of photography, popular in the 1850s.
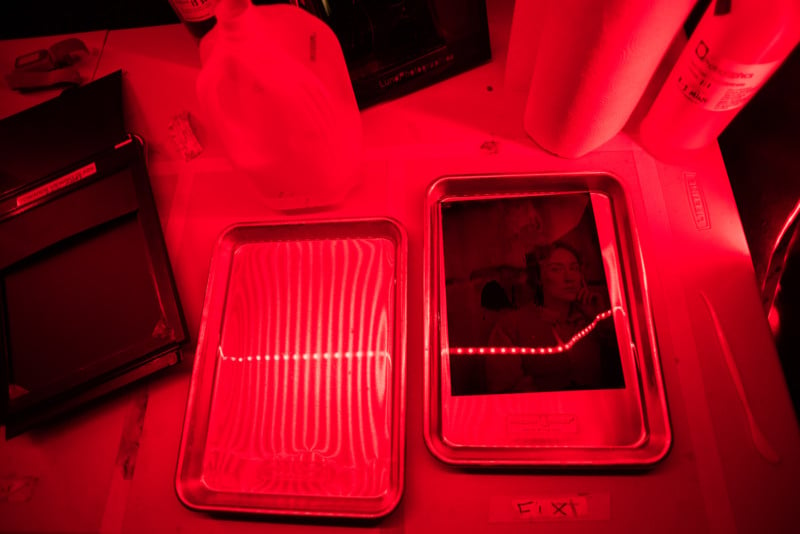
It was a kind of incredibly inconvenient Polaroid — the photos were exposed instantly after a quick wash on plates of iron or aluminum (never actually tin). All you needed was a very, very large camera, plates treated with “collodion” to make a light-reactive surface, and a sizable collection of chemicals. Unfortunately, the genuine process has a high risk of explosion, creating cyanide gas, incurring blindness from silver halide splashback, or getting whacked out on ether.
“Dusty”. Tintype/ferrotype by Quinn Jacobson and licensed under CC BY-SA 3.0
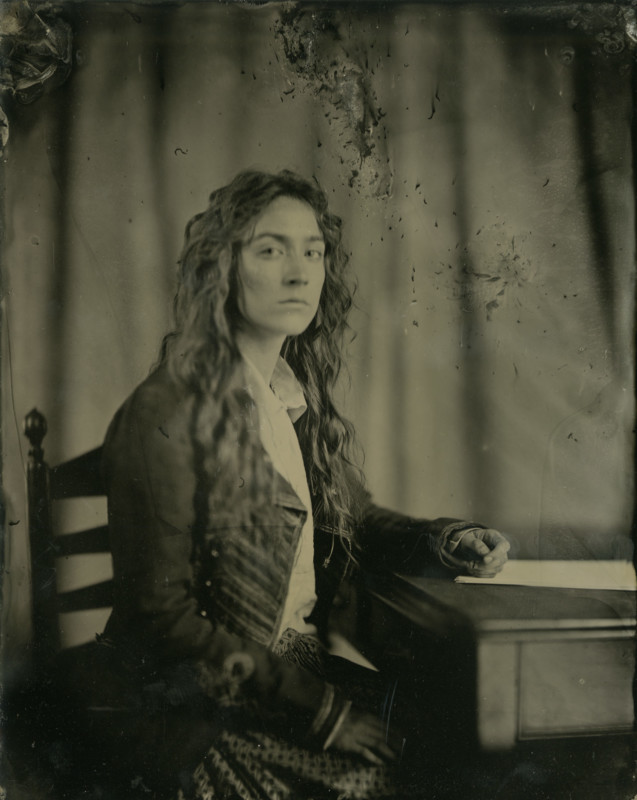
Kristy showed me each painstaking step, and I was enamored with the result. With her mastery of lighting techniques, she’d produced tintype photographs where every detail popped — every freckle, hair, and eyelash seemed to stand out. Yet, these looked very different from modern photography. There was a certain, seemingly unquantifiable trait to them. Why?
I sought out to quantify this ol’ timey look and the fashion by which one could reproduce it with a digital camera. Perhaps I could share in this delight without keeping jugs of volatile chemicals in my room.
Look to the Spectrum!
Kristy had told me that her exposure plates were only sensitive to certain colors: UV, blue, and some green. There was a specific range of wavelengths this collodion emulsion was sensitive to — one that doesn’t match human vision.
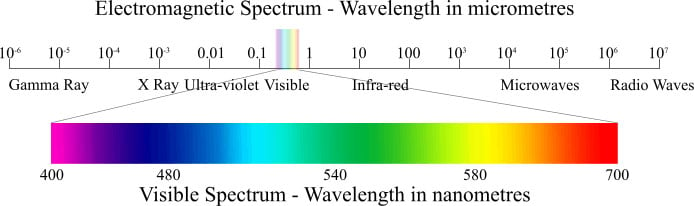
Human vision, as we can see above, is a sensitivity to the electromagnetic spectrum. Electromagnetic waves between about 400 and 700 nanometers will be perceived as light to us — the seven colors of the rainbow! (Interesting article about this to come later) If we dip to wavelengths shorter than 400, we get imperceivable ultraviolet (UV) light; rise to wavelengths above 700, we get imperceivable infrared (IR) light.
But What Do Vintage Photographic Emulsion Surfaces See?
Engineer Niles Lund seems to be the only person who has researched the spectral sensitivity of collodion, the emulsion chemical stew used to make wet-plate and tintype photographs in the mid-1800s. After exchanging a few emails, Niles sent me this updated spectral chart.
Spectral sensitivity of cadmium bromide, potassium iodide, and collodion consisting of the two. Available here.
So now we know what to recreate if we want “digital collodion”! We need to cut out the upper half of the visible spectrum allowing nothing above about 520 nanometers into the camera.
I’ve done much work in this field, so I thought this would be a great time to blend science and art to explore this concept and compare it to other hyper-spectral imagery!
Setting Up an Experiment
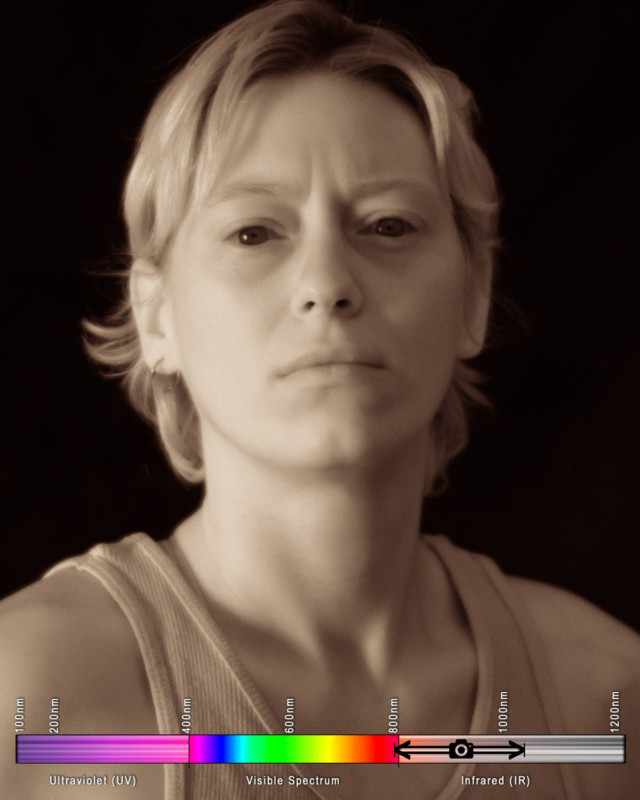
Now we invite some friends and models to come sit for us! I asked the models to avoid skin-concealing makeup and zinc-oxide sunscreen, which is the only sunscreen to obstruct UV-A rays. They were asked to model under a broad-spectrum light source (the sun), with an additional light source of a silver reflector, and maintain a pose for a few minutes while I photograph each under the following conditions:
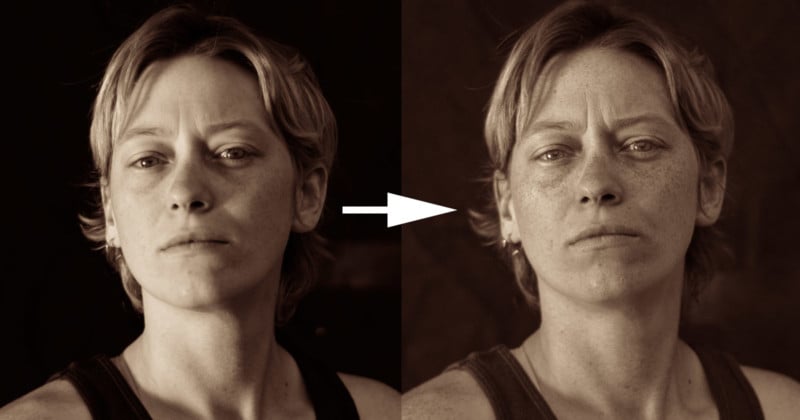
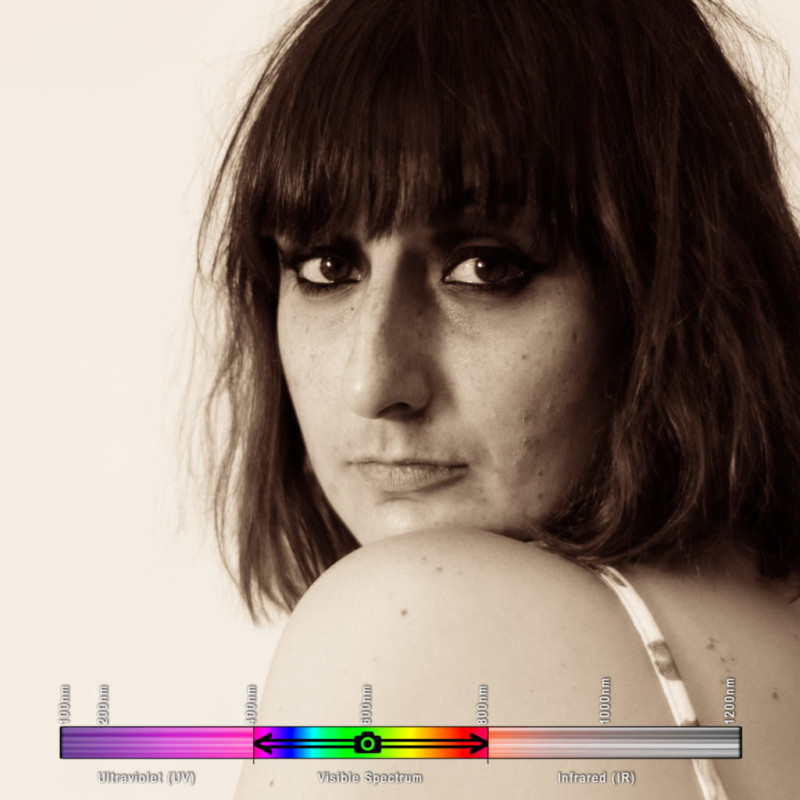
Visible Spectrum
This is what humans see (obviously). Using three cones, sensitive to three different ranges of wavelengths, which loosely map to red-green-blue, we see everything from violet to red. Violet is the shortest wavelength. Red is the longest. Not surprisingly, this is what digital cameras see, as well. Silicon photovoltaic sensors, whether CCD or CMOS, can take in a theoretical 290nm to 1100nm. However, it would be maddening to have your photography overexposed, blooming, and flaring due to lightwaves you cannot see, to say nothing of threats of overheating, so sensors are limited by optical filters placed directly over the sensor to only photograph, more-or-less, in the human visible spectrum. Photons that don’t play nice in this range are either bounced back out of the lens or absorbed and destroyed.
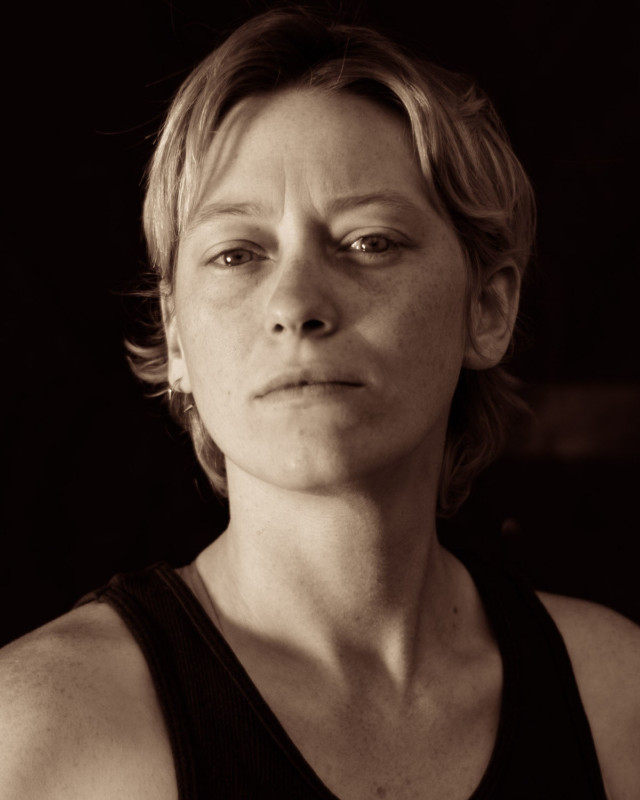
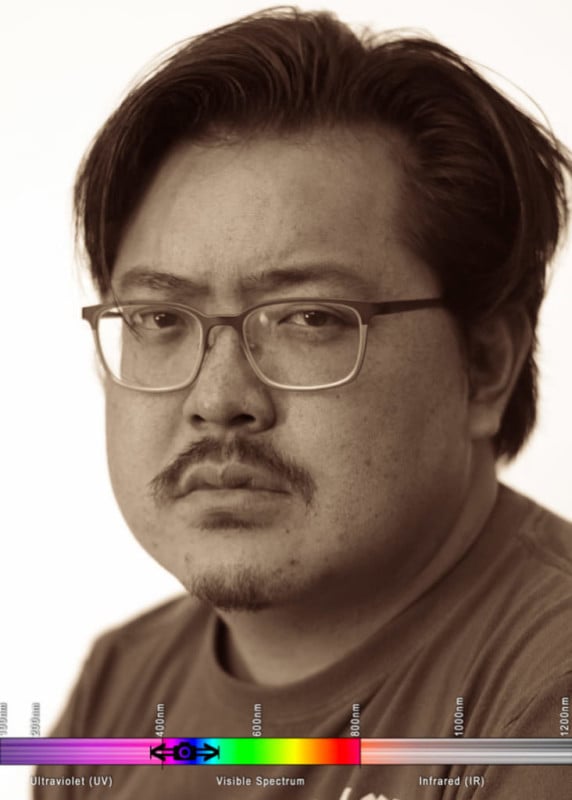
Here’s what our model Kayla looked like in the visible spectrum:
Captured on an unmodified Nikon D610 through a normal UV-limiting 50mm lens. Notice her light freckles, dark shirt, and slightly light eyes
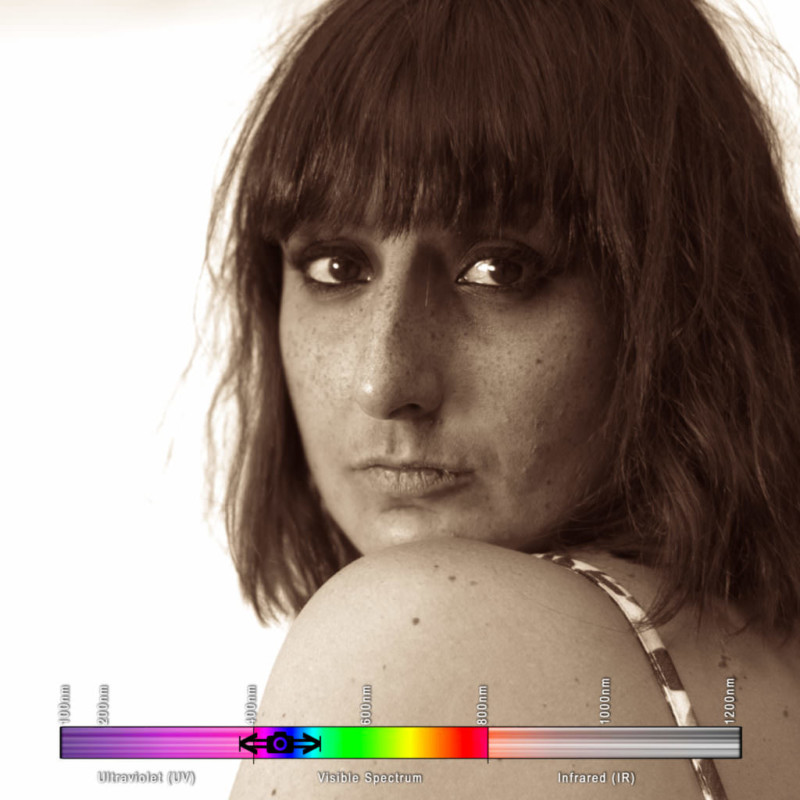
Orthochromatic Blue (Collodion AND Squid Vision)
This could be seen as the same spectrum that octopus and squid might view in. Humans, except for rare and awesome mutants and the colorblind, are “trichromatic”, with three cones that allow for three different ranges of wavelengths in. Cephalopods only have one, the S cone, which is sensitive in almost the exact fashion of the spectral curve of the 1850’s collodion (except for UV). Though they might have a different mechanical use of their eyes, which could allow for more color vision, but I digress…
By using Schott BG25 bandpass glass, bought off a gentleman who fits esoteric german glass into filters, on a lens that cuts UV (any normal lens) on any unmodified camera, we get a theoretical spectral sensitivity that looks like:
The “double bandpass” ionically colored glass made by Schott AG in Germany nicely mimics the spectral response of the collodion.
Of course, all the photons that this can transmit that the camera can’t capture become irrelevant, so on an unmodified camera, we will get a spectral response that looks like:
This means that on an unmodified camera, using a lens that doesn’t block UV, we’re going to get an image where the focus is going to be more on near-UV damage to the skin — concentrations of freckles and blemishes are going to much more pronounced. There’s going to be a light leak of very red photons, and we’ll be missing much of the UV range, but we’re very close to vintage emulsion now.
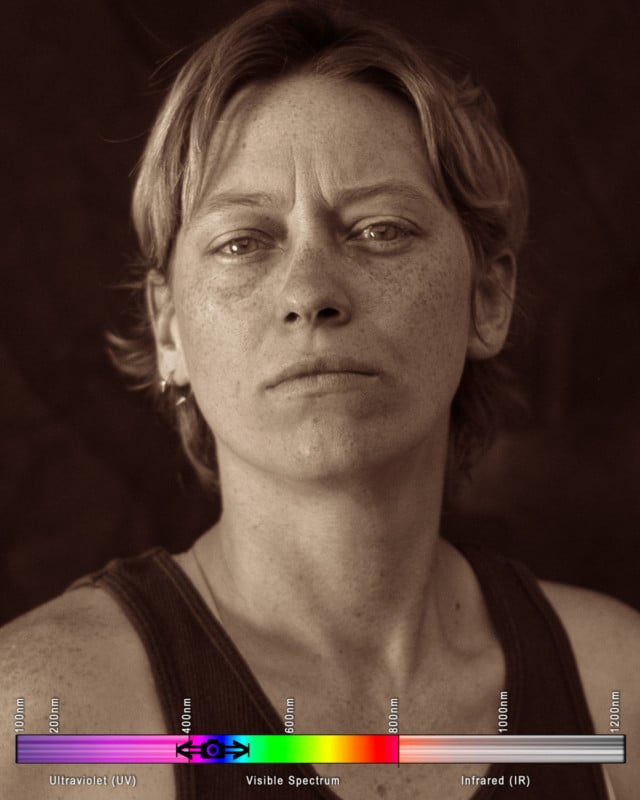
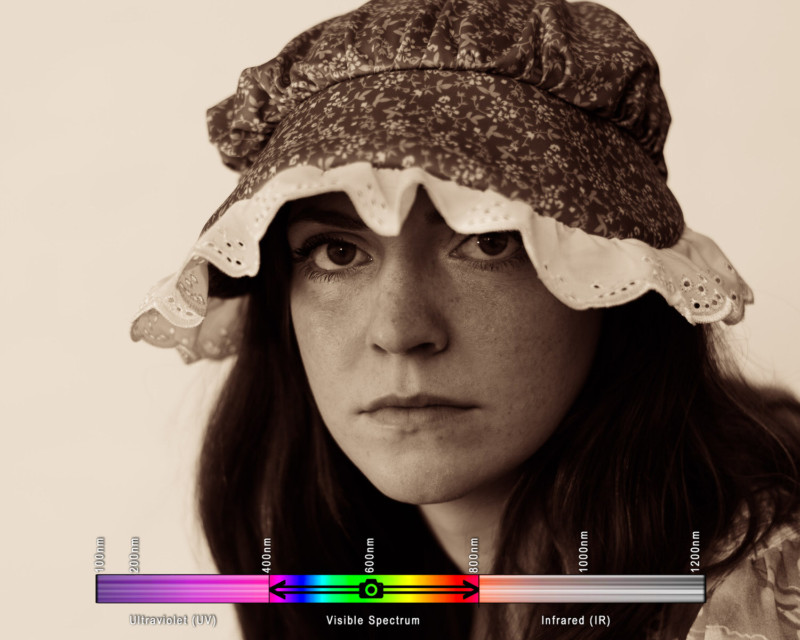
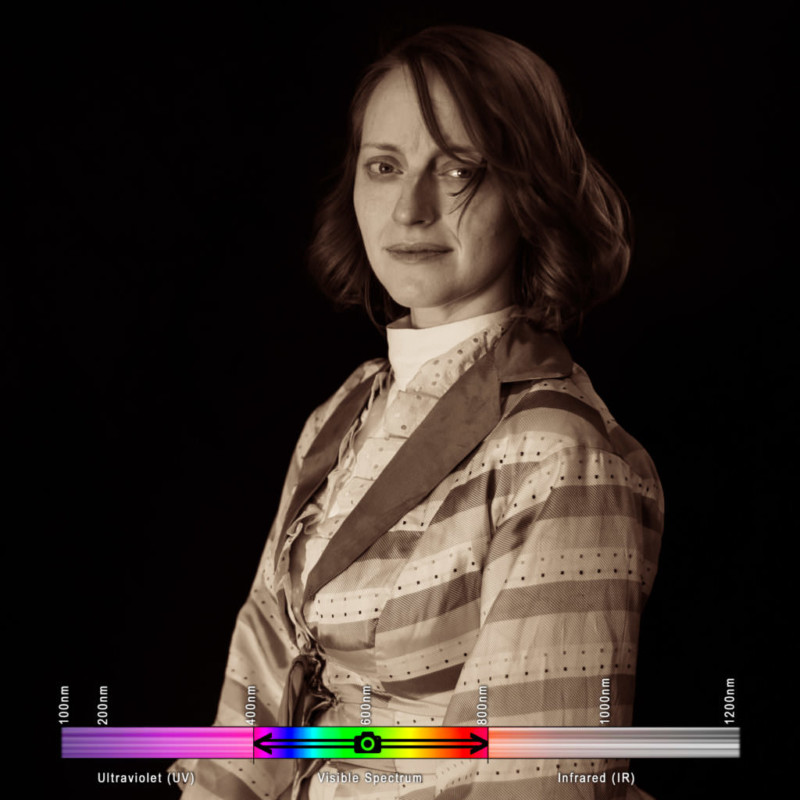
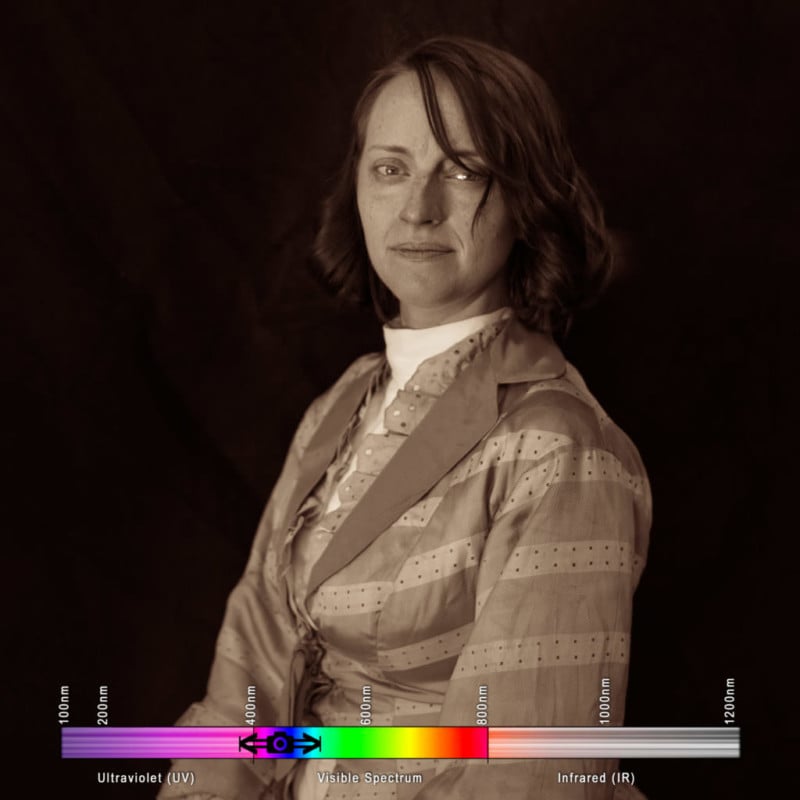
Our model, under the same lighting conditions (with an exposure compensation of +.7, calibrated from an 18% gray card):
Captured on an unmodified Nikon D610 through a UV-permitting 50mm lens and a BG25 double bandpass filter. Notice her pronounced freckles, dark shirt, and very light eyes
By gum, we’ve done it! With that nanty narking, I think we can say we’ve captured the ol’ timey feel of collodion!
…but it is not scientifically accurate. This is about the best we can do on an unmodified camera, as we need some expensive modifications to allow UV to extend into the sensor. More on that later.
Let’s see what she looks like in some other, more bizarre wavelengths!
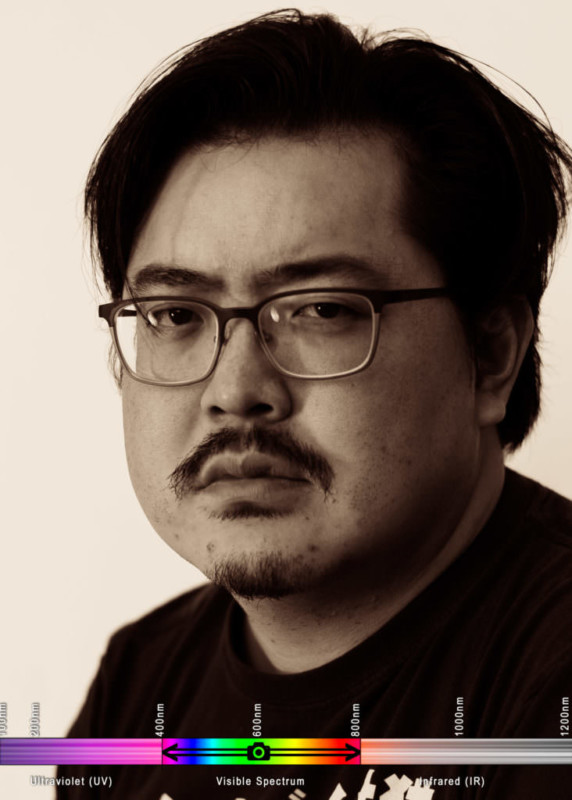
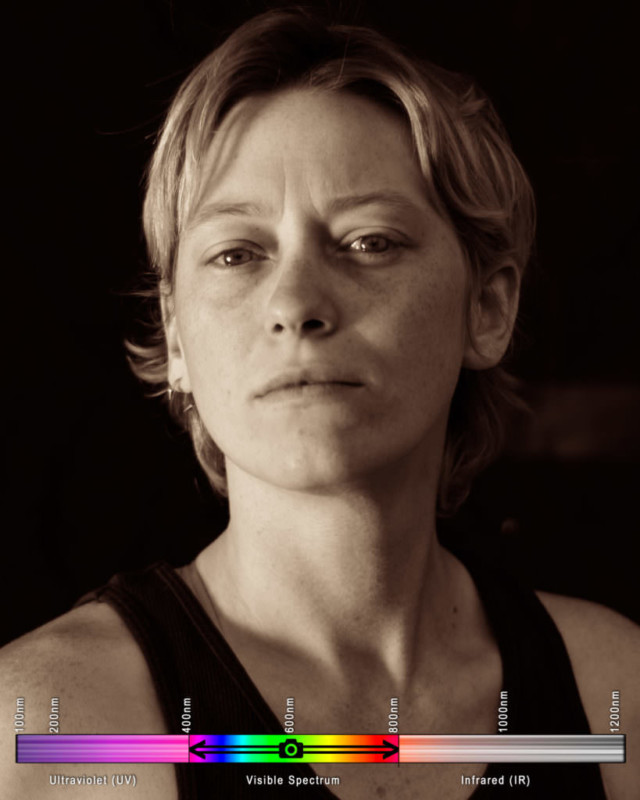
Near Infrared and Short Wave Infrared (Snake Vision)
This is, likely, what snakes see. This is the orange-and-red human-visible spectrum (near infrared, or NIR) and the infrared waves closer to the human spectrum. This is what I like to photograph foliage in because it can be false-colored and remapped using the color channels that your camera knows how to deliver data in. I have a Nikon D80 that has been modified to shoot in this wavelength, with an upper infrared spectrum bound (unmeasured) limited only by the physical limitations of a silicon CCD.
For some reason, for the duration of this experiment, this setup absolutely refused to focus properly. This camera does not have live-view, and it is very difficult to assess these images until they’ve been processed on a computer. Nonetheless, these blurry images were interesting…
Captured on a modified Nikon D80 through normal 50mm lens, no filter. Notice there are no freckles, and her shirt appears grey.
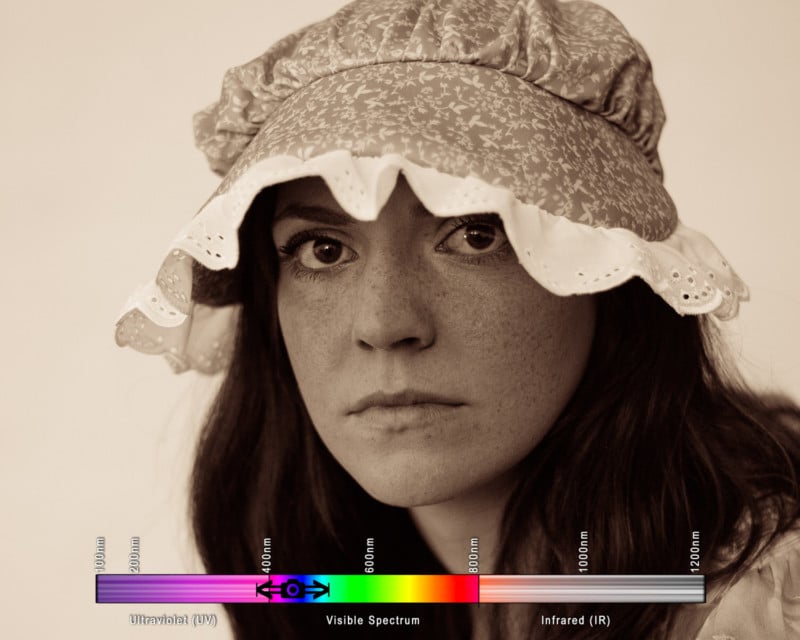
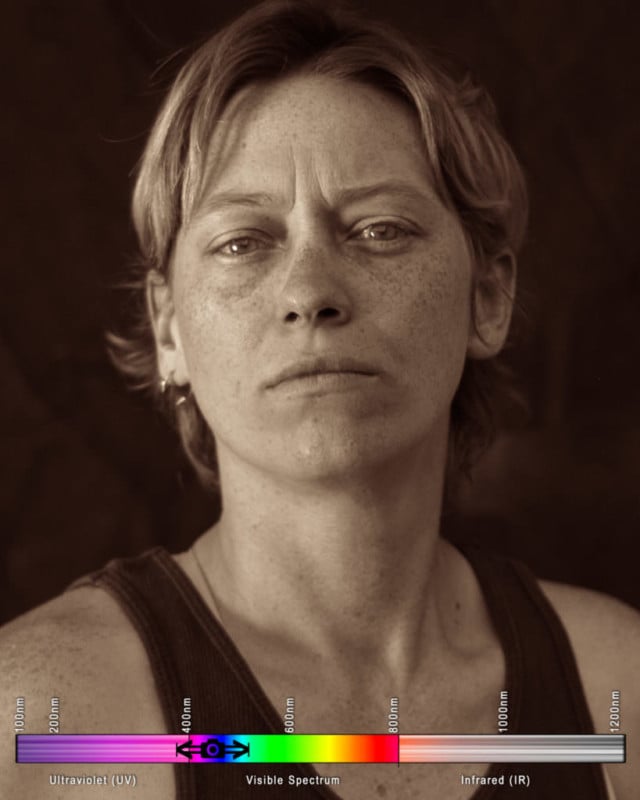
Short Wave Infrared
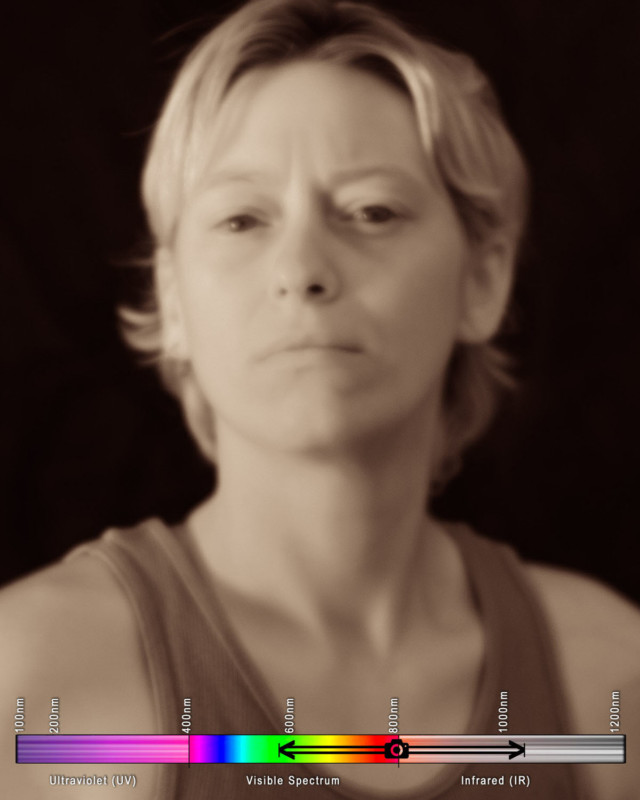
I don’t think anything “sees” solely in this spectrum, though it is a difficult concept to explore, so perhaps time will tell. To capture the full breadth of short wave infrared, or to move into longer wave infrared, we would have to use a special sensor made out of indium gallium arsenide. It’s interesting to see that any sun damage and melanin deposits, such as freckles and tans, will not appear in this wavelength. The IR photons do a good deal more sub-surface scattering in the skin than visible light, rendering each person as a waxen figure.
Captured on a modified Nikon D80 through a normal 50mm lens and a BG25 double bandpass filter. Notice there are no freckles, her shirt now appears white, her eyes have darkened considerably, and all of her skin appears waxen and soft.
Polishing these photos up a bit in a vintage style split-toning
You might have noticed these are not delivered in monochromatic black and white, as in the style of a silver gelatin process. Instead, I chose to render them out with a bit of split-toning. Since the birth of photography, this was a common practice, using various methods to bring color to the highlights and to the shadows.
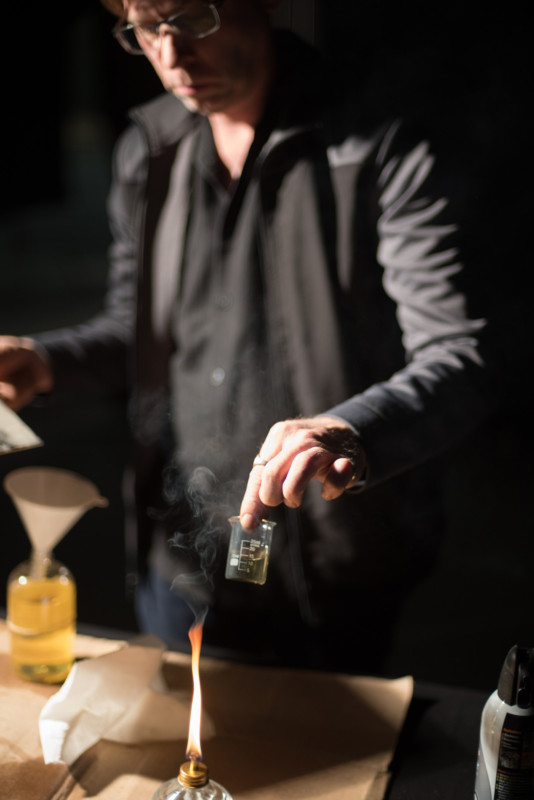
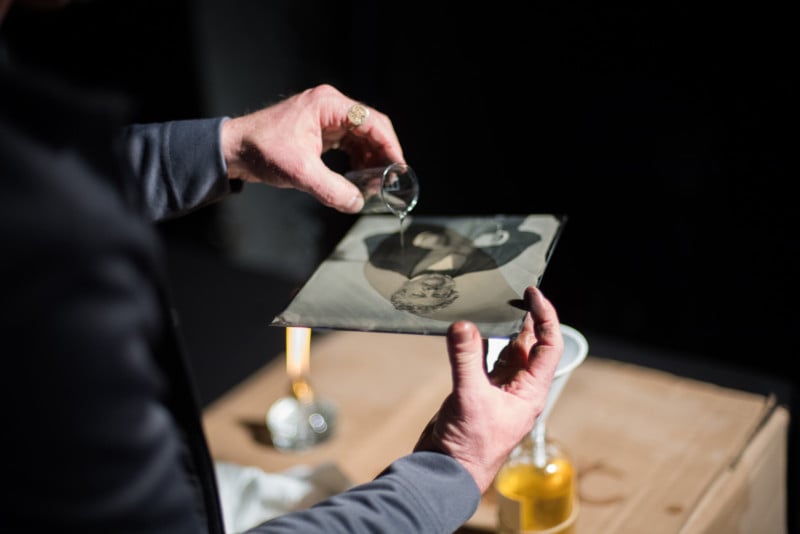
In this case, I made the highlights gold to mimic the flame-gilding of the mid-1800s, which “fixed” the highlights of a photograph using a gold chloride solution and an open flame. As ambrotypes caught on in the 1860s, “ruby” hued backs became more common in photography, so I enjoy using a red tint in my lowlights.
Photo Results
Kaitlin
VisibleCollodion
Kevin
VisibleCollodion
Christine
VisibleCollodion
Xach
VisibleCollodion
Caitlin
VisibleCollodion
Kayla
VisibleCollodion
Next Steps to Take it Further
In order to fully and accurately capture the collodion sensitivity range, I need to not only use a lens that allows ultraviolet photons to pass, as used in this experiment, but also a camera with a sensor modified to receive UV light. Because this is not a fast or cheap prospect, I’ve been dragging my feet to see if this could be done in conjunction with another modification…
As photographing humans draws no benefit from presenting false color, hyperspectral photography (such as UV) is best delivered in black and white. Having a color sensor actually hurts collodion-spectrum portraiture — if the construction of the image relies on a missing red channel, then we need to have a monochromatic sensor to gather an image using the filters described in this process with due sharpness.
We have different options: Buy a monochromatic camera, which can run between 3,000 and 50,000 dollars, or do a “mono-mod” to scrape the Bayer filter off of an existing camera. Conversion shops have assured me this is impossible on the Nikon cameras that I like to use, but I hold out hope for a “full spectrum” monochromatic modification. Alternatively, I can also look into intelligent upscaling, possibly using AI to regain resolution lost in the process.
Final Thoughts
As I used attractive models in this experiment, instead of the lab tools one should use to characterize optics, the spectral range of each photograph is an educated guess at best, based on theoretical readings. Lab characterizations will follow.
Trust the math. I know things look underexposed and incorrect, but if you’ve set your exposure compensation based off an 18% gray card — or, realistically, ignored that and just set it to +.7, then you can trust your lightmeter shooting in “orthochromatic blue”.
Sometimes, there’s no substitute for the real thing — recreating wet-plate collodion and tintypes is severely limited by digital consideration — but limitation is the mother of invention!
Editor’s note: A longer and more comprehensive version of this article can be found on Warren’s website. In it, Warren also discusses challenges he encountered with Bayer filters and how he wrote his own demosaic algorithm script to overcome them.
About the author: Phil Warren is a photographer, engineer, explorer, and adventurer. The opinions expressed in this article are solely those of the author. You can find more of Warren’s work and writing on his website and Instagram.
This year, over 220 photos were submitted by 90 photographers based in 19 different countries. The judges, Michael Godek, Giles Clement, Alex Timmermans, Tom DeLooza, and Paul Barden, spent nearly a month on “difficult deliberation” before deciding on the handful of winning wet plates.
Here are the 2019 winning photos, artists, and stories:
I first became interested in collodion after seeing the work of Sally Mann in a photo book several years ago. I found the photographs moving and the process itself rather compelling. In 2013, I attended a workshop at the George Eastman Museum to study under Mark Osterman and learn the wet plate process. I’ve been practicing ever since.
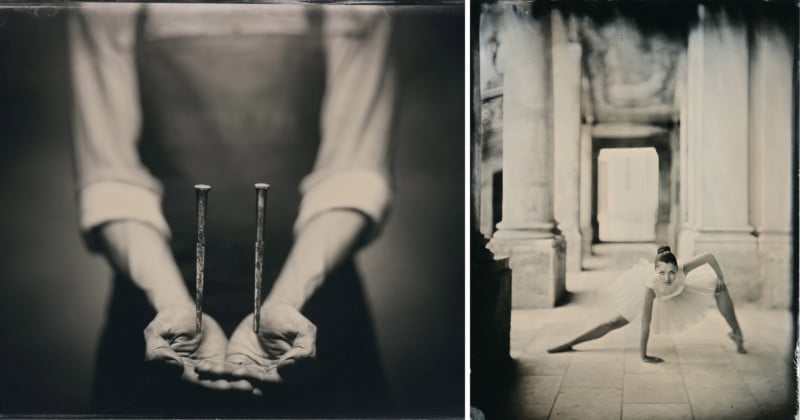
Two Nails is an attempt to share something of my own experience with the world. It comes from an ongoing body of work titled The Framer. I’ve been working professionally as a picture framer for nearly a decade now, and it seemed like a natural extension of my working life to begin photographing the tools of the trade. With this ambrotype, I wanted to make a self-portrait that sought beauty in its simplicity.
Making the plate itself was a real labor of love. I say this, in part, because it took two months to work through. How does one make nails float? The answer, it turns out, is a lot of hard work. Through the use of selective focus, lighting, perspective, and a bit of custom fabrication, I was able to achieve the illusion. For me, the process was all about trial and error. I’ve discovered you learn a lot in the trying.
I have always lived in big cities, now I live in a tiny medieval village surrounded by nature. My approach to photography, through wet plate collodion process, reflects the slowness of the place where I live.
I also really like portraiture, the result of a tension between me and the subjects in front of me that results in a unique image.
This plate (10×12 inch) is part of a series called “Gestation” consisting of four collodion plates on clear glass. Each plate is the result of a double exposure: one image of the silhouette of my pregnant wife, obtained through a backward illumination of the subject with continuous light; and another one of the grain I placed on a black background.
The idea come up during the period of my wife’s pregnancy and was created two days before my daughter Giorgia’s birth. Seeing the transformation that my wife had during her pregnancy time was an incredible experience. Day after day her body has become more and more beautiful and strong in order to protect the life she was carrying on.
Studio Portrait, Runner Up: “Waltnessmonsta” by Matt Alberts
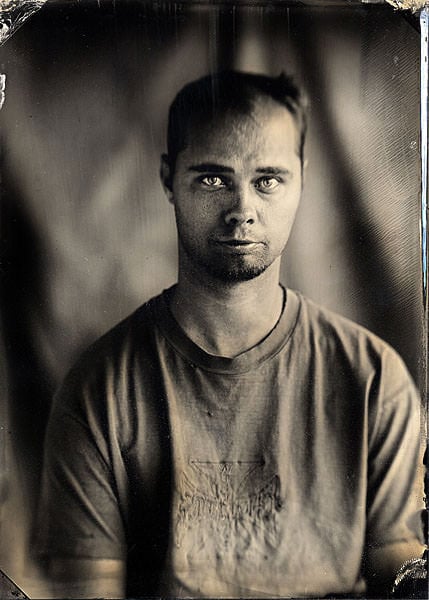
Feeling frustrated with the meaninglessness of most digital photography in combination with a desire to make something with my hands, I found the wet collodion process. In February of 2013 I took a class taught by Quinn Jacobson and thereafter we became good friends. I related to Quinn’s philosophy that the collodion process should be used to create something meaningful; he took me under his wing and he became my mentor. While apprenticing at Quinn’s studio in Denver, I invited my close friend and skateboarder, Walter Lacey, over to show him the process and take his portrait.
The plate “Waltnessmonsta” was one of the earliest images I made for the LIFERS project series. This shot was made using a 11×14 Deerdorff studio camera with a 320mm CC Harrison Petzval lens. The image is on black glass.
Natural Light Portrait, 1st Place: “Ballet in the Castle” by Gabriel Kiss
This photo is the result of a three days long preparation and negotiation. The photo shooting took place in one of Hungary’s most beautiful castles, the Esterhazy palace. Because it is a scheduled monument we needed a lot of permits. With the figure of the ballet dancer I did not want to point out the dance but rather to emphasize the tension surrounding the dance itself, its edges and lines.
Natural Light Portrait, Runner Up: “Gravity” by Keira Hudson
I originally studied printmaking at RMIT University in Melbourne, Australia from 2009-12 before transitioning to photography. I worked digitally for five years until I grew tired of working in front of a screen and decided to enroll in a tintype/ambrotype workshop at Gold Street Studios in Trentham.
I am inspired by a mixture of artists, writers, films and TV shows, and have a large hard drive full of media collected over 10 years. The artists whose work I regularly revisit include Berlinde de Bruyckere, Jenny Saville, Lauren Simonutti, and Sally Mann. I am drawn in by the rawness of their work, and the treatment of the human body in their respective practices.
For the past few years I have been working on a series centered around anxiety, and the body’s physical and emotional responses to persistent overthinking. I incorporate props such as thread, clothing, plastic wrap, and glass vessels into my photographs to restrict and compress the flesh, and recreate the daily feelings of anxiety I experience. In “Gravity”, I wanted the body to be suffocated in a glass and water cage.
We are primarily self-taught having been introduced to wet plate collodion almost by accident when a friend showed us the basics of the process. Admittedly, there’s more than a little bit of punk rock, DIY attitude in us, so making photographs the hard way somehow naturally meant for us that we’d also learn the hard way.
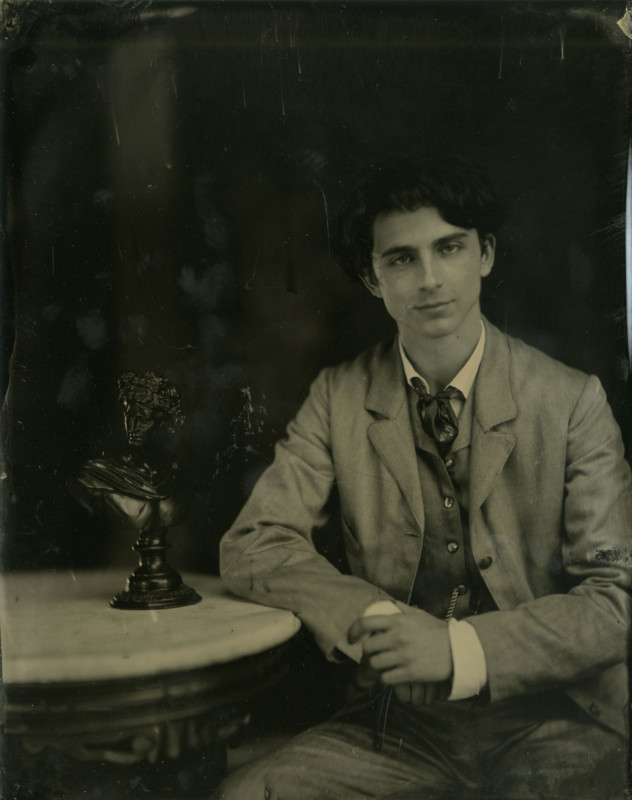
About our piece, fully titled Incroyable! (Wednesday, November 9, 2016): intentionally referencing the surrealist painter Magritte, it’s our attempt at expressing the collective spasm of disbelief felt by many following the 2016 presidential election in the United States — not just the surreal nature of that moment but the outrageous nature of life since. Beyond the symbology of the carnation, the suit and tie and mushroom cloud-like explosion, it was thematically relevant to use the in-camera trick photography associated with the early 1900s spiritualist movement to express this communal gasp and the experience of being hoodwinked by charlatans.
Still Life, Runner Up: “The World and The Man” by Gabriel Kiss
My photo was born from the idea that the egg as the origin of our world – the birth – has already been set on its edge and has to balance on it. And the scissors as the sword of Damocles are swaying above the egg. The rope can break any time and they can smash into the fragile eggshell.
Landscape/Architecture, 1st Place: “A Quiet Lakeside” by Maximilian Zeitler
Last October someone broke into the shared place I use for a studio and stole nearly all my large format cameras and a very rare and big lens I got borrowed from a friend for ultra large format portraits. Gathering equipment for wet plate always means searching auction houses and hoping to be lucky. Since I started wet plate about four years ago I therefore tried to get good equipment to work – that then was gone.
When I had overcome the first shock I packed the last ‚portable‘ wooden camera and all my darkroom equipment and drove into the Spreewald near Berlin to escape the studio and all the bad thoughts. At this small lake in the woods I set up the camera from 1890 together with an old wide angle lens from 1880 and exposed one plate around 60 seconds.
One should always keep on doing what you love!
Landscape/Architecture, Runner Up: “The Best Day” by Lynnette Bierbaum
I started doing wet plate collodion two years ago and glassblowing shortly thereafter. I stumbled through being self-taught with wet plate in the beginning but wanted to learn more about the process. I took a wet plate collodion class taught by Dan Estabrook at Penland School of Crafts in the summer of 2018 and returned again as a studio assistant for Jill Enfield in the spring of 2019.
These opportunities allowed me to refine and continue printing on my blown glass forms. I strive to find a balance between two and three-dimensional planes within my art. I blow the glass vessels to create an extension beyond the photograph that is just as important as the image itself.
I use positives in contact with the wet plate emulsion under an enlarger to expose the images onto the three-dimensional glass forms. Next, I develop, and varnish before removing the frame from the glass.
The idea behind the forms was my constant search for belonging and a place to call home. I always knew that the Midwest wasn’t the place for me, so I started traveling around the world looking for my idea of a home. Home is more than just a place, it’s about finding the right person, community and artifacts to make a place your home. The image printed on this glass vessel was taken in Ebeltoft, Denmark.
You can find a gallery of Honorable Mention wet plates as well as the full gallery of submissions over on the competition website (warning: some of the photos are not safe for work).
I’ve been experimenting non-stop with a few new daguerreotype techniques lately, and however promising the results are looking so far, those experiments are slow going. But here’s something I thought up and was able to execute in a relatively speedy manner — something I believe warrants a look. I don’t believe this method of making a panoramic image has ever been utilized before, so I’m dubbing it the “Antorama.”
The point of the antorama is to use variable focal lengths to achieve shortening or lengthening in the appearance of a scene within multiple frames of a view, in order to bring distant objects closer or to be able to see more of those near the camera. One doesn’t have to do execute the antorama in daguerreotype format, by any means. As a challenge though, I don’t believe there’s a greater one out there.
Ever since the 19th century, a multiple plate daguerreotype panorama (made in the usual way, with the same lens for all plates) has been referred to as the ultimate technical challenge in photography.
Daguerreotype plates are made on highly polished silver plates, which are sensitized with fumes of iodine and bromine, and developed in fumes of mercury. Matching all those steps over multiple plates, and getting same tonality and contrast from one plate to another is a task unlike any other I know of in photography. You don’t have to take my word for it, but using multiple lenses adds a whole extra level of fun to the pursuit.
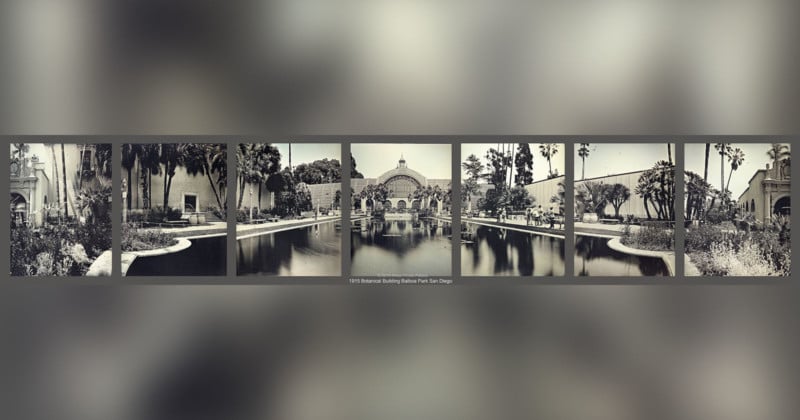
Botanical Building and Reflecting Pool at Balboa Park. 7 4×5 plate antorama, 4 lenses
The focal lengths in millimeters of lenses used for the above 4x5in plates from left to right are 120, 150, 180, 210, 180, 150, 120.
Due to daguerreotype being a UV-sensitive medium, various lens coatings used by different companies through the decades (and I also suspect the thickness of glass and the number of elements that light has to travel through) make lenses give surprisingly different exposures when all are set to the same f-value. I suppose that having a full set of the same type of lenses would help here, but I had to work with what I had, so it took me a few experimental plates (shown below) to match exposures of Schneider 150 Xenotar, Rodenstock Sironar 180, and Fujinon-W 210. However, after the first go at the above view, I understood that 5 plates weren’t going to be enough as the composition ended rather anticlimactically on both ends. I then decided to add a frame with 120mm Schneider 120-XL on both sides, which showed parts of the promenade walkways and made it into an approximately 220° view. Based on previous experience with the other three, I guessed the exposure for this lens and luckily got both end plates on the first try.
4×5 Daguerreotype Test of 3 lenses (shown not gilded)
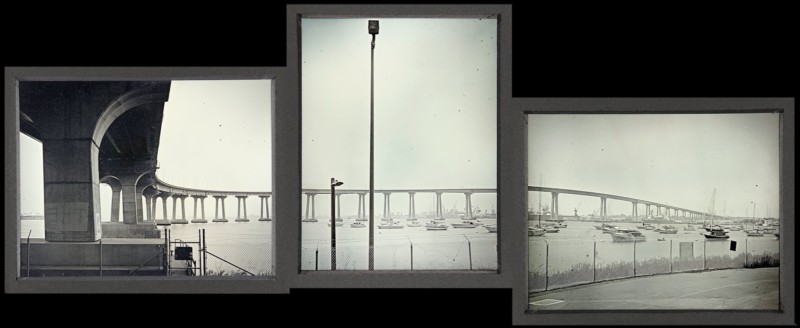
For the above 7-plate antorama to be as I envisioned, the sun needed to be out at 1pm, which is normally something you can bet your bottom dollar on in San Diego from about March to November. I won’t go into details of how much frustration was added by climate change and the fact that it seems that these past two weeks have been the cloudiest and rainiest ever for this time of year here. Anyhow, while waiting for right atmospheric conditions, I decided to capture a slightly less ambitious 3-plate view of San Diego Coronado Bridge, this time with just one plate per lens (again, 150, 180, 210).
San Diego – Coronado Bridge. 3 4x5in plate antorama, 3 lenses
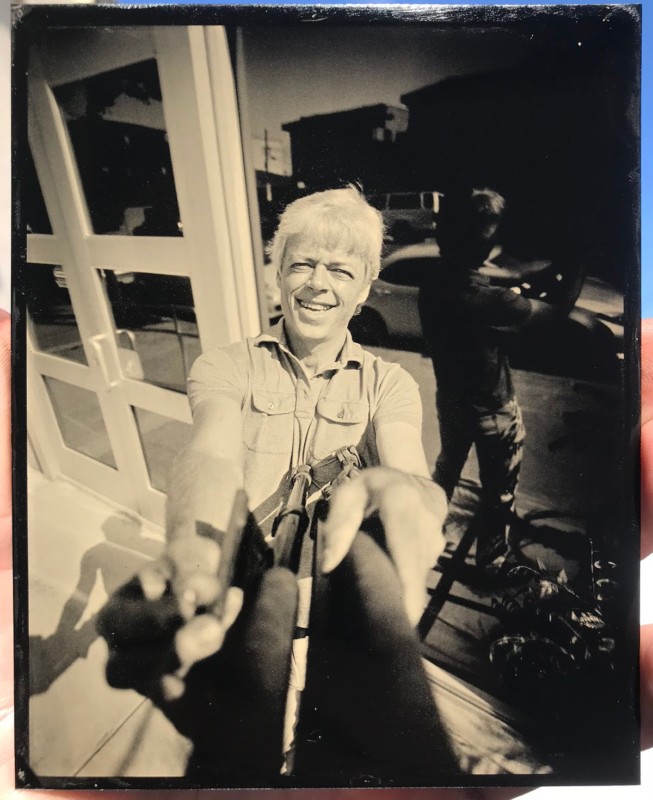
These two compositions took a fair amount of effort and polishing hours. At one point, a few days ago, I was going at it for a while and my shoulder got tired. I didn’t want to stop working, so, to switch gears, I decided to see if I can pull off another minor “first ever,” but this time with an easier medium that can be done on the fly: wet plate collodion tintype.
During my Grand Canyon trips earlier in the year, I saw more than enough tourists wielding phones propped upon those ubiquitous selfie sticks. Let us not address here the impact of those sticks on user’s experience of his/her surroundings and the narcissistic tendencies driving their sales, but among social media groups a while back people jokingly speculated if this concept can be applied to collodion. Most people expressed doubt because of the usual understanding of collodion as being a slow methodical technique, which requires long exposures and steady tripods with heavy cameras upon them (though lately people have been using anything from Kodak folders to tin cans to make images with). I don’t recall however anyone every actually going for it and trying it out. Well, no time like a break from polishing daguerreotypes to try something new.
To imitate the wide angle lens of a cell phone, I chose the Burke and James 4×5 Orbitar camera, which comes with a 65mm Schneider Super Angulon. Having the maximum aperture of f/8, that lens wasn’t exactly ideal, but I figured that with my relatively fresh collodion and somewhat healthy silver bath, I should be able to get near ISO 1 speed, which in direct sunlight would give a proper exposure of 1/4s at f/8.
Burke & James 4×5 Orbitar camera and my ‘selfie stick’
Yeah, holding a 4×5 outstretched on a tripod as a selfie stick for 1/4sec is not exactly something you do when you want for sure to get a sharp image, but I did all right on the first try and the image turned out rather sharp, but a bit on the dark side. I guess my silver wasn’t as good and collodion did age in the fridge over the 4 months that I’ve had it in there… So, 1/2sec was the next try. I held my breath, squeezed the cable release and voila: what I strongly believe to be the first ever handheld collodion selfie.
4×5 Handheld Wet Plate Collodion Selfie. Phone copy of plate while still wet.
I’ve been working on daguerreotypes for a few months now almost non-stop. Back to the darkroom for me — the other daguerreotype techniques are calling to be transferred from dream to reality. This year marks the 180th anniversary of the invention of the daguerreotype, so I really think it’s time for its world to be explored beyond that which has been done already.
About the author: Anton Orlov is an analog photographer and the man behind The Photo Palace, a 35-foot school bus that has been converted into a darkroom and presentation area for educational and artistic purposes. He previously created a transparent camera and the world’s smallest tintypes. Visit his website for more of his work and writing. This article was also published here.
I always resisted writing artist statements and bios. In school, that part of every assignment or exhibition was the most agonizing. It felt overly simplistic to just describe what the viewer was about to encounter, or why objects or abstract shapes, making my specific image or groups of images, were presented in this way or another.
It seemed that by assigning it a set number of combinations of words and letters, designed to invoke a set of associations or emotions, and qualifying and quantifying it that way, I would be doing a disservice to my work, by not letting it have a clear and unadulterated voice of its own. I never did connect with the majority of artist statements I’ve read, be it on walls of student shows or those of more established institutions. Most of the time, they seemed contrived, often borderline pedantic. Far removed from the subject matter in the actual show, they often seemed to be paying more service to the ego of the photographer rather than to photographs shown, or Photography itself.
Meanwhile, I kept shooting. I wanted to be a ‘photographer’ since I was very young, influenced by seeing my grandfather and his Zenit 18 on all family outings, and how much joy it gave him to grab the camera in crucial times and quickly change position for better light and composition, or sometimes ask us to pose in just the right way, or sometimes just to point it at things and directions I didn’t yet understand, and to get locked into whatever he must have seen in that little window. He passed on before I was old enough to learn much, but right before I turned 12, my classmate showed me how to develop and print black and white film, and at that point, I knew that the darkroom constant was lodged in my heart and mind forever. So, I had to keep shooting.
My family moved to the US when I was 16, and prior to photography, spurred on by inertia of overachieving drive that most immigrants seeking a better life in America have, I started college studying chemistry, in order to follow my parents’ professional footsteps. But I always kept shooting. It was something about the light, the act of vision, the process of solidifying fleeting images seen by my eye while on the journey of life wherever it took me, and the experience of seeing my thoughts and feelings about various subject translated onto a page in form of shades and shapes in a visual manner with light and chemistry. I needed to keep shooting.
With passage of time and accumulation of different work in a variety of photographic mediums, in my mind started to congeal a more cohesive view of what it is that most excites me about the photographic branch of the arts, and its myriad of processes, and why it was that I can’t seem to stop shooting. A common thread started to come more and more into critical focus. It started to become apparent that no matter where I found myself, no matter what I was going through in life during each moment, I always found instances where Light and Shadow beautifully accented certain subjects, and it was Photography’s innate ability to record this interplay of shades upon tangible matter by use of no less tangible chemistry, that relentlessly inspired me to give life to each individual image, regardless of particular content. Light became content. Light became the focus.
I once asked myself ‘why not?’, and switched my college major from a reliable track of laboratory research chemist and dedicating my education to the direction leading along an often-uncertain and eroded, overgrown and yet congested, path of paying the bills with images. This is the same question I like to ask myself often while pondering my next image. Why not point my lens in this direction? Why not try it this way? I find myself enjoying absorbing light reflected from a thistle in a field just as much as it brings me joy to see it strike any face in a compelling or complimentary way.
A 4×5 handheld wet plate collodion selfie… possibly the first one ever made.
I am reverend and grateful for the perfection of the photographic medium, which allows for a seemingly infinite amount of both precision and variation in capturing reality in all manners it appears to me. Without taking this into account, my work may seem fragmented to an outside glance, but if one considers that the inspiration stemming from Light Itself as a uniting foundational thread, the fragments then make an almost Surat-like single vision from the sum of all parts. My individual images, projects, bodies of work, are all akin to separate letters, words, sentences, paragraphs, chapters, and tomes of the same story or song.
I feel compelled to dedicate this last part of this formulation of the impetus behind my work, to addressing why I always choose to work in analog photographic mediums. The world around us is a tangible place. Molecules and atoms, which make up all that is visible to us now, switch states and places in one grand infinite cycle. During some parts of this flow of energy, some of those molecules are briefly arranged in forms that reflect Light. At that point, it becomes possible for Photography, processed through the filter of each practitioner’s vision and skill level, to manifest the action of distilling this combination of light and matter to concrete compositions we call photographs.
For me, it seems logical to make my images from essentially the same particles which I photograph, real physical atoms vs. more ephemeral electrical fields. I’m attracted and intrigued by the continuity of this physical property in my images, and the incredulous variety of way in which I can act to physically arrange a set of molecules on a page to reflect a moment in reality as it was experienced by my eye and envisioned by my mind. I am also heartened by the knowledge that the Light reflecting from those molecules will reach the eyes of all future viewers in the same manner as it reaches my eyes now, and that the weight of my prints or plates will remain the same each time someone picks them up to feel their heft and presence.
For the past 6 years, I’ve worked almost exclusively with direct positive techniques of wet plate collodion tintypes and ambrotypes, and am now gravitating more and more toward daguerreotype technique, which is irresistibly noble in its process and unparalleled in visual appearance and sharpness. A direct positive is a truly unique creation/experience with almost no chance for post-production manipulation, making it a technically demanding way to work, particularly when one has a set pre-visualization in mind and is set on actually having their vision to be communicated precisely.
A direct positive exists singularly, like the moment during which all elements came together for its making, and there’s only one set of molecules bearing that particular visual semblance. Because of that, I feel a deeper connection to each plate (of metal, or combination, of metals or glass) with an image which I placed upon it.
After varnishing a tintype or sealing a daguerreotype, I am done with a given particular personal challenge of capturing beautifully my experience as closely to my vision of it as I could and, as the moment itself starts to recede to the annals of memory, while molecules upon the plate hold it fixed as intended for at least a few centuries, I can be open to meeting the next inspirational challenge as quickly as possible. After all, it’s fun to keep shooting.
P.S. Here’s a 4×5 tintype made the night after I typed up the above formulation, because a blog post without an image is only about as good as photography without a camera:
About the author: Anton Orlov is an analog photographer and the man behind The Photo Palace, a 35-foot school bus that has been converted into a darkroom and presentation area for educational and artistic purposes. He previously created a transparent camera and the world’s smallest tintypes. Visit his website for more of his work and writing. This article was also published here.
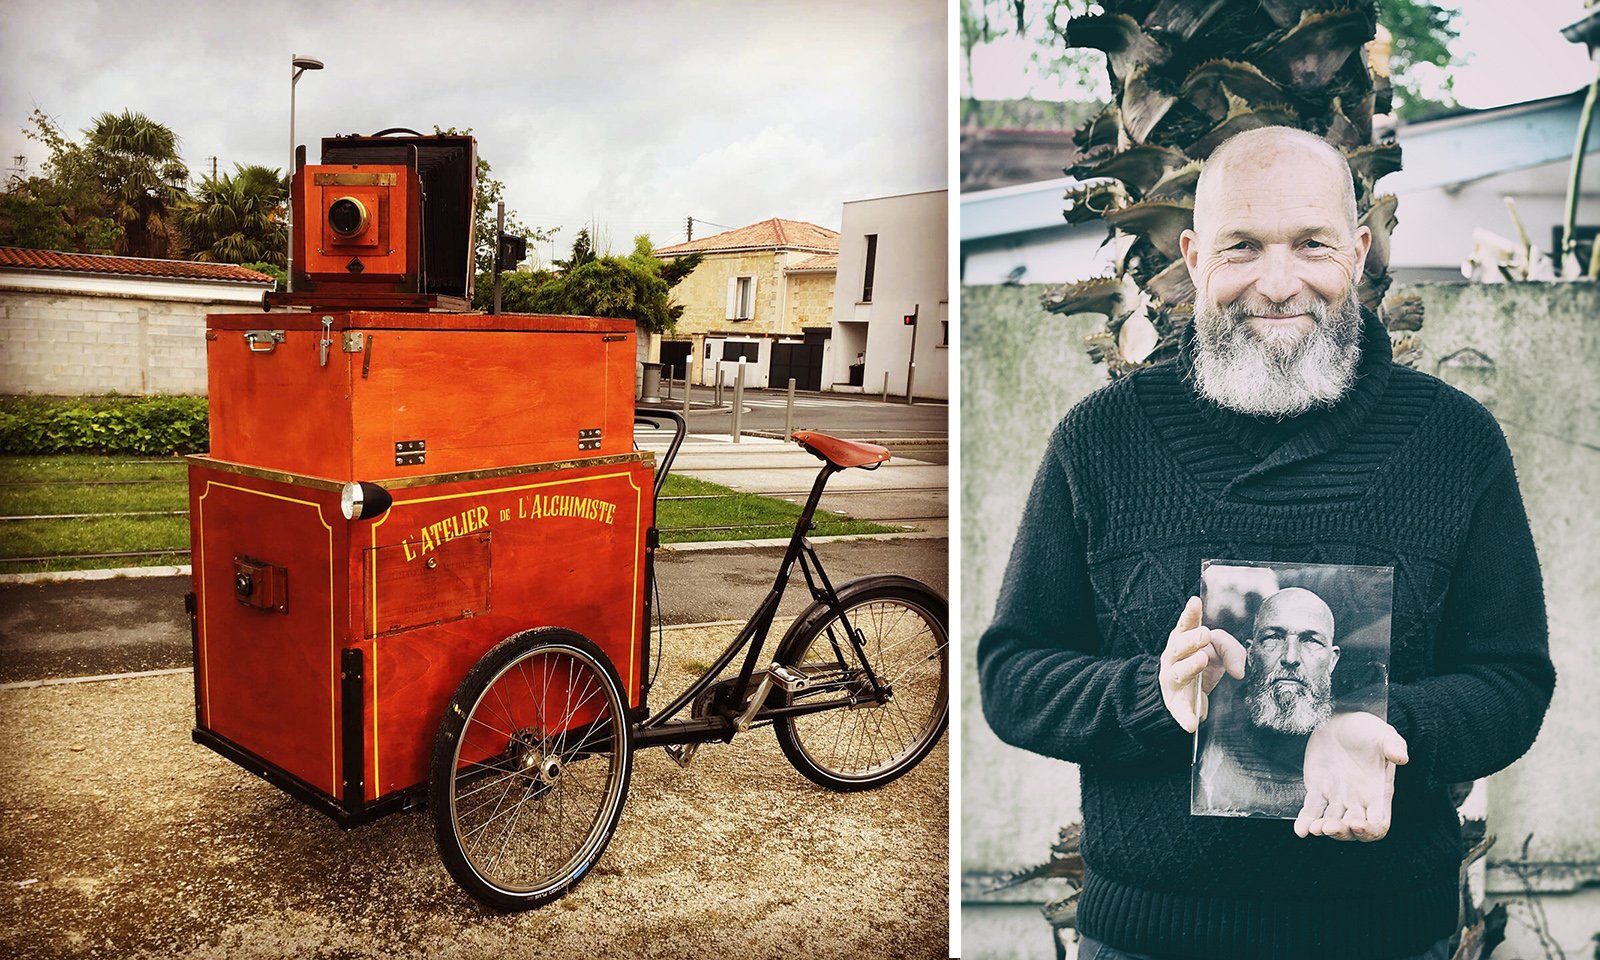
Michaël Tirat, a wet plate photographer based in Bordeaux, France, has created something pretty special. In an attempt to make his photography services more portable, he’s created a mobile darkroom on a tricycle that enables him to capture wet plates photography all over the city.
Tirat—who shoots under the moniker “L’Alchimiste“—rides his mobile darkroom to events around Bordeaux, offering wet plate portraits to attendees right then and there.
“Composed of a dark chamber on the upper box, and a storage space of the material on the lower box, it is able to allow the realization of photographs with the wet collodion going from the 10x12cm format to the 18x24cm format,” explains Tirat. “Its originality is to allow any passer-by to be photographed and have this historical experience for free. It is only if the person wishes to acquire the plaque that an affordable rate is applied.”
The whole setup weighs in at a staggering 250Kg (~551lbs), but Tirat nevertheless maintains that the tricycle is pretty easy to move around. Plus, it allows him to access pedestrian areas where a larger motor vehicle (like his Caravan darkroom) cannot possibly go.
You can see the tricycle in action in the videos below. Watch as Tirat creates a few portraits from start to finish using only the gear he hauls around on his tricycle studio:
And here are some of the plates Triat has captured around Bordeaux using this setup:
To see more from L’Alchimiste and his mobile darkroom, head over to his website or give Tirat a follow on Facebook and Instagram. Fans of wet plate photography will find his accounts are a treasure trove of high-quality portraiture and great behind the scenes imagery.
Credits: All photos and videos by Michaël Tirat and used with permission.
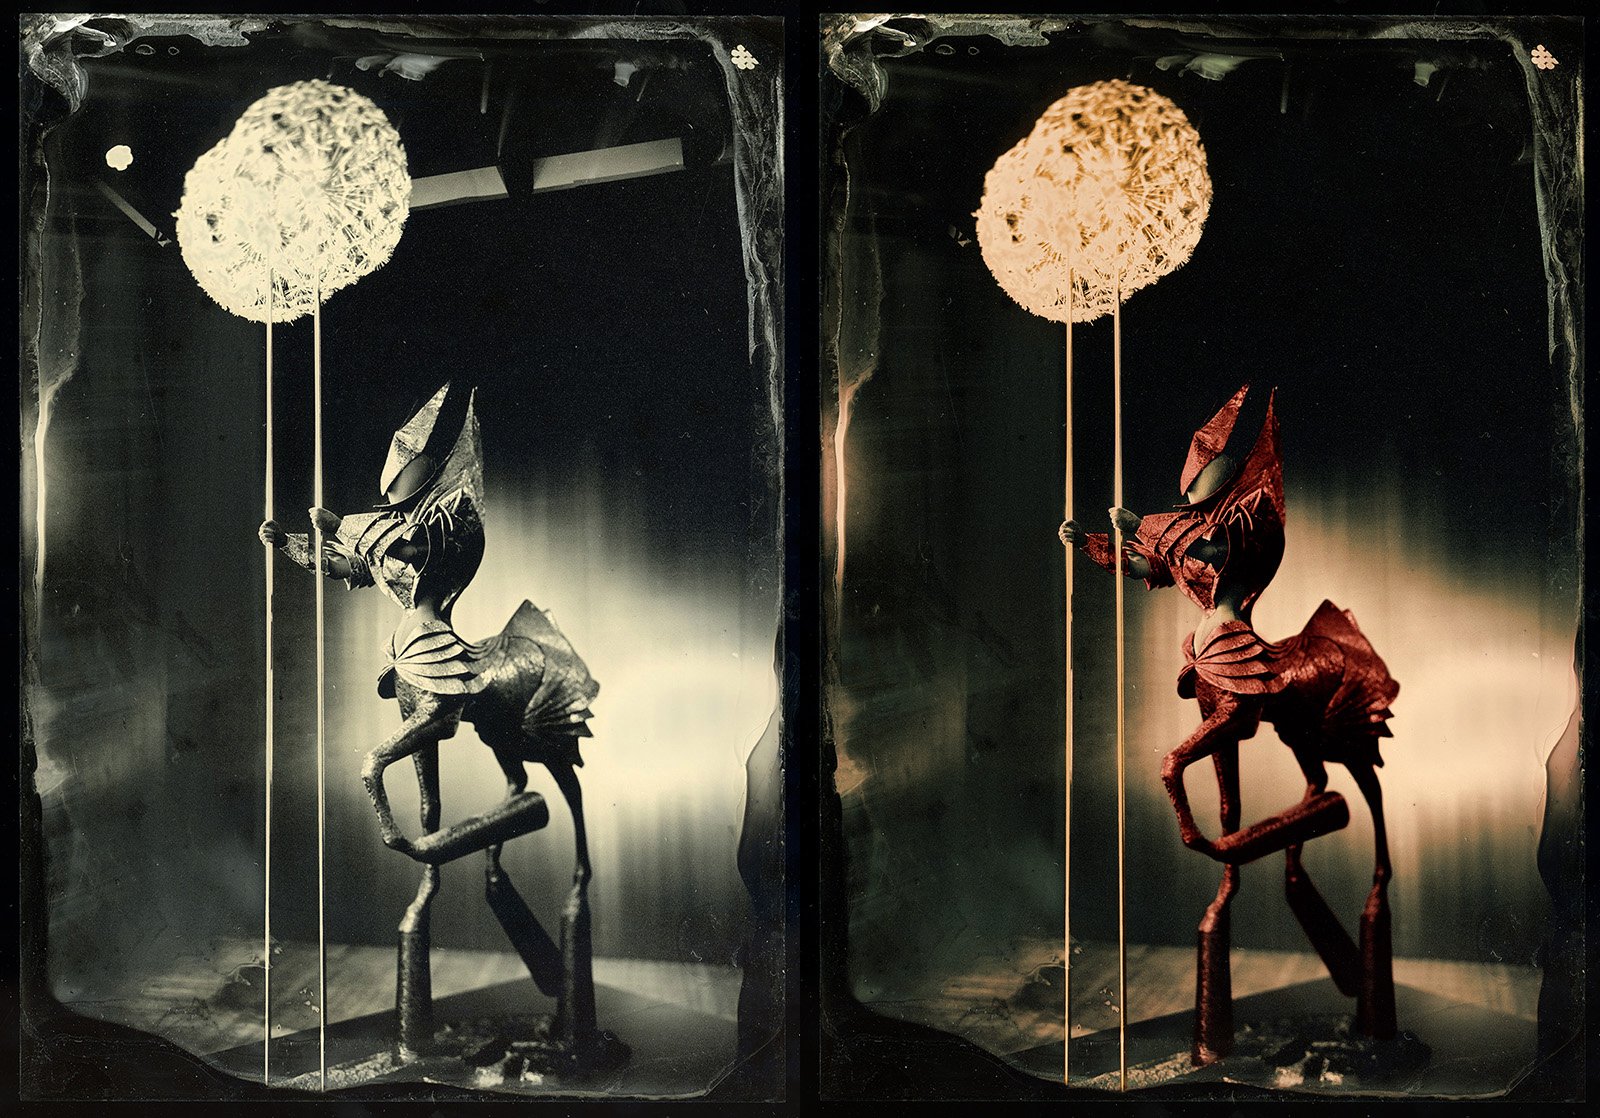
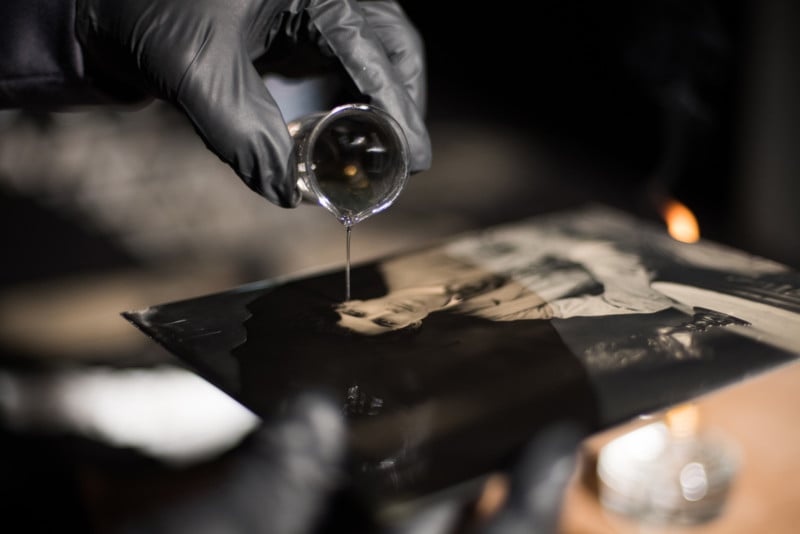
Fine art photographer Borut Peterlin was recently commissioned to shoot some ambrotypes by costume designer Alan Hranitelj, but he went a few steps beyond your standard wet plate collodion photography. In addition to shooting some beautiful multiple-exposures, he also decided to colorize the scans, creating striking photographs the likes of which we’ve not seen before.
There’s nothing particularly unique about wet plate photography, and there’s certainly nothing unique about colorizing monochrome imagery, but Peterlin is the first we’ve seen who put the two together so artfully in his work work. As it happens, the technique was also crucial for this particular photo shoot.
“Alan Hranitelj is a costume designer who is deeply inspired by Charles Ludwidge Dodgson, better known by his pen name Lewis Carol. Dodgson was an excellent wet plate collodion photographer, and even considered a caree as a full-time professional photographer, but decided to be a writer,” Peterlin told us over email. “His Alice in Wonderland is a life time inspiration for Alan Hranitelj and through the colourized wet plate photography of his costumes the circle closes. The concept is why it’s crucial—it’s not only a technique, it’s the application and the concept that makes the difference.”
He took viewers along on this shoot via his YouTube channel, and you can watch the whole process—from shooting through developing—in the video below:
Unfortunately, the one thing Peterlin didn’t cover in detail in the vlog is how he colorized the images exactly, which is why we reached out to ask him if he’d send us some high-res scans and share some information. He kindly obliged.
“In this case I am hand colouring scans of ambrotypes in Photoshop. I’ve done it also on the paper, but for this project it was much more suitable to do it in Photoshop, using advanced application of the gradient tool,” Peterlin tells PetaPixel. “I learned the technique from this PixImperfect tutorial on YouTube, but of course while working I’ve found some variations that suited me better.”
Using the technique seen in the linked video, he’s able to transform his ambrotypes and highlight the costumes.
Here are more colorized ambrotypes from this beautiful costume shoot:
And below, the creative multiple exposure portraits of Alan Hranitelj himself, in case you wanted a closer look at those as well:
To see more of Peterlin’s fine art photography, be sure to visit his website and subscribe to his YouTube channel. And if you enjoy the work above, Peterlin has promised to create an in-depth tutorial of his ambrotype colorization process for us in the coming weeks, so keep an eye out for that!
Credits: All photographs by Borut Peterlin and used with permission.
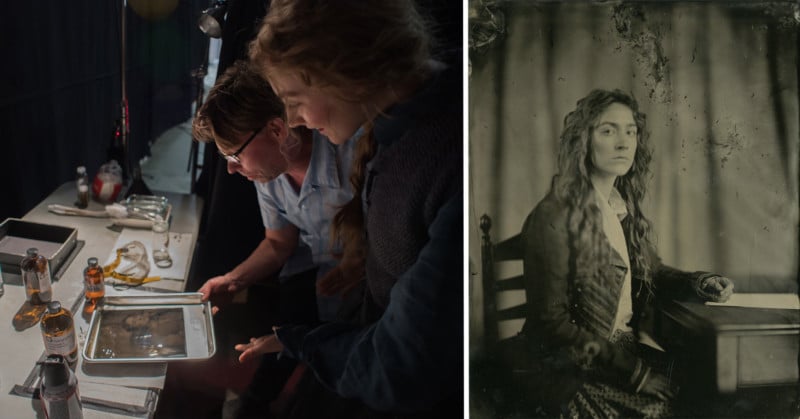
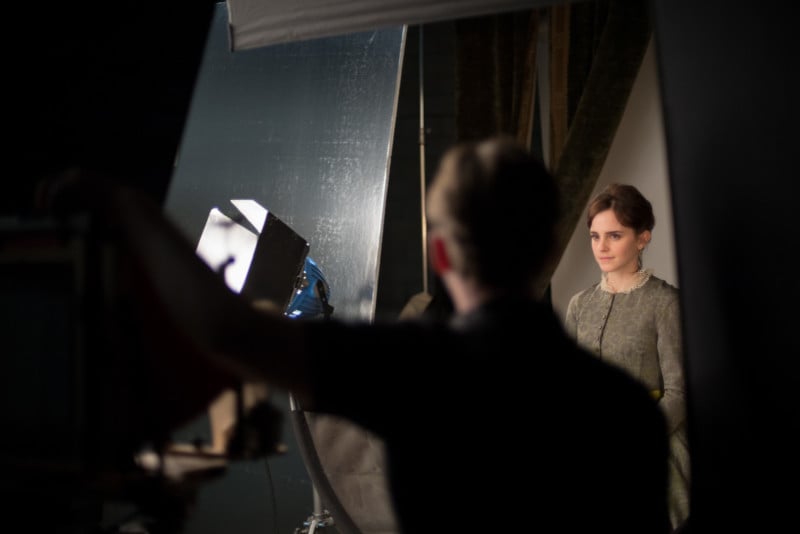
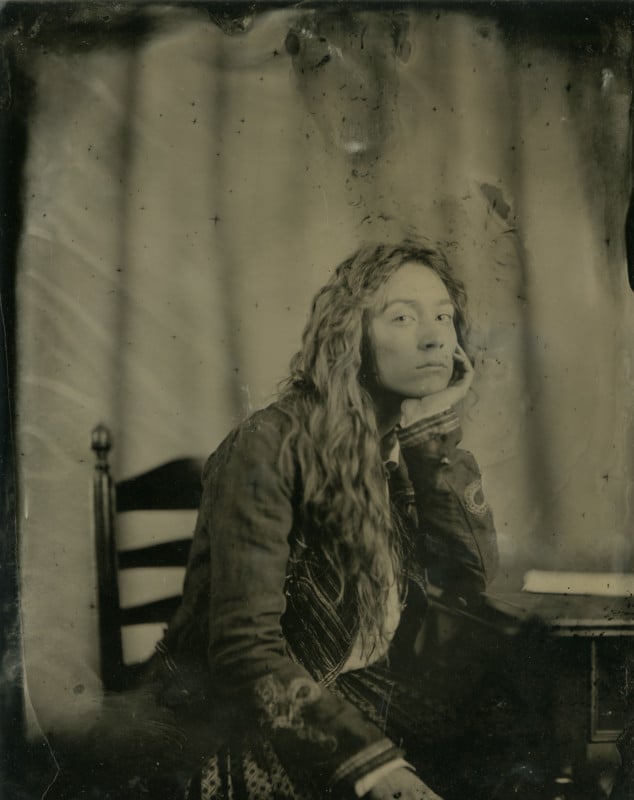
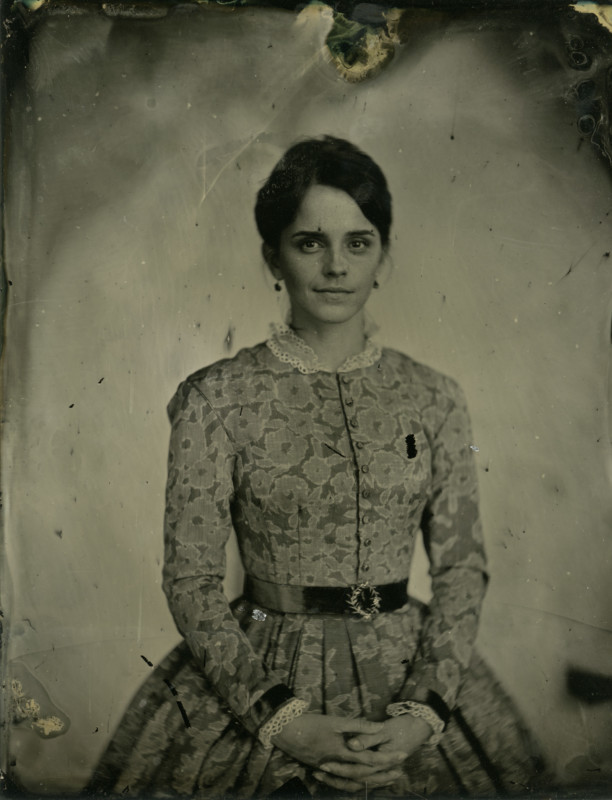
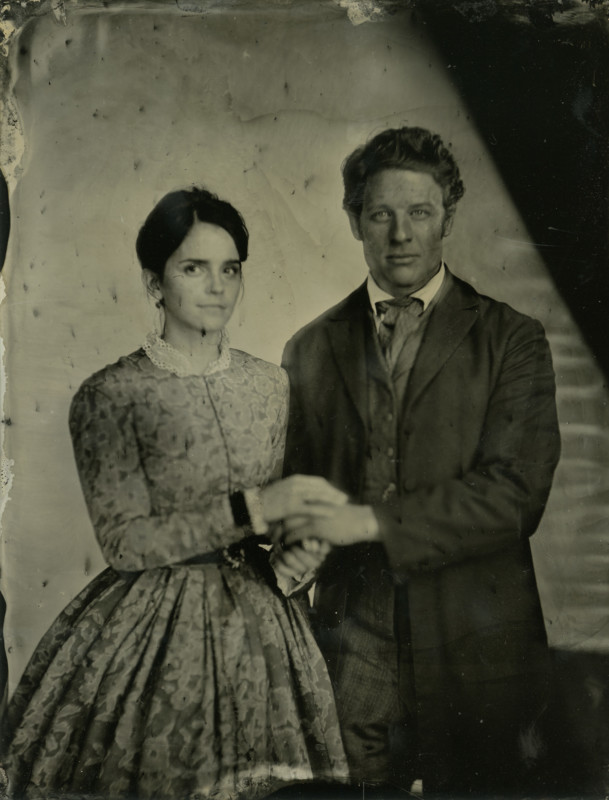
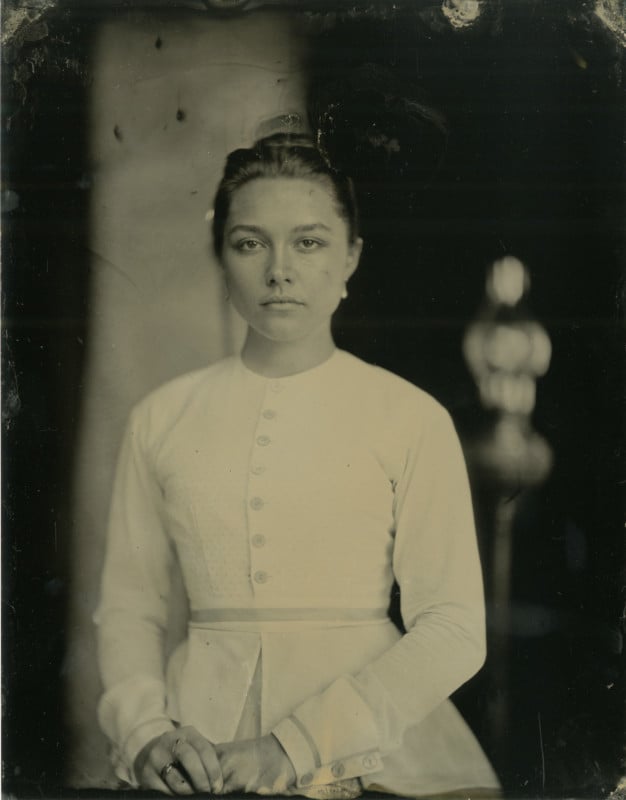
Now these are some cast portraits we can really get behind. On-set photographer Wilson Webb recently got the chance to photograph the entire cast of Best Picture nominee Little Women, but instead of shooting glitzy studio portraits, he decided to stay historically accurate and capture wet plate collodion portraits instead.
If you’ve seen any on-set photography over the past decade, you’ve seen Webb’s work. His portfolio includes work from Little Women, Marriage Story, Baby Driver, The Secret Life of Walter Mitty, A Serious Man, Men in Black 3, and many many more. In other words, he’s a seasoned veteran in this industry, so when he was approached to take the cast portraits for Little Women, he knew exactly what he wanted to do.
“As soon as I talked to Greta and she offered me the job I just knew that this was a perfect way to use photography in the period of the film,” Webb told CBC radio program As It Happens in a recent interview.
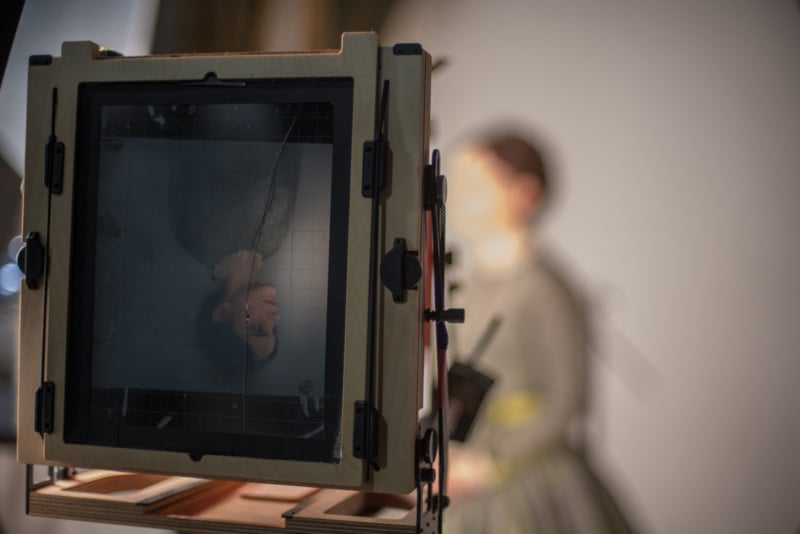
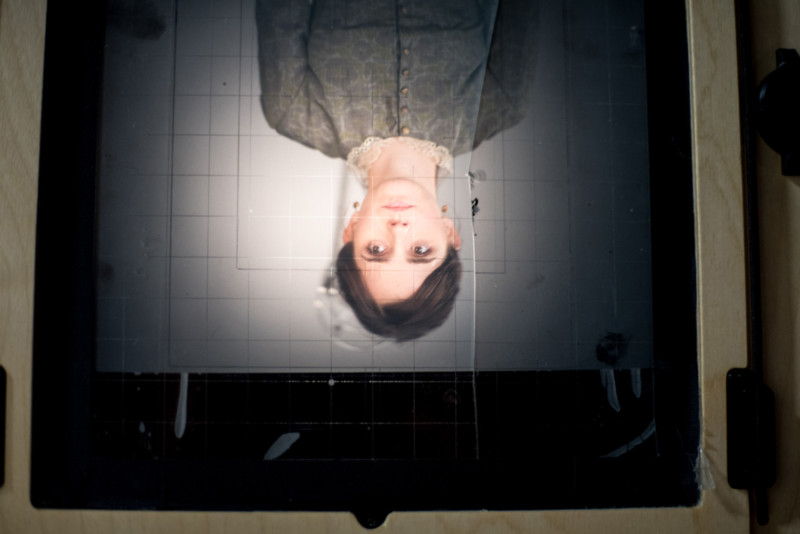
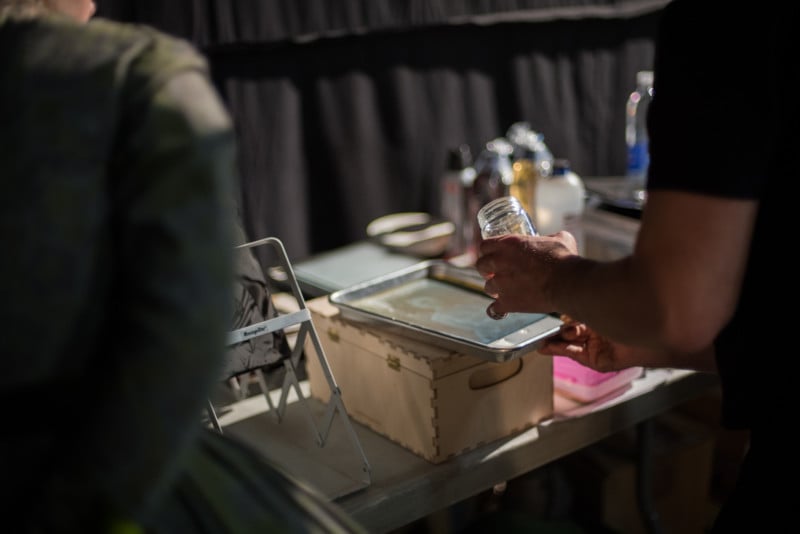
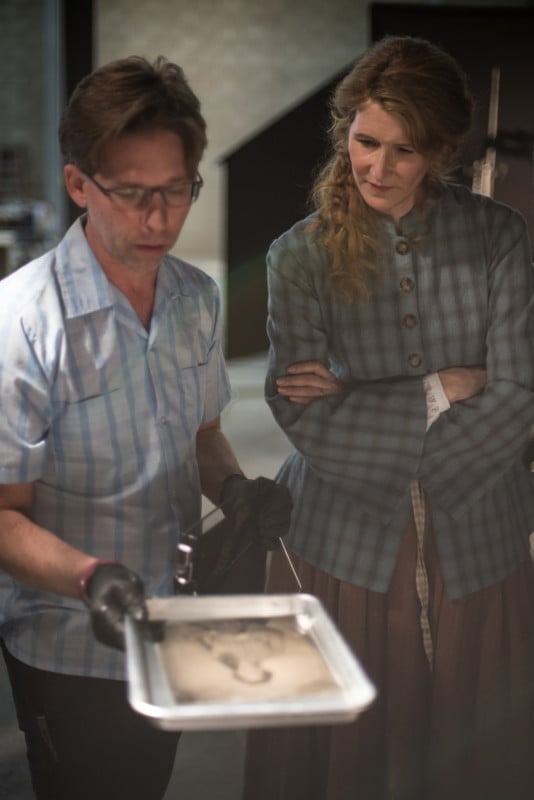
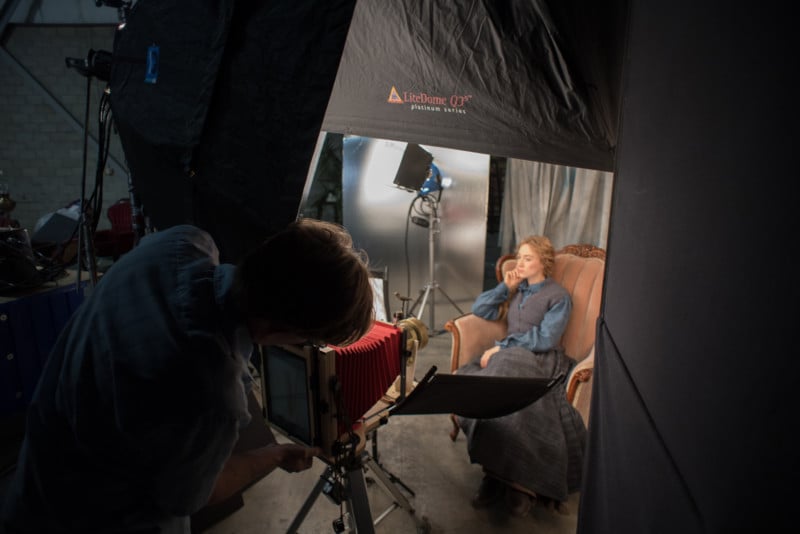
To capture the actual portraits, Webb got his hands on a 130-year-old Dallmeyer lens that he strapped to a modern large format camera, and set up 25,000 Watt-seconds worth of flash to ensure he had enough light. That’s… a lot of light. So much that Webb says his subjects “can feel a wave of heat and they can also smell the ozone that’s created when the picture’s taken.”
But despite all of this light—which allowed him to capture a much faster “shutter speed” than traditional wet plates—he still had the cast pose in a traditional fashion: facing the camera, stoic expression, sitting still for 30 seconds at a time to capture each individual frame.
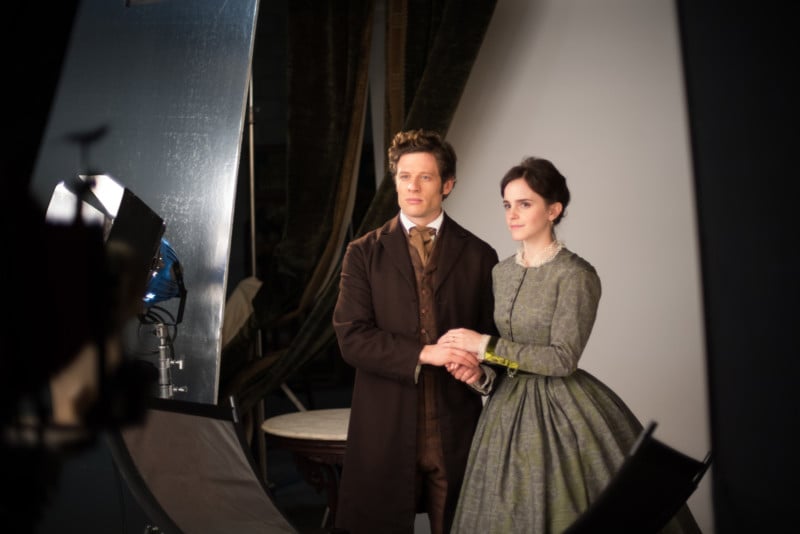
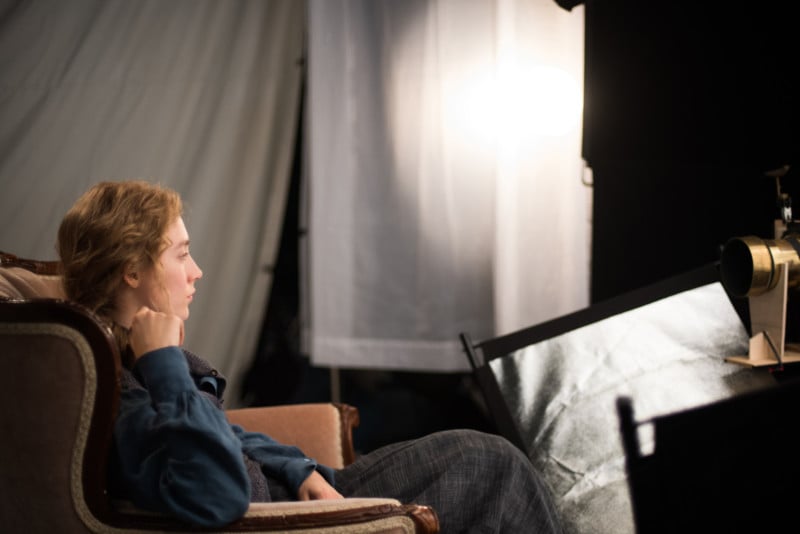
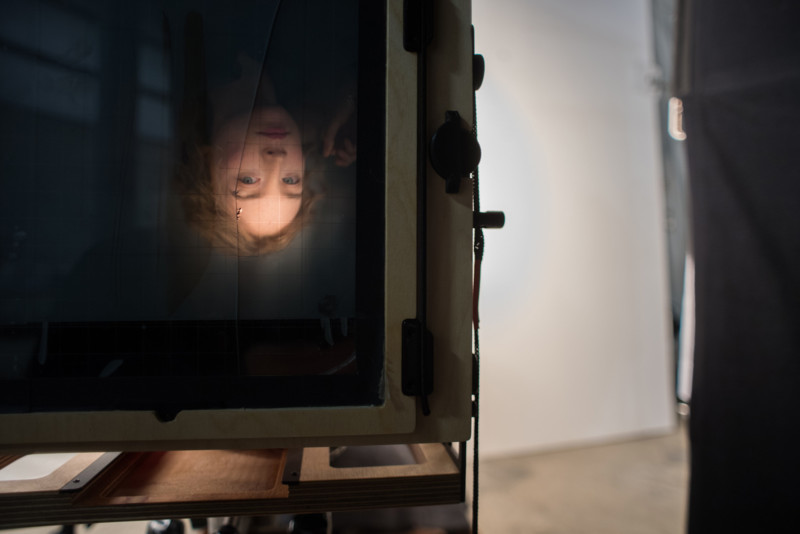
Scroll down for a Behind the Scenes peek at Webb in the studio with the Little Women cast, who he says really enjoyed the process:
Interestingly, Wilson says the final portraits he captured would have been “laughed at” in the 1860s. All of the imperfections that we’ve come to treasure would have been seen as evidence of sloppy technique.
“If I was trying to pass as a photographer in the 1860s, I would probably be laughed out of the studio,” he tells the CBC. “All of the things that make them interesting now — the textures and weird shading and bending that you can kind of see in the portraits — are interesting to us now because we’re so desensitized […] But back in the day, those are attributes that would have been seen as a mistake and would not have been presentable whatsoever.”
Scroll down to see all of the final wet plate portraits, shared courtesy of Mr. Webb and Columbia Pictures:
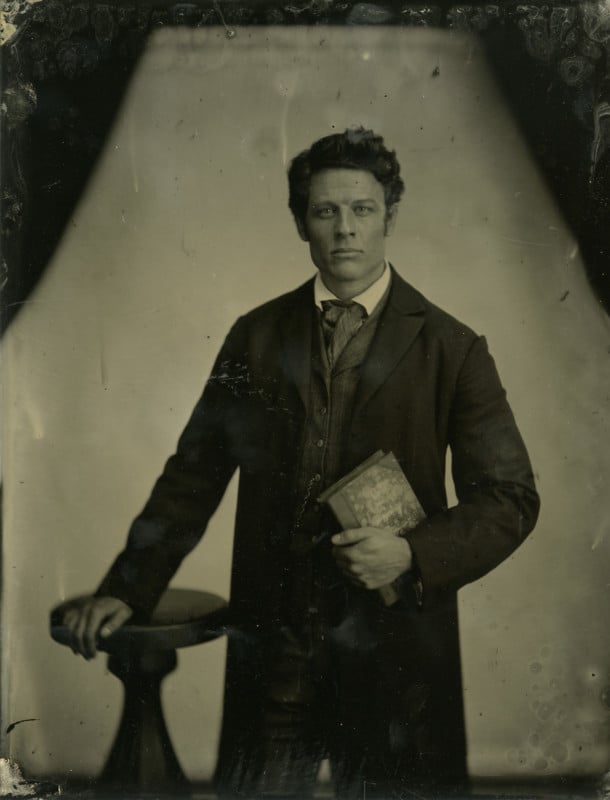
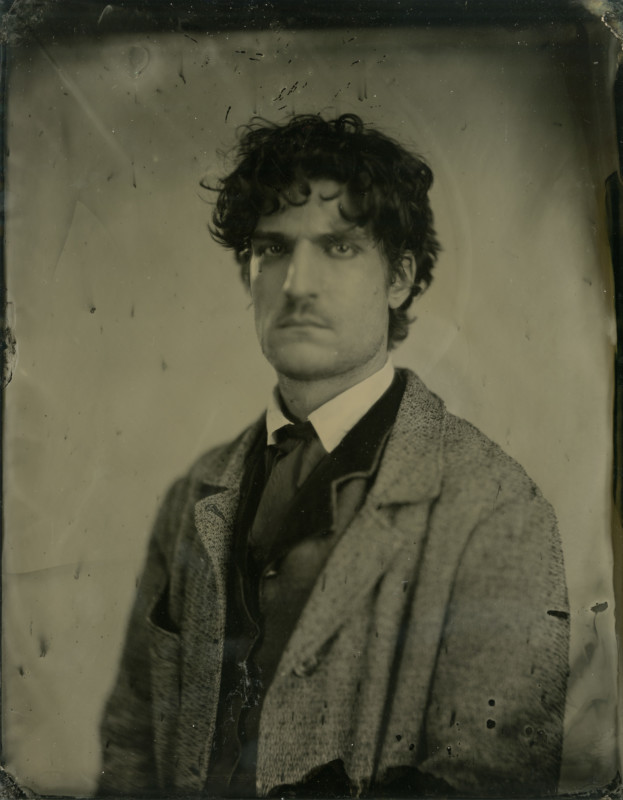
Jo March (Saoirse Ronan)Jo March (Saoirse Ronan)Meg March (Emma Watson)Meg March (Emma Watson) and John Brooke (James Norton)Amy March (Florence Pugh)Beth March (Eliza Scanlen)Beth March (Eliza Scanlen)Laurie (Timothée Chalamet)Mr. Laurence (Chris Cooper)Mr. Laurence (Chris Cooper)Marmee March (Laura Dern)Father March (Bob Odenkirk)John Brooke (James Norton)Friedrich Bhaer (Louis Garrel)
A huge thank you to Mr. Webb for letting us share these images with our readers. To learn more about how these photos were shot, check out the full As It Happens interview at this link. And if you want to see more of Webb’s impressive on-set photography, visit his website or give him a follow on Instagram.
Image credits All collodion portraits by Wilson Webb/Columbia Pictures, behind the scenes images by Kimberly Scarsella, all images used with permission.
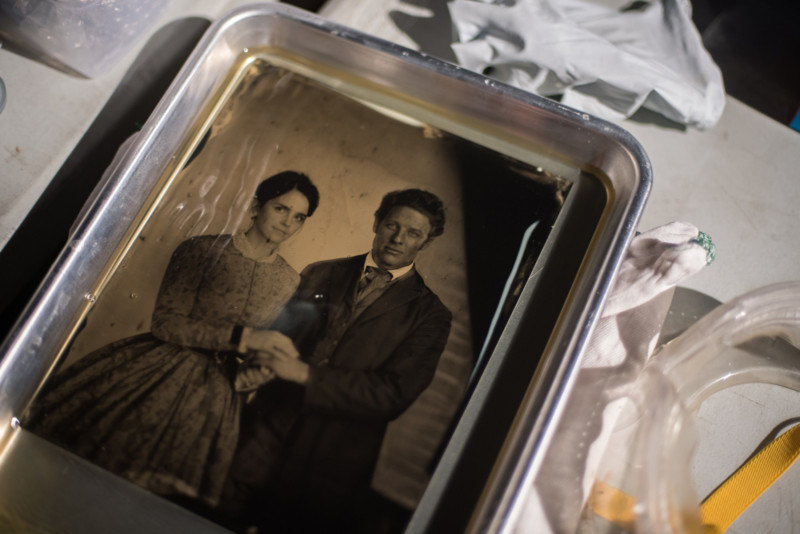
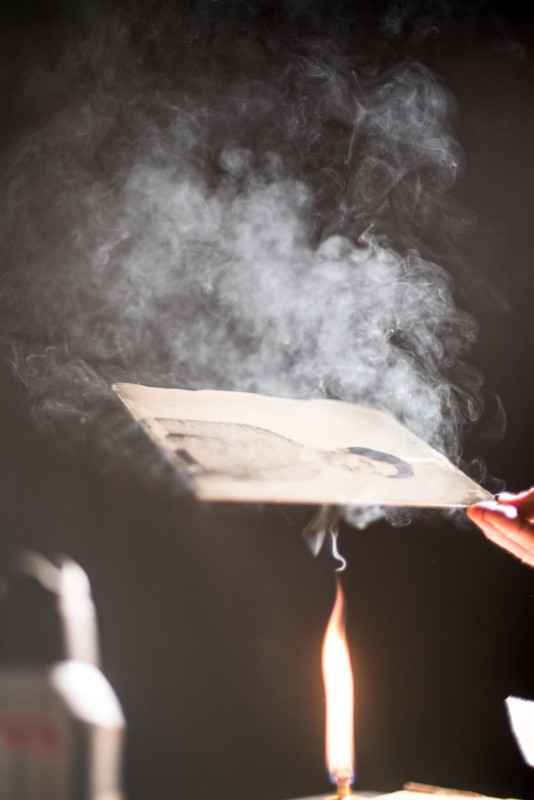
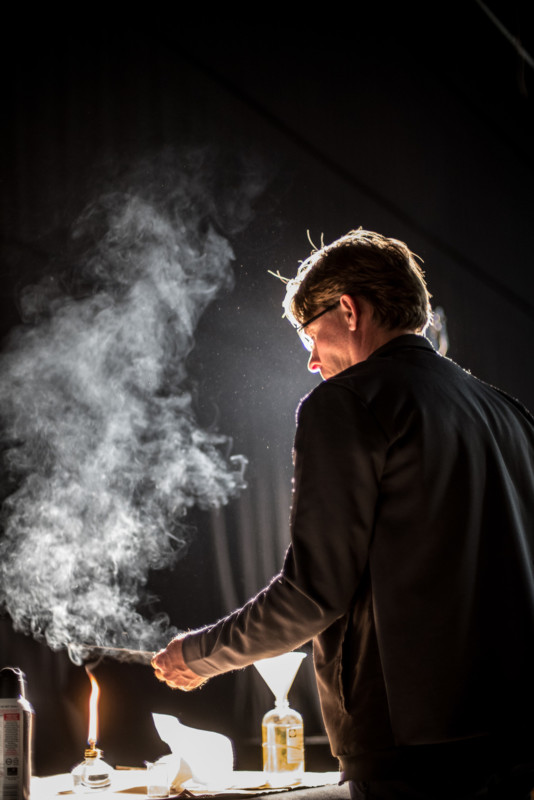
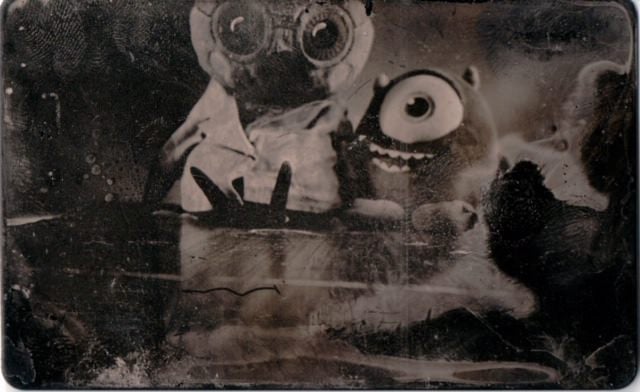
Photographer Markus Hofstätter has made a name for himself by pushing wet plate photography to new heights, trying things others have never even thought to do. Today brings yet another example of his creativity, as he sets out to create an animation using, not digital files, but wet plate collodion tintypes.
The idea was born out of the crisis that is on all of our minds: COVID-19. “You know me, if something bothers my mind, I have to make an art out of it,” he wrote to PetaPixel over email. “It also fits with the Collodion process: no touching and no breathing the chemicals, just as you do not want to touch or breath the virus.”
So he teamed up with his friend Erich and, together, they came up with a method for ensuring that each frame of his 7-shot GIF would be similar enough to create a smooth animation.
As you might imagine, creating a watchable animation using only tintypes is no easy feat. Hofstätter tells PetaPixel that the whole process took about four hours—including preparation and varnishing the plates—and was only done this quickly thanks to some modification he made to his studio.
“We had to figure out how to fix my hands on the same spot and how to move the plush virus from one point to the next one. For the virus we used a boom stand and for my hands we mounted a nylon string from the chair up onto my ceiling,” explains Hofstätter. “When I rebuild my studio, I integrated metal sheets into the ceiling, so I can easily mount anything with magnets there. This was very helpful for this project.”
Here’s the final product for your viewing pleasure. Seven tintypes transformed into an animated GIF… or, as one of Hofstätter’s friends put it, “the most expensive way to make a movie.”
Check out the BTS video up top to watch this whole process from start to finish. For those of us who get annoyed at cameras that can’t shoot below 7 frames per second, you have to admire Hofstätter’s determination—7 frames per 4 hours sounds significantly more troublesome.
And if you’re looking for more creative inspiration, head over to Markus’ blog, visit his website, or give him a follow on Instagram. If you’re a wet plate photography fan and you don’t already follow him, you’re missing out.
Image credits: Photos, videos, and animation created by Markus Hofstaetter, and used with permission.
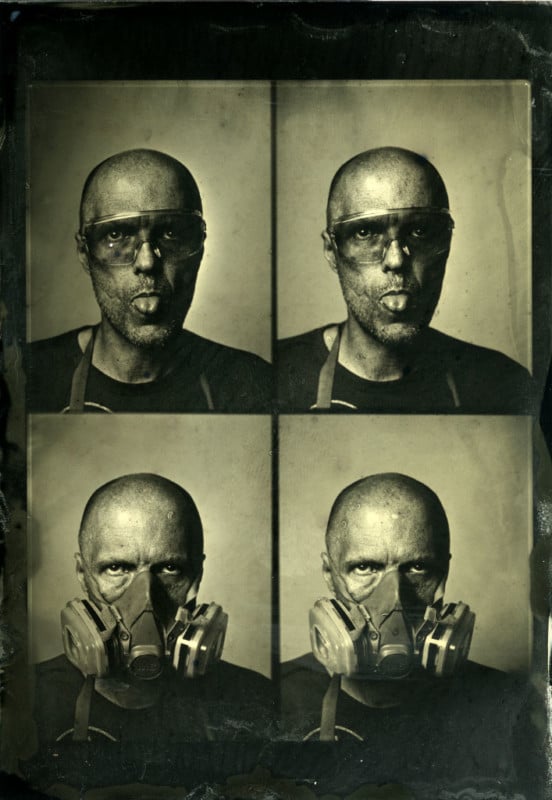
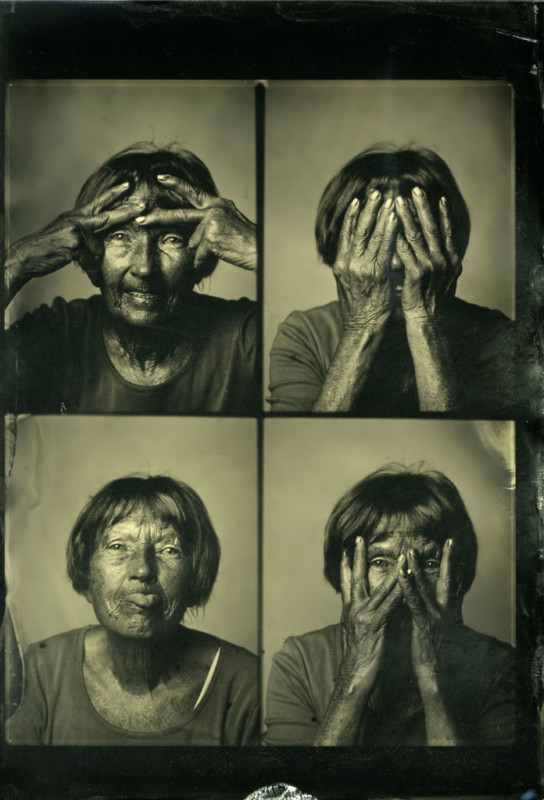
Wet plate photographer Markus Hofstätter wanted to use his art to encourage people to #stayathome during the coronavirus pandemic, so he took a series of self-portraits that are meant to drive home a simple message: don’t be like Bob.
In a new series of wet plate self-portraits captured at home (for the record: alone, without anybody else around to help him) Hofstätter once again channeled his anxiety about the novel coronavirus and self-isolation, into art.
“Lots of people don’t take this topic serious, thats the reason I had to do this one,” he tells PetaPixel. “Since I’ve also lost all of my assignments because of this virus, at least I have time to spread awareness about it.”
He captured the four-in-one shot using a Polaroid MiniPortrait to take one photo per quadrant, centered around the old “hear no evil, see no evil, speak no evil” theme. Since he obviously can’t use an assistant, he used an iPhone to make sure he was properly framed, and an Insta360 camera to capture the BTS video up top.
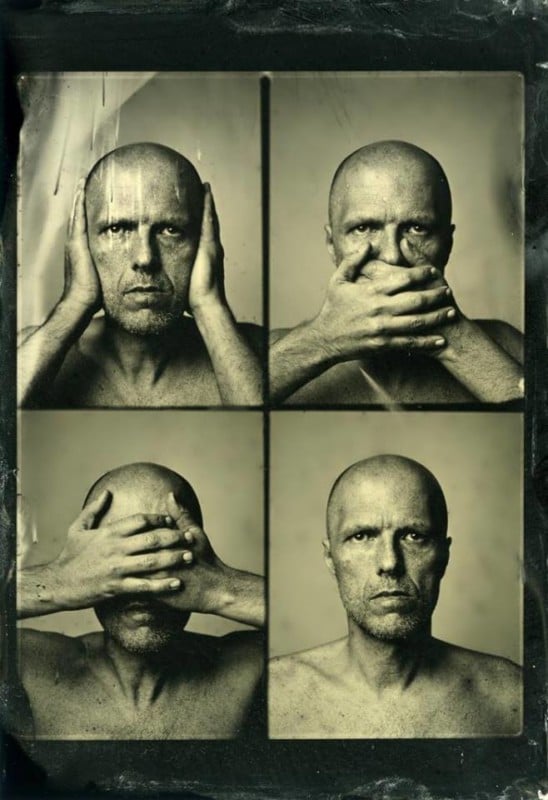
When all is said and done, here’s what he came up with:
Check out the full BTS video above to watch Markus at work, and if you like his stuff, you can find lots more on his website and in the PetaPixel archives. Most recently he created a short stop-motion animation out of tintypes, also in reference to the coronavirus, which may be the most expensive way to animate anything…
Image credits: Photos by Markus Hofstätter and used with permission.
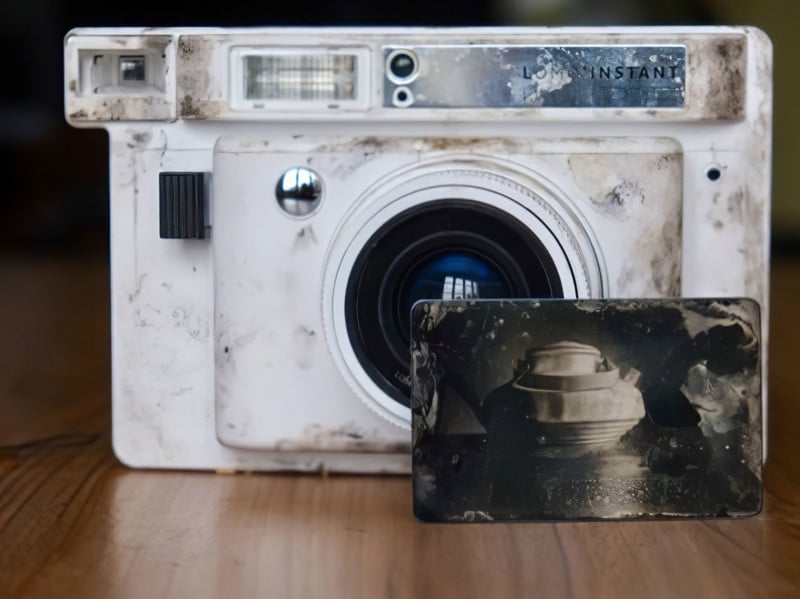
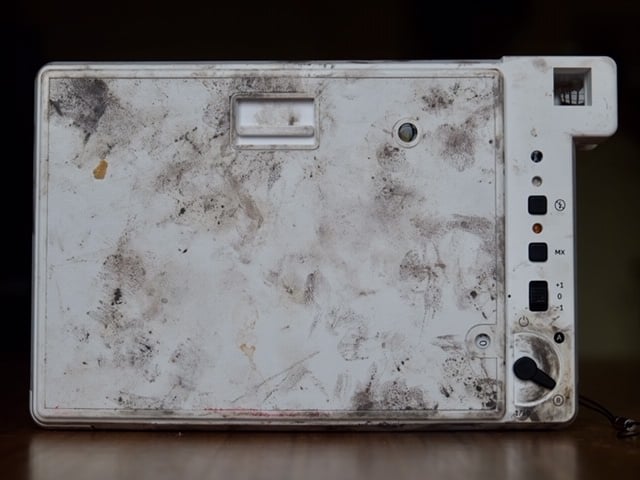
Italian photographer Ursula Ferrara‘s Lomography Lomo’Instant Wide camera is a bit different than others you’ll find. Instead of shooting Instax Wide instant photos, it’s used for capturing tiny wet plate collodion photos.
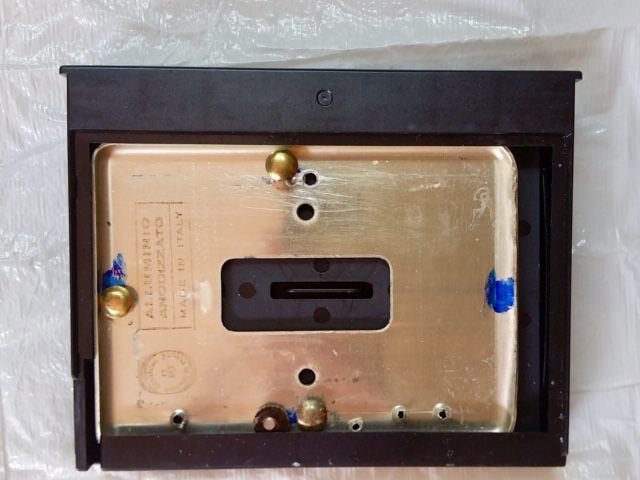
Ferrara started out by taking the shell of an empty Instax Wide cartridge and combining it with the metal shell of a light switch using some brads.
For plates, she poured collodion on black plastic cards — any flat plastic card will work, from fancy business cards to hotel card keys.
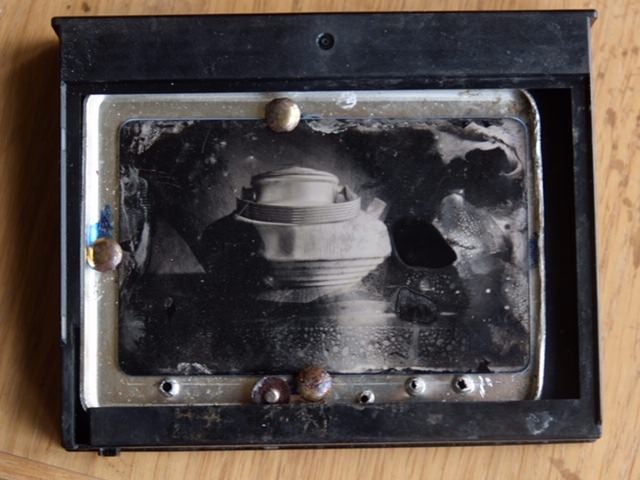
After pouring the collodion and then sensitizing the plate in a silver bath in the darkroom, Ferrara places the plate into the holder and loads up the camera.
Then you simply take a photo and develop it in the darkroom before fixing the plate.
What you get are beautiful wallet-sized tintypes.
Ferrera says these photos are her modern-day take on cabinet cards, the style of portrait photo that was popular after 1870.
Old 1800s tintype (left), a new wet plate photo on a plastic card (center), and a plastic card (right).
Here’s a 3-minute video that shows Ferrera’s process:
You can find more of Ferrera’s work on her website.
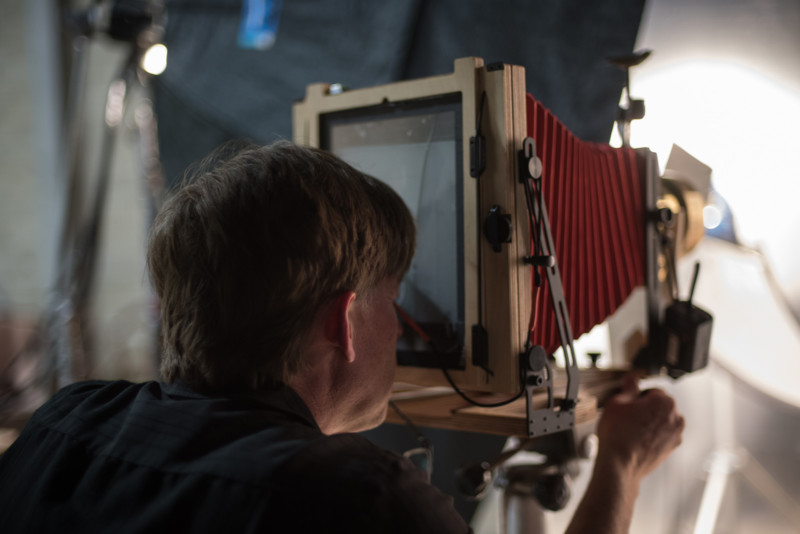
With the current state of affairs, photographers have been coming up with unique ways to exercise their craft remotely. Photographer Markus Hofstaetter decided he wanted to make a portrait with a friend and came up with a way to do it despite the vast distance between them.
Because of the COVID-19 pandemic, Hofstaetter has been unable to travel to see friends, let alone take photos with them. Still, he did not want to simply do nothing.
“We couldn’t do a lot of things because of the pandemic, but I won’t let this get me down,” he writes in his blog about the project. “I also didn’t want to wait for some things I wanted to do. That’s when I came up with the idea to do things differently.”
Hofstaetter decided he wanted to stand side-by-side with his friend Shane Balkowitsch despite their physical distance. To do so, he came up with a rather innovative way that involves a projector, a Dedolight with a gobo cutout, his camera, and a darkened room.
“For me, it was important to show, that there are always ways to do something,” Hofstaetter says.
Hofstaetter played around with the idea of making a projection of his friend standing next to him in the studio and decided to see how that would work. As you might imagine, given the vast difference in light, the exposure didn’t quite turn out right.
“I knew I needed an additional light source to get the exposure right.”
To get around this, Hofstaetter created a man-shaped gobo that he placed in front of a Dedolight, a brand of constant light devices that are usually employed to create spotlights for different lighting effects in cinema.
By firing the Dedolight beam formed into the shape of a man on top of himself, Hofstaetter was able to balance the exposure of his own section of the photo with that of his friend that was being projected onto the background.
Hofstaetter chose to shoot this project with a 8×10 Century Field Camera with Dallmeyer 2B lens.
“I could only shoot 13x18cm plates, because the camera would have been in the way of the projector for 8×10 plates,” he explains. “Using a longer lens would also have been an issue because then I would have an aperture of f/4.5 or even f/6. With that, the exposure times would have been twice or four times as long.”
Given that he was already looking at a five-minute exposure, that wasn’t a compromise Hofstaetter believed would be in the best interest of capturing a good image.
“As you could see in the video, I set the timer on my watch and released the lens cap with a string that I squeezed between the lens cap and the camera,” he explains. “And then it was only us two and 5 minutes in front of the camera.”
Hofstaetter says that this project was not only challenging, but a lot of fun for him and his friend.
“It was such a great experience and so much fun. I will for sure do it sometimes again. Maybe some people even want to do a portrait like that. It’s a great way to get memories during that time where we have to be at home.”
You can visit Hofstaetter’s blog here to get a full explanation of the project and see additional images. For more from Hofstaetter, you can subscribe to his YouTube Channel.
Image credits: Markus Hofstaetter and used with permission.
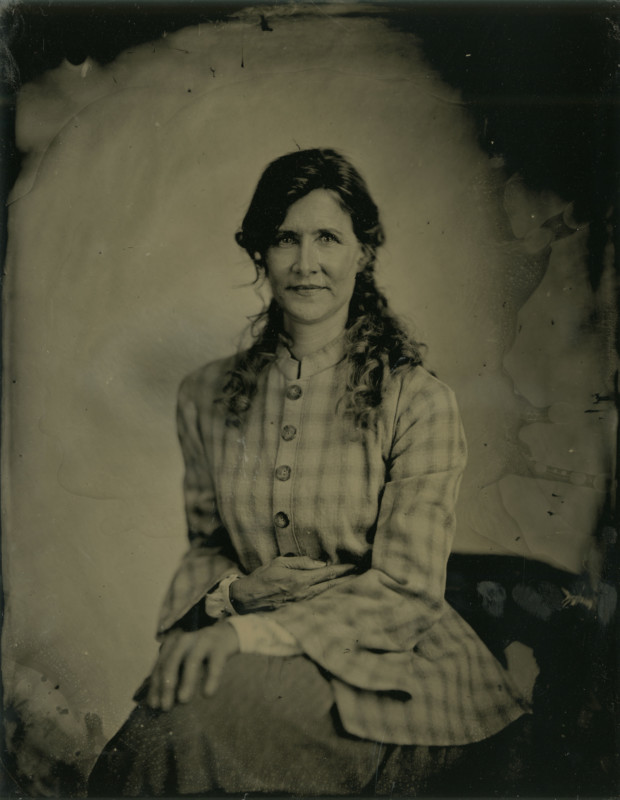
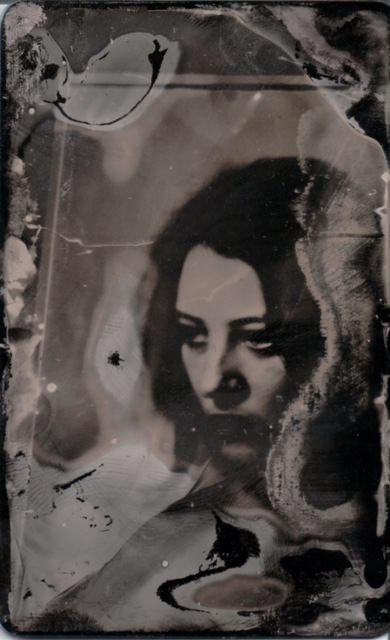
It hasn’t been easy being a portrait photographer during a pandemic. I opened my tintype portrait studio in February of 2020 with visions of goofy vintage photo remakes and smiling families gracing my lens. By the end of March, it was only still lifes full of skulls and dead flowers, dark and stale tones oddly appropriate for the time.
Eager for something with a pulse, I asked my wife to come pose for me. We would attempt to find some way of dealing with the horrid stories she was recently bringing home from work. Not a lot of people were staying home at the time, but health care workers certainly weren’t. My wife is a nurse and has been on a COVID 19 unit since March. I admired her for lacing up her scrubs and heading into a space ripe with a strange new disease every evening.
The portraits I took that day shocked us for their honesty of the moment. A hesitant determination in the eyes. A strength and grit to the pose. The chemicals and my technique were off that day but it only added to a look from a different time, a different world. And we were living in it.
Alyssa Retterbush, wife to the author.
After that session, I continued to hear terrifying stories from close friends in the medical field–flight nurses and ICU doctors, paramedics and firefighters–each telling stories that weren’t broadcast by any media outlets. They were accounts lost to censorship, only to be found in the cruel memories from the few people in the hospital room, the nurses, doctors, and clean-up crew.
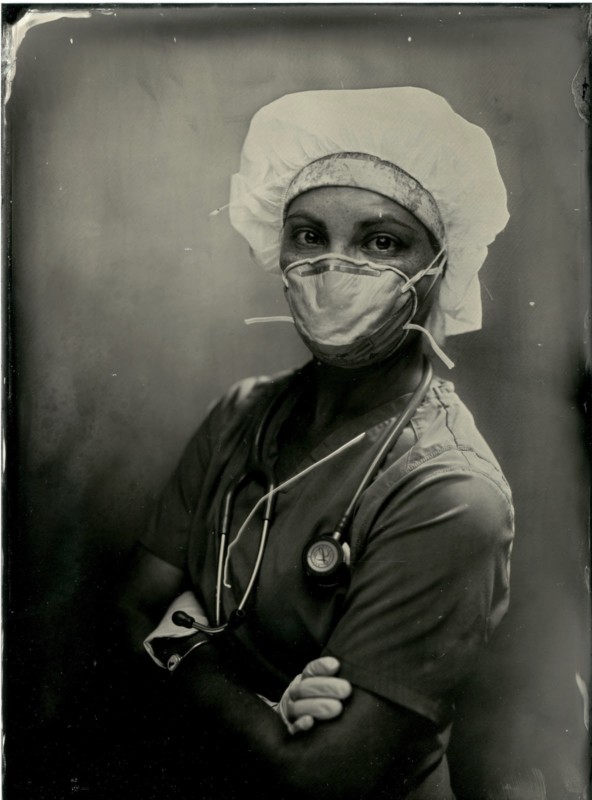
In an attempt to make sense of it all, I took to the ancient craft of the wet plate collodion process and my 5×7 Kodak 2D. Part photographer, part rapt listener, I made more than 120 tintypes in seven weeks. The culmination of a series I have since titled “Resilience”. A fitting name, I hope, for a group of people choosing to risk their own lives to help others if at times only to facilitate a more peaceful departure.
Melissa Rodriguez. “The biggest frustration with COVID is nobody understands how evil it can be.”
Nine months have passed since I created these tintypes and the faces speak louder now than ever before. They have to. With news of vaccines on the horizon, hope is certainly here but our collective patience is running thin. While fatigue has set in for the public, it is the medical worker’s fatigue that we should remain concerned about.
Catching up with one of the faces of “Resilience,” ICU RN Melissa Rodriguez said:
We have risen to the challenge, but it has shown significant flaws in the healthcare system and it is the healthcare workers that are suffering in that process. Some days we come in anxious, stressed, and work so hard. Every day for the last three months somebody mentions getting help, some sort of counseling, and even harming themselves. Lots of staff have quit our unit. I don’t know anyone that hasn’t thought about leaving. Everybody has cried with a patient, cried at home and there is worry for this winter.
Melissa, who has lasting symptoms from her own battle with COVID-19, recently enrolled in school for counseling for this upcoming year. She says there are good days too when everyone is working together, supporting each other. But the difference this year is before going into work she has to mentally prepare, find a good head space just to survive. “Otherwise it will crush you”
Melissa Rodriguez. “One of the things I find myself doing now is just hold my hands on the chest or head of a patient on a ventilator. Unconscious, alone, unable to breathe, it’s a terrible place to be.”
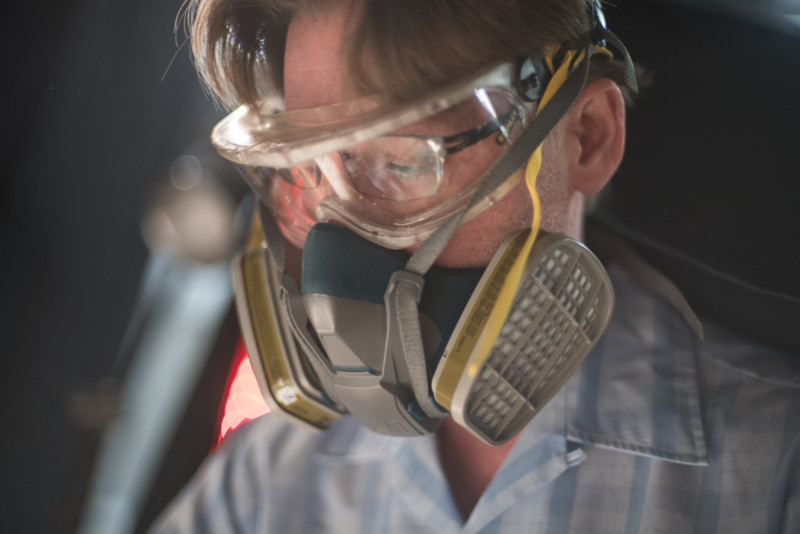
A lot has changed since March of 2020. Treatment of the virus has drastically improved. We know how to protect ourselves. The long road of resilience, however, has not been without some major bumps in the road. For medical and first responder staff, the suffocating PPE will continue to be a reality, as they don face shields, masks, and hazmat suits daily to adhere to strict protocols and measures taken for the best care possible.
This photo series reminds us that progress in fighting this disease is not carried on the backs of bureaucrats but rests instead on the strength and courage of the individuals on the front lines of this pandemic. “Resilience” is a reminder that they have been giving their best effort for nine months straight now, so perhaps we owe them ours as well.
About the author: Eric Retterbush is a beauty hunter. The opinions expressed in this article are solely those of the author. Retterbush loves creating and exploring with the visual arts in many mediums and most recently began creating tintypes using the wet plate collodion process. Since beginning this intriguing adventure, Eric has learned how to understand light, chemistry, and the subjects he photographs. Every aspect of the process brings enlightenment and joy to Eric and he is often found tinkering with the technical aspects of the art form and begging people to sit for just one more frame. He currently resides in the high desert of Flagstaff, Arizona. You can find more of his work on his website and Instagram.
Photographer Markus Hofstätter had been designing parts for his cameras and 3D printing them at home when the idea to try something new struck him: 3D printing photographs. After a lot of trial and error, he successfully found a way to translate wet plate photos into 3D printed pieces.
Hofstätter says that when he thought about using his 3D printer for making photos, the idea came to him because the process shared similarities with the wet plate collodion process.
“The wet plate collodion process is kind of, maybe, 3D printing. You know, the light and the developer manifests the silver on the plate in layers, and afterward, the silver that is not exposed to light is washed away with a fixer. So if you have ever seen a resin printer working, it’s similar,” he says.
Every part of the image that would be dark is printed thicker, and likewise, any lighter are of the image is printed thinner. When showed without a backlight, the print doesn’t look like much. However, when held up to the light, a photograph appears.
Hofstätter said this again reminded him of the wet plate collodion process because the same general principles apply to an ambrotype.
Beyond just being able to feel the subject and the edges of the 3D printed image, Hofstätter says that when he holds the photos, he can even feel the bokeh.
“Have you ever experienced bokeh with your fingers?” he asks.
Creating these prints is a long process. Each one takes about 17 hours to print because he has to print it very slowly in order to get the level of detail he has achieved.
“These beautiful prints (lithophane) took a pretty long time to finish. My printer was working on them for 17 hours per print to make them as beautiful as possible,” he writes on his blog. “And that does not include all the fails, the search for the right filament and to find the right settings. But I am so happy that it worked out.”
You can see several different angles of some of his prints on his blog, where Hofstätter also shows what the prints look like both with and without backlighting.
Hofstätter doesn’t reveal the exact process he uses to create the prints as he is selling them on his Ebay store. Still, what he has done here is extremely unusual and unique, and it’s hard not to be impressed with how he has taken photography into another dimension.
For more from Hofstätter, visit his blog or subscribe to his YouTube Channel.
Image credits: Photos by Markus Hofstätter and used with permission.
Every Sunday, we bring together a collection of easy reading articles from analytical to how-to to photo-features in no particular order that did not make our regular daily coverage. Enjoy!
Inauguration of President James Buchanan (1791-1868) at the east front of the U. S. Capitol, March 4, 1857. Photo by John Wood, the photographer for the Architect of the Capitol from 1856 to 1861. Courtesy of Library of Congress
John Wood was the U.S. government’s first official photographer. He photographed the above wet plate collodion of 15th president James Buchanan’s inauguration in 1857. The exposure was four seconds* (NO, I do not have the metadata to prove it!!) and therefore the blurring of the people who were not standing still. He also photographed Lincoln’s First Inauguration.
Wood was the photographer for the Architect of the Capitol from 1856 to 1861. The capitol building was under construction at the time. Wooden boards cover the stone yard in the foreground to create a standing platform for the attending people.
The next president was Abraham Lincoln in 1861, and the inauguration photo above is technically better in quality. “A small camera was directly in front of Mr. Lincoln,” reported a newspaper, “another at a distance of a hundred yards (this seems to be the one that took the above photo), and a third of huge dimensions on the right … The three photographers present had plenty of time to take pictures, yet only the distant views have survived.” (Source: Ostendorf, p. 86-87) Some sources credit this photo to Scottish photographer Alexander Gardner (if you know the correct photographer or images from the other two angles, let us know in the comments below).
Remember that the entire process, from coating to developing, had to be done before the plate dried in wet collodion. The photographer had to use a portable darkroom and had to finish everything in 10-15 minutes.
Photographer Wood went on to photograph in the Civil War, where he photographed maps for Gen. George McClellan.
* The exposure time of 4 seconds is mentioned in the journal of Architect of the Capitol, Montgomery C. Meigs, who hired Wood as a “photographic draftsman.”
Quiz:
What was the main advantage of the collodion wet plate process over the daguerreotype? The daguerreotype produced a one-of-a-kind positive image and could not be replicated. The collodion process (invented 1851) produced a glass negative so that multiple albumen prints could be made. In the collodion process, the photos were also not laterally inverted and correct left to right.
Which is the world’s largest collodion photo ever produced? It is 5.5 × 7.5ft with more details here.
If we have whetted your appetite for collodion wet plate, click here for a few dozen articles.
We have often covered photos of animals taking a curious interest in cameras and photographers. Sometimes they are looking through the viewfinder, or they are climbing on top of the tripod or even the photographer.
Joaquim Campa has compiled a hilarious Twitter thread of animals interacting and interrupting photographers as they go about shooting wildlife. Foxes, deer, meerkats, leopard cubs, seals, eagles, bears, wolves, squirrels, penguins, monkeys, beavers, kangaroos, lions, and owls all come close enough to take a second look at what the photographer is doing on their territory.
Enjoy 40 photos showing animals going crazy at the sight of a camera.
The Hawaiian big wave season has been in full swing since November and continues typically through February.
Ryan Moss, a California surf photographer, was getting shots of professional surfers risking their lives when he ended up nearly dying when he broke his back in a monster wave accident at the Himalayas on Oahu’s North Shore.
Whether you are a photographer capturing headshots or a client looking for headshots, check out these tips from five experts for that great headshot. And while this post is geared towards actors, it certainly applies to others as well.
The most engaging images will be the ones where people are relaxed and unapologetically themselves.
The client should be curious to explore the different facets of their personality, and the photographer should be interested in unearthing them.
A photo that captures your essence is what will set you apart.
If you want to use a photo where you’re not even looking at the lens, and you can justify your reason, go for it.
The goal is to make the headshot clients feel confident, at ease, and one hundred percent like themselves.
Don’t begin by telling the photographer or yourself, “I hate having my headshots taken,” and that’s no fun for anyone!
Just like a “perfect” performance, the “perfect” headshot doesn’t exist.
YouTube is free education, but finding the right video is always a challenge and is often a hit or miss. The above post mentions a few from the ones who have hundreds of thousands of views to over five million views, which could be a good starting point.
Harvard University, yes, that Harvard University, has free classes as well.
Master photographers Anne Liebovitz and Jimmy Chin are available on Masterclass for $15/month. Plus, there are offerings from manufacturers with Nikon School and Canon Connected. Nikon School was earlier available for FREE for the holidays till December 31, 2020. But when I checked today, they are still available for free. So, hurry up!
Van Lam, a wildlife and landscape photographer, based in Massachusetts, arrived at the beach at 5 in the morning. After a few hours of walking there was sunrise, and he saw a small white dot from a distance.
He slowly got closer, set up his tripod, and lay flat on his stomach. After some time, the owl took off unexpectedly. Lam grabbed the back button focus and fired off some shots. Although he was in wide focus mode, the Animal Eye AF Tracking helped get the Snowy tack sharp. The lens was fully open, but the teleconverter brought it down one stop to f/5.6
“The driftwood next to the Snowy Owl helps balance the scene out,” Van Lam tells PetaPixel. “I also like the misty and cloudy conditions, which help provide a very clean background. My most favorite part is the take-off. I love the sand below its feet because it gives it a sense of action freeze at the moment.”
Lam, who works full time as an IT specialist, keeps post-processing to a minimum to keep it natural-looking. You can check the link above to find out what he did in Lightroom and Topaz Denoise.
Most photographers have some sort of editing software. But if you are contacted by your neighbor for help, and he does not, here is some advice to offer.
In this guide, you will learn how to resize an image using Photos in Windows 10, Preview in macOS, and Gallery in Chrome OS. There is also a free version of the web-based client Pixlr X
Street photography seems simple enough when you are a viewer, but the first time you go out in the street with a camera, it may not end up being that simple.
Like everything else, there is a learning curve, and to help you along are some tips.
Pick a Spot and Wait
Become an Actor
Get Closer
Embrace Spontaneity and Imperfection
Capture Expressions, Emotions, and Gestures
Study Famous Street Photographers
Visit the link above for more tips, FAQs, and a list of 20 famous street photographers that you can study.
Here is another starting point. Check out this video by Magnum photographer Bruce Gilden, an iconic street photographer with a unique style. In 2013 he received a Guggenheim Foundation fellowship.
An infrared greyscale scenery of a park under a cloudy sky. Photo by Wirestock
Infrared photography has a very unique and even unearthly look. You will either love it at first glance or hate it; there is no middle ground.
In infrared photography, an infrared filter that looks black or deep red is used together with infrared-sensitive film or sensors. This produces false-colors or black-and-white images with a dreamlike or sometimes lurid appearance, an effect mainly caused by foliage (such as tree leaves and grass) strongly reflecting in the same way visible light is reflected from snow.
Smart HDR on iPhone XS. Every time you snap a photo with Smart HDR, the phone captures a primary 4-photo buffer, secondary interframes at different exposures, and a long exposure for shadow details. The phone then analyzes all the photos, selects the best portions of each, and then combines them to create an optimal version of what you’re trying to capture. Photo courtesy Apple.
Computational photography is the reason for the amazing progress smartphones have made in the last decade and not just the improved sensors and better and faster lenses.
All phones have hardware and software components. In some years, the hardware does not even change, yet they produce better photos due to improved software. After the sensor captures the image, it goes through image processing. Think of it as an automatic Photoshop, before it is saved to the disk.
One important feature is stacking, where a camera takes multiple photos at different times and with different exposure or focal lengths. It then becomes the job of software to combine them to retain the best details from each image into a composited final image. This is why a phone camera photo can look better than one taken with a much more expensive regular camera in some cases.
Jokes Only a Photographer Will Understand
Two amateur photographers were catching up with some street photography when they were surprised by a beggar asking for help?
The first looked in the other direction and carried on.
The second stopped.
When they reconnected, the first asked, “I saw you stopped; what did you give the beggar?”
“f/4 at 1/500s, as he kept moving,” replied the first.
Email Phil your favorite photography joke. If we share it, we will credit you and link to your site.
When asked: “what makes a great photo?” often, the response is: “one that elicits an emotional response.” For me, this image from the 1968 democratic convention by David Douglas Duncan was the first time I perceived a true emotional response to a photograph.
I was in my teens and had just developed an interest in photography. A freelancer for my local newspaper took me under his wing and became my mentor (mostly so I would load his cameras during high school football games). And in this informal education, he shared Duncan’s book Self-Portrait: U.S.A—and I was hooked.
For those who do not know the story: Duncan was a seasoned war photographer (Korea and Vietnam) hired by NBC News to roam both national conventions and produce a series of images shared each evening on the telecast. (A very cool idea that I wish a network would repeat in the future.)
Duncan noted in the book: “My qualifications were limited to being a professional loner accustomed to thinking editorially, and then producing my picture stories—good or bad—as highly distilled packages with little superfluous material clinging to the story-theme.”
Once the conventions were over, Duncan quickly assembled the book, published by Harry N. Abrams. What drew me to it went beyond the superior photojournalistic coverage of these fraught and, at times, violent gatherings. It was the whole package: the pacing of the images, the design, and the quality of the printing—this was not just a collection of pictures, this was a fully-formed, dramatic play written in images. As someone who later pursued a career that straddled photography and design, the book became a key touchstone.
And of all the incredible images that make up the book, it is this one of a delegate at the credential hearings that preceded the Democratic convention in Chicago that always stops me. The hot lights, his sweat, I can feel the added heat from the cigarette in his mouth—it makes me wince every time I look at it, even today over 50 years later. That is an emotional response, and why I don’t just like it, I revere it.
Postscript: When I was director of photography at National Geographic, David was invited to speak at our annual photography seminar. As a teenager, I would have never dreamed that I would actually meet the very photojournalist that helped put me on my path. It was the honor of my life.
David Griffin is the founder and creative director of D Griffin Studio, a graphic design firm specializing in photographic-based projects. The most recent design project is Hidden: Animals in the Anthropocene by Jo-Anne McArther and Keith Wilson. David has worked at National Geographic, U.S. News & World Report, The Washington Post, The Philadelphia Inquirer, among others. He is an undergrad of Ohio University. He’s got a TED talk.
The irony of photography is, it’s always a split second. But the amount of time that you invest to record that split second is a lot – Brendan Smialowski
To see an archive of past issues of Great Reads in Photography, click here.
We welcome comments as well as suggestions. As we cannot possibly cover each and every source, if you see something interesting in your reading or local newspaper anywhere in the world, kindly forward the link to us here. ALL messages will be personally acknowledged.
About the author: Phil Mistry is a photographer and teacher based in Atlanta, GA. He started one of the first digital camera classes in New York City at The International Center of Photography in the 90s. He was the director and teacher for Sony/Popular Photography magazine’s Digital Days Workshops. You can reach him via email here.
Image credits: All photographs as credited and used with permission from the photographers or agencies.
Clément Marion, a French photographer in his early twenties, shoots only with analog processes. In his latest project, he decided to use wet plate collodion to capture intimate portraits of burn victims.
Warning: This article contains graphic images of burn victims.
“My first contact with this world was during childhood; there was one in my village,” says Marion. “Much later, I heard an interview which asked this question: ‘When was the last time you saw a major burnt person? Haven’t you seen any? These people are hiding.
“This sentence touched me, so I asked myself how to help this cause, [and bring] acceptance of others, … advocate tolerance.”
Marion had also wanted to try wet plate collodion photography for some time, so he decided to combine both his objectives in 2020.
Photography has always had an omnipresent place in Marion’s life for the past fifteen years. He started photography very early on when his father presented his sister with a compact camera, which he used for some time. That was his first contact with photography. He then had his own camera, ultimately moving on to Minoltas, a Rolleicord, and even a miniature Minox.
The first film that Marion developed was in college when he was nineteen, and he was instantly in love with the medium. He enjoyed the fact that he could accomplish everything with his own hands, from the shoot to the darkroom processing. Digital photography, even today, does not interest him at all.
Last year, Marion, who has never taken photography courses, spent the first half of 2020 practicing his collodion skills by photographing his friends. Then he was ready for the project. He had heard about the process from Sally Mann, one of his favorite photographers. Collodion to him was the “highest photographic process, but also the most random and complicated.”
The Sinar F2 4×5 is his camera of choice, a 135mm lens and 8-10 Multiblitz X10 AC/DC flash heads to light the subject and the background in a rental studio. His plates’ sensitivity is approximately only 3-6 ISO, and therefore he needs that many flash heads to get a good exposure.
Flash gives him the convenience of not having to have the model stand still for long exposures. The 4×5 collodion plates are scanned on an Epson Perfection V850 Pro Flatbed Photo Scanner for online use and making prints.
The wet collodion process has a significant disadvantage: the entire process, from coating to developing, has to be done before the plate dries. This gives the photographer no more than about 10-15 minutes to complete everything. Marion has to use a rental studio with an attached darkroom for his project due to this difficulty.
His first model had to travel to Toulouse, France, where Marion had his set up then. He found her from her Instagram, which she had set up after her accident. In that first shoot, he had chemistry problems but managed one good plate from the session.
“I welcome people early in the morning; I present the laboratory and the protocol from start to finish,” says Marion of the morning introduction. “At first, I lacked training, it was 4 or 5 plates per afternoon, but towards the end, I reached 10.”
As he gained expertise, he had to worry less about lighting and chemistry. He had figured out the shape he wanted to give to the series, and things followed more smoothly.
In between the session, Marion serves a meal and discusses the project. They can view the photos already in the series and ask him questions.
“Often, that’s when we bring up each other’s stories. It’s a crucial step, especially to introduce the shot,” the photographer explains. “Some have had accidents. For others, it is about aggression [assault]. I usually guide the models, especially to make them feel comfortable at first. But of course, I am open to suggestions. It’s very important to stay that way in these cases; everyone has something to bring to a shoot. It’s a four-handed work.”
Marion has shot twelve subjects so far but always shoots only one angle/pose for each person even if he exposes multiple plates.
“The parallel between this [collodion] texture and that of the scarred skin of burn survivors is obvious, [and therefore] I decided to use wet collodion for this project,” explains the artist. “This film dries little by little from the preparation for the shooting, until at the end of the development of the photograph. Eventually, it hardens, retracts, sometimes cracks, and often changes color. These are also the main characteristics of burn scars.”
The negative emulsion is made up of two main elements, among others, collodion and silver nitrate. Separately, they are both used in medicine for wound healing. The collodion as a bandage, and the silver nitrate, in the form of a small stick, allow burning a poorly healed scar to direct the skin’s re-healing. Together, these two elements form a photographic emulsion similar to a thin skin spread on a glass plate.
Marion also has a book (hopefully) to be published by crowdfunding (PetaPixel asks all crowdfunding backers to do their own due diligence as we do not endorse any project). It is a 6×8, 50-page book that will be sent free of charge to around fifty health professionals, who will use it as a support in their medical procedures with their severe burn patients. It will feature photos as well as “a small writing participation from each of the people photographed.”
When asked how long he’ll continue to work on this series of burn victims portraits, the French artist replied: “Forever, I don’t know, maybe when I’ll think that I have what I need.”
About the author: Phil Mistry is a photographer and teacher based in Atlanta, GA. He started one of the first digital camera classes in New York City at The International Center of Photography in the 90s. He was the director and teacher for Sony/Popular Photography magazine’s Digital Days Workshops. You can reach him via email here.
Image credits: All photos by Clément Marion and used with permission.
For the past five years, I have organized an annual photographic Tableaux Vivant based on classic paintings. I have included anywhere from 15, or in the instance of my 2021 construction, No Vaccine for Death, 90 collaborators.
Ideas come from everywhere. Occasionally we self-generate. More often they are thrust upon us. Photographic history is certainly replete with expansive portraits. Utilizing a digital camera, group portraits can be captured quickly, in rapid succession, and at a moment’s notice.
My portraiture, however, vastly differs from the work of contemporary photographers as I turn the clock back with the use of Frederick Scott Archer’s 1851 medium of wet plate collodion, and it is thought that less than 1,000 photographers practice this archaic form of analog photography in present day. I am very proud to be one of them.
In the wet plate process, liquid collodion is poured over a piece of polished black glass, sensitized in a bath of silver nitrate, exposed in the camera, and then developed immediately (under safe light conditions), usually within minutes, as to not allow the collodion to dry on the plate and the image lost.
For location work, I have built a portable darkroom that is easily transported. All development must be done instantly and on-site. For the techies, I use an Italian Alessandro Gibellini 8×10-inch bellows studio camera mounted with a Carl Zeiss Tessar 300mm f/4.5 lens with a manual lens cap as my shutter. No Vaccine for Death was shot outside under the open haze of a Bismarck, North Dakota sky (artfully and unfortunately provided by the California wildfires) with a one-second exposure at f/11.
No Vaccine for Death is the fifth largest production that my friend, collaborator, project director, and St. Mary’s College (of Bismarck) film professor Marek Dojs and I have worked on together. Each time we start a new project, it seems we get more ambitious and attempt to push the envelope of what is, or seems to be, possible. Two years ago, our project was going to be something completely different. We had a painting of saints descending from, and people ascending to, heaven. The image personified the conflict between the ideas of good and evil.
When COVID hit, we knew we had to confront the pandemic.
With the onset of the pandemic, life, as we well know it, changed in a heartbeat.
“In regards to the theme — one thing that I’ve been thinking a lot about is how afraid of death our society has become. The idea that we will live forever, and that pain and suffering should be avoided at all costs, has created a lot of problems in our time. The pandemic brings the possibility of death closer to us, but death is the real pandemic — and there will be no vaccine for that — we will all die. No Vaccine for Death might be an interesting title,” Markek said at the time.
At that point, No Vaccine for Death was born. In a meeting several days later, Marek and I discussed The Triumph of Death, Pieter Bruegel’s 1562 masterpiece which hangs in Madrid’s Museo del Prado. Inspired by the unstoppable onslaught of Europe’s Black Plague which killed over 25 million people (nearly a third of Europe at the time, and which lingered on for hundreds of years longer), our wet plate shoot could not have come at a more poignant time in modern history. The world had just started to recover from the COVID-19 pandemic.
The Triumph of Death | Pieter Bruegel| 1562 – 1563. Oil on panel
Marek and I thought that if we could immortalize this scene through our own visual vocabulary, we could possibly put COVID behind us. Marek, cognizant of our inevitable death, felt that if people focused so much time and energy on things that are not important, we would lose track of our time here on Earth. He wanted to stress the fact that there is no vaccine for mortality. In so doing, we attempted to pay homage to Bruegel’s original image.
With the concept firmly in hand, our efforts turned towards the logistics of production. Needing an open and accessible location, my first call was to Monsignor Shea, the President of the University of Mary here in my hometown of Bismarck, North Dakota. On the college grounds is the sacred Marian Grotto which formed the basis for the scene. The stone arch of the grotto was a close match to the stonework in our inspirational painting from 459 years ago.
I then enlisted the aid of Michael Stevenson and Michele Renner Oster, directors of the local (Shakespearean) theatre companies for the creation of costumes. Forty backup and support personnel, including make-up artists, hairstylists, carpenters, dressers, and armorers were pressed into action. Dozens of skeleton costumes were purchased, altered, and fitted for the various volunteers. As a matter of fact, once the call for actors went out on social media, over 100 respondents ranging from local university students to photographers from San Diego, St. Louis, and Cleveland, Ohio, asked to be part of, then joined, the collaboration.
Finally, the morning of July 21 arrived. I had barely slept. At 6:00 am, I was on-site with a flatbed pick-up truck arranging camera angles and laying out the relative positions of each of the participants. By 8:00 am, the temperature had hit 80 degrees (on its way to 100 a couple of hours later).
The intrepid actors were in full-length Renaissance costumes and ready to be placed. I estimated it would take at least eight collodion plates to get the perfect shot. Each plate would take a minimum of 30 minutes to expose, develop, and evaluate, let alone allowing the actors time to stretch, move around, grab a bottle of water, and then reset.
As it is often said, a wet plate is not taken, it is given to you. I was prepared to work until I had a satisfactory image. Fortunately, my crew was likewise committed.
I mounted the truck, double-checked the exposure, and left to coat the first plate with collodion. Marek, bull horn in hand, directed the actors to their positions.
The first plate was over-exposed.
Nailing down a precise exposure on a first attempt using natural light is always a challenge. Reset, I took another plate which I judged as adequate. It’s now an hour later and the sun has really begun to take its toll. A third plate was exposed, we were beginning to see our vision for the shot unfold. As everyone gathered around to see the results once it was washed, a cheer went up with the general agreement we were close.
We took a short break and went for our fourth and final plate of the day. All the elements we were trying to incorporate and capture became visible. We had our one plate, the plate that would represent our 18 months of planning. The final plate is being donated to the State Historical Society of North Dakota with a list of all of the collaborators that were involved.
We had something to show for our moment in the sun. A pure silver-on-glass image when properly curated will exist for hundreds if not thousands of years after we are all gone. One second of our lives immortalized as a reminder to others of our time together.
Pizza served. Champagne uncorked. Camaraderie exchanged. Congratulations were shared by all.
We were asked by the local media if this is the largest “live” wet plate collaboration of all time? To that, we had no answer or concern. We just wanted to come together for no other reason than to create as a group. The history and significance of our time together will be left up to others to determine.
No Vaccine For Death | Shane Balkowitsch
I want to thank each and every person that contributed to this fabulous adventure. I am so blessed to be on this creative path with all of you.
Editor’s note: A full list of all those involved in this production as well as a great deal more behind-the-scenes images can be viewed on Shane Balkowitsch’s website.
Image credits: Behind the scenes photos by Chad Nodland.
About the author: Shane Balkowitsch is a self-taught photographer from Bismarck, North Dakota that specializes in wet plate collodion photography. He believes this process is magical because the end result is tangible and precious. His extensive work in the medium can be seen on his website. The documentary Balkowitsch details his growth from a quirky businessman in his 40s who was looking for a creative outlet and stumbled upon an archaic form of photography that changed his life’s path. Eight years later, his Native American wet plate photos are being archived around the globe, and his recent portrait session with Greta Thunberg at Standing Rock Indian Reservation has been seen by millions and is in the vaults of the Library of Congress.
Well-known wet plate photographer Markus Hofstätter recently purchased an old wet-plate camera, repaired it to a working condition, and added two lenses to it with the help of his 3D printer.
An Austrian-based photographer and educator, Hofstätter likes to bring the old and new together. In his photography, he specializes in collodion wet-plate, which means that he’s regularly working with decades-old equipment that may require certain parts restored. He recently purchased a Mentor wet-plate camera at the Camera Obscura Festival auction and had to spend some time repairing it to bring it back to life, similarly how he repaired a damaged Linhof tripod a short while ago.
In his latest YouTube video, Hofstätter shows that it is possible to restore damaged equipment back to full working order, even though at first glance old cameras like these could be overlooked and forgotten. First, he had to fix the slide lock before he made repairs to the wobbly plate holder — which could otherwise lead to light leaks — and the cable release. Although the bellows — which is the accordion-like, pleated expandable part of a camera — wasn’t broken, it made a cracking noise so Hofstätter decided to rip it apart and glue it all together himself.
The damaged cable release
To be able to shoot a wet plate with this camera, Hofstätter had to modify the plate holder and was on the lookout for a suitable lens. He eventually found a fast Leitz Hektor 200mm f/2.5 lens and, using his 3D printer, Hofstätter made a compatible lens port. After four days of printing, he had to add final touches and his new wet-plate set up was ready for a portrait shoot in the garden.
The reason why Hofstätter is attracted to wet-plate collodion photography is that the shooter gets instant results, similar to polaroids, which makes it a great process for impatient analog photographers. Also, every single plate is one of a kind, which makes the results unique and the look cannot be easily reproduced digitally. Because of this excitement, Hofstätter tells PetaPixel that he remembers the plates he has taken for a very long time compared to the more fast-paced digital shooting.
As an experienced wet-plate shooter himself, Hofstätter recommends attending a workshop to learn about the process, including the danger of the chemicals, the equipment, and the history of this type of photography. Even better if support is provided after the workshop to ensure safe wet-plate practice. He also recommends two books: “Chemical Pictures: Making Ambrotypes Tintypes Negatives and Prints” by Quinn Jacobson or “Das Kollodium” (German language) by Peter Michels.
For those looking to buy a camera of this kind, he explains that a lot of wooden cameras were made by unknown carpenters, which although isn’t a bad thing, it can mean that the buyer forgets to check if the camera comes with fitting plate holders, which is necessary otherwise the chances of getting a suitable holder are very low. When it comes to lenses, small scratches are nothing to worry about but it is recommended to see the equipment in person or it can also be bought from a trusted source, like Wet Plate Dreams, which provides accurate descriptions for buyers.
However, even if buying from a reliable source, there are additional tasks to undertake, such as modifying the plate holder for the wet plate process, as presented in his video above.
More of Hofstätter’s work, including wet plate portraits, can be found on his website, blog, and Instagram page, while his videos can be viewed on his YouTube channel.
Image credits: All images by Markus Hofstätter and used with permission.
Although large-format photography may be an intricate and slow process often shot in a studio, it doesn’t mean that it can’t be taken outdoors with a little ingenuity. Photographer Markus Hofstätter has shared how he modified an ice fishing tent to create the ultimate mobile darkroom so he can shoot and process his work anywhere.
As an experienced collodion wet-plate photographer and educator, Hofstätter has previously shared his best tips and experiences in this type of art where the old practices and equipment meet new technology and methods. He has created tutorials, such as how he repaired a broken Linhof tripod he came in possession of and damaged cameras that simply needed a touch of DIY and 3D printing technology to get them back to full working order, as well as a step-by-step on how to make a ground glass focusing screen at home, among other resources.
In his latest video, Hofstätter revisits mobile darkroom modification — following a previous video from 2019 where he reviewed the dark tent he used at the time — to make it both light tight and easy to set up whilst on location, especially if he is shooting by himself.
Using a portable Eskimo Quickfish tent, which he first tried at the Camera Obscura Festival, Hofstätter realized the tent would give him the exact space he needs for darkroom work both by himself and when working with others and would serve as an upgrade to his current solution.
He purchased a refurbished Eskimo Quickfish tent and set out on a mission to find the best option to modify it for his darkroom needs, taking into account other photographers’ suggestions and advice. First, he used a black screenprinting paint mixed with a cold fixer and used it to paint all over any holes and seams inside the tent. The next step was to fix the existing zipper so it would not let any light in. Hofstätter solution involves a permanent cover for the zipper that is similar to the one found on a pair of jeans.
Designing a cover for the zipper
To deal with the tent’s windows, Hofstätter combined red gelatin filters and Velcro which he is able to stack on top of each other in cases where he is in particularly bright locations. To completely black out the tent, he used sheets of pond liner that could also be attached over the windows with Velcro.
Hofstätter also used that same pond liner to cover the floor inside the tent to protect it from any possible chemical spills and to block any humidity that could come up from the ground.
The finished setup uses the modified tent along with other internal additions like a power bank, red light LED, portable table, water canister with a tap, and the appropriate cases to safely transport chemicals. Despite all this, Hofstätter maintains that the setup is still easy to assemble and can be done alone. He says that it is a great solution for photographers who want to travel with ease while still being able to effectively work in the darkroom.
In the video above, Hofstätter shares in detail what kind of equipment he uses inside the tent and why with the hope that others will find it a useful resource to start with. As always, his goal is to share his knowledge and help photographers find the most cost-effective and ergonomic solution to pursue large-format photography.
Photographer Markus Hofstätter — known for his collodion wet-plate photography expertise — decided to try something different and used the 170-year old shooting process to capture incredibly detailed high-end food photos.
Hofstätter, based in Austria, has photographed it all — from portraits to wildlife — but hadn’t experimented with food until an unexpected connection was made. While in the process of purchasing a Cambo AST studio stand, Hofstätter learned the seller was well-known food photographer and columnist Hans Gerlach.
After months of planning and discussing, both decided to collaborate on a high-end food photography shoot using the wet collodion process. Hofstätter and Gerlach had to carefully plan what dishes to photograph and what colors the dishes should contain because this type of photographic process only sees blue light — this means that red color turns black and blue turns white.
Hofstätter writes in his blog that the collaborative project was even more enjoyable because of Gerlach’s extensive food preparation and presentation experience which combined well with Hofstätter’s own expertise in the wet plate collodion process.
The shoot took place in Hofstätter’s studio where he used a 13 x 18 centimeter Mentor camera with a 250mm Zeiss Tessar lens. While Hofstätter set up the equipment and made it’s secure enough for top-down photography, Gerlach prepared the dishes in the kitchen. Both worked tirelessly throughout the first day and photographed numerous dishes but realized that the silver nitrate bath had turned bad which caused some plates to come out less than ideal. Once the problem was corrected, they could return to shooting and producing successful wet plate images.
This is not the simplest type of photography and other issues were caused by Hofstätter’s modified wet plate holder which didn’t stay in place and caused some plates to become scratched.
“This is something every wet plate artist has to face from time to time,” says Hofstätter.
However, most plates turned out exactly how they imagined it — full of detail and texture that would look great as large prints.
Shot with Dallmeyer 2b Petzval lens
Hofstätter also shot some plates with a 150-year old Dallmeyer 2b Petzval lens which created a swirly bokeh. Even though the lens produced a strong out-of-focus area, what was in focus — such as the texture of the bread and the onion pieces — show great detail when closely inspected.
More of Hofstätter’s work can be found on his website, Instagram, and his blog, including a list of what tools he uses for his wet-plate photography. Hofstätter’s prints from the shoot can be viewed on ArtPal.
Image credits: All images by Markus Hofstätter and used with permission.