Quantcast
Channel: wetplatecollodion News, Reviews, and Information | PetaPixel
Viewing all 67 articles
Browse latest View live

Watch as a Tintype Portrait of Adam Savage is Made on Stage, From Start to Finish

$
0
0

Tested recently put on a show at the Castro Theater in San Francisco. One of the presentations was by local photographer Michael Shindler, who specializes in wet plate collodion photography.

In the 12-minute video above, Shindler transforms the theater into a studio and darkroom, introducing the live audience to this 19th-century photography process by creating a large-format tintype portrait of Adam Savage (the co-host of Mythbusters).

Here’s a still frame showing the portrait that was created in front of a live audience:

result

You can find more of Shindler’s beautiful tintype photography in the gallery on his website.


Shooting Wet Plate Collodion Portraits with 12,000Ws of Studio Lighting

$
0
0

20150816_Wet_Plate_BTS_055

This is a story about a collaboration to overcome 19th century technology problems using 21st century technology to produce well lit portraits.

Luke White and I, Paul Alsop, are two English photographers living in New Zealand who came together in 2014 to make wet plate collodion portraits.

I work as a medical doctor in the Bay of Plenty, New Zealand and I am also a self taught photographer, mainly using the wet plate collodion process to make portraits. Luke holds a First class honours degree in photography and manages Kingsize Studios in Auckland, New Zealand. In August 2015, we worked together for a second time, outside of our day jobs to create ‘The Auckland Project‘.

20150816_Wet_Plate_BTS_045

Making portraits with studio lighting might not be a huge deal, but when the ‘film’ you are using has an ISO of approx 0.5, you need a whole lot of light. In fact, the amount of light needed to make an exposure is phenomenal: in full sunlight, you are still looking at an exposure of 5-6 seconds.

I was looking for an amount of light produced in a ‘flash of a second’ that would allow me to freeze motion (at 1/125th of a second for example). Technical jargon aside, you basically need a lightening bolt of light to make an image. Fortunately, Luke had a few suggestions.

Wet plate photography is where you make your own gelatinous, light-sensitive ‘film’ in a darkroom then pour it over a plate of glass or blackened metal. This plate is then loaded into a large format camera and you make a photograph the same as if you were using film. Then you take the plate back to the darkroom and develop it straight away. Location shoots mean you need a portable darkroom and quite a lot of gear and chemicals. In my opinion, the collodion process produces some of the most beautiful photographs.

20150816_Wet_Plate_BTS_001

Prior to meeting Luke, my lighting of portraits had been sub-optimal, I was either using sunlight, which can be difficult to shape and is weather dependent, or I was using harsh, non-diffused 150W metal halide lights which gave ugly light and was very difficult for sitters to keep their eyes open to this blinding amount of luminescence. Having the opportunity to work with Luke at a high-end studio was a great opportunity, as we tested light outputs and lighting with wet plate.

I felt like a photographic pioneer, doing something that no-one in New Zealand had done before. The amount of light used was migraine inducing. There are alot of collodion photographers using strobe and artificial constant light now, whereas historically it has been bright sunlight. Despite the resurgence of wet plate and artificial lighting, we were still the first people ever to shoot with artificial lighting in New Zealand (one of the benefits of living in a remote island nation is that you can still be a pioneer at some things!).

20150816_Wet_Plate_BTS_005

20150816_Wet_Plate_BTS_008

The difference between this project and others, is that we set out with a different mindset. Shape the light first, then increase the power. The first thing a collodion photographer often asks is “how can I get as much light as possible to bounce of my subject, to make sure it registers an image on a wet film of ISO 0.5?” During my testing phase, I was also guilty of thinking like this too.

The problem with this is we end up using light modifiers (or even bare bulbs) that give ugly light and end results that we wouldn’t dream of showing had the film sensitivity been higher (film or digital). Our mindset for the Auckland Project was to work out an individual lighting set-up for each of the sitters, paying attention to the details that make up some of the most excellent studio portraits.

decponst

20150816_Wet_Plate_BTS_042

20150816_Wet_Plate_BTS_049

20150816_Wet_Plate_BTS_018

Here’s a quote from Luke about this project:

While wet plate photography is enjoying somewhat of a resurgence, I have not seen many examples of photographers crafting light to make interesting portraits. I love the look of tintypes but not the blur which usually results from the requisite long exposures. I’m a huge fan of the beautifully crafted lighting of the portrait masters such as Karsh, Platon and Dan Winters. After some experimenting, we realised that around 12,000Ws of flash lighting was enough to make an exposure.

We needed this much strobe power to compensate for the light lost through the modifiers. Fortunately Luke manages Kingsize Studios, so access to high end Broncolor packs wan’t a problem. See this diagram of a lighting breakdown:

decponst

I actually live 3 hours away from Auckland, so I had to drive the round trip with my toxic and explosive chemicals in the car. There is no darkroom in the studios, therefore we had to fabricate one.

20150816_Wet_Plate_BTS_011

20150816_Wet_Plate_BTS_013

20150816_Wet_Plate_BTS_010

Luke had put alot of effort into lining up a host of New Zealands talented artists, musicians and models, and knowing the fickle nature of collodion, I was hopeful the process would work OK. It is an antiquated technique that renders a beautiful aesthetic that I am in love with, however, it is quite a laborious and meticulous process that is known for having a mind of its own.

20150816_Wet_Plate_BTS_004

20150816_Wet_Plate_BTS_048

20150816_Wet_Plate_BTS_035

20150816_Wet_Plate_BTS_051

I cannot explain the immense amount of angst and pressure I always feel right up until I have made the first successful image, so I was very pleased when the very first test shot popped up in the developer. As we were going to all of this effort, we wanted to ensure we’d have a good range of sitters. We scheduled 20 people across two days, exposing 40 plates. When a single plate takes 10 minutes to prepare and 5 to develop, this is no easy feat.

20150816_Wet_Plate_BTS_065

It was nice to work this way, ensuring the lighting was as perfect as could be before making the photograph. With digital, there is a tendency to over-shoot and ensure you ‘get the shot’. Our slow and precise method also led to good results with a good hit rate, with only one image deciding to lift itself off the glass plate and vanish into thin air.

Here’s a behind-the-scenes video that offers a glimpse into the project:

Finally, here is a selection of the portraits that were made:

Chris Sissarich

Christina Bayer

Damian Alexander

Elise Hislop

Keiran Scott

LarzRanda

Natalie Walsh

Nate Kingston

Paul Serville

Sal Valentine

Thomston


About the author: Paul Alsop is a New Zealand-based photographer who creates handcrafted images of glass and metal using silver and light — the process of wet plate collodion photography. You can connect with him and see more of his work on his website, Instagram, and Facebook.


Image credits: Photographs by Paul Alsop and Luke White and used with permission. All behind-the-scenes photos and video by Lee Howell

These Are Likely the World’s First Wet Plate Collodion Photos of Snowflakes

$
0
0

15_washed_IMG_4527_2

Want a crazy photography challenge? Try photographing a snowflake. Want to make it even more challenging? Try doing it with the wet plate collodion process.

That’s what a couple of photography professors over at the Rochester Institute of Technology recently attempted and pulled off.

RIT professors Willie Osterman and Michael Peres have been colleagues for 3 decades now, with Peres in the biomedical photographic communications department and Osterman focusing on fine art photography. Back in January 2016, they started throwing around the idea of combining their skills to create a wet plate collodion photo of a snowflake.

On February 10th, 2016, a day after doing some trial runs and tests, the duo got their chance thanks to snowflakes falling under the right temperatures and conditions. They converted Peres’ laundy room into a darkroom and prepared emulsion for collodion plates measuring 3.5×4.5 inches.

At 5:30am, while the temperature was 30°F, the photographers sensitized a plate for 10 minutes, collected a few snowflakes on glass slides, exposed the plates through a microscope for 16 seconds, developed the plates for 15 seconds, and then washed in running water to stop development before fixing.

catchingsn

08_collodion_silvernitrate_bath_IMG_4504

09_the_pour_DSC9063_2

10_the_plate_DSC9058_2

11_developer_bath_DSC9068_2

12_testing_exposure_IMG_4500

13_catching_DSC9061_2

14_ready_for_developmentIMG_4521_2

What resulted were a set of pioneering wet plate collodion photos of snowflakes:

16_plate_one_DSC9084_WTO

17_plate_two_DSC9083_WTO

18_plate_three_DSC9081_WTO

While snowflake photos were already being made in the late 1800s, they used different processes (e.g. John Dillwyn Llewelyn’s salt print photos in 1851 and Wilson Bentley’s dry plate photos around the 1900s). So, Peres and Osterman’s project could very well be the first wet plate snowflake photos ever made.


P.S. Photographers at RIT are constantly pushing the envelop when it comes to interesting photo techniques and concepts. We’ve previously shared a number of them.


Image credits: Photographs by Willie Osterman and Michael Peres and used with permission

The Wet Plate Collodion Process from a Photographer’s Point of View

$
0
0

During a photo shoot last summer under the hot sun in the South of France, photographer Nède strapped a GoPro HERO4 Black to his chest to document what the wet plate collodion photography process is like from the practitioner’s perspective. He was shooting with a Chamonix 8×10 large format camera and a Industar-37 300mm f/4.5 lens. You can find examples of Nede’s wet plate photos on his website.

(via Nède Nède via Reddit)

Shooting a Surreal Photo with the Wet Plate Collodion Process

$
0
0

unsuspectingvictim

French photographer Nède has been working on a project called Altered Reality in which he explores the line between mundane reality and madness. One of the images, shown above, is titled “The Unsuspecting Victim.”

“Each photograph shows a place, a character, and an object, and when you mix them together they tell a new different story,” Nède tells PetaPixel. “This story has several endings as it’s open to everyone’s mind and thoughts, it’s kind of a collaborative work between the photographer and the public.”

French filmmaker Mr Blonde of Art Cream made a 3-minute behind-the-scenes video showing how the photo was made (note: there’s a NSFW image in the intro):

You can find more of Nède’s work on Facebook and Instagram. He’s also the same photographer that recently shared a video showing the wet plate collodion process from his point of view using a chest-mounted GoPro camera.


Image credits: Photograph by Nède and used with permission

Haunting Ambrotypes of Endangered Species Encased in Ice

$
0
0

endangered_feat

When photographer Erik Hijweege realized that there were over 22,000 species on the IUCN Red List of Threatened Species, he was shocked… and inspired. Inspired to create a hauntingly beautiful series of glass ambrotypes depicting some of these endangered species encased in ice.

The resulting series and photo book are both called Endangered, a series of wet plate collodion images that draws on the fragility of both the animals depicted in each photo, and the glass the images are captured on.

“Fascinated by the beauty of the imperfections inherent in the [19th century wet plate collodion process], I started on endangered,” writes Hijweege in his artist statement. “The fragility of the glass and the authentic nature of the process seemed to me to fit well with the animals’ vulnerable status.”

2-emperorpenguins

Hijweege wouldn’t reveal exactly how he set up the photos, saying that he’d like to leave that piece to the imagination of the viewer. “To me,” he told us, “they are endangered species preserved in ice.”

What he did tell us was that each of these images was captured with an Arca Swiss 8×10” camera using an old (1880) Copper Petzval lens with a focal length of around 360mm. Scroll down to enjoy a piece of this photo series for yourself:

3-californiacondor

4-americanbison

5-blackrhyno

6-asianelephant

7-hippo

8-hawksbillturtle

1-giantpanda

9-sumatrantiger

10-lion

11-polarbear

12-westafricangiraffe

13-mandrill

If you want to see the full series, you can pick up the book here. And if you want to see more of Hijweege’s photographic work, head over to his website or give him a follow on Instagram.

(via Medium)


Image credits: All photographs by Erik Hijweege and used with permission.

This is the First Known Photograph of a US Presidential Inauguration

$
0
0

The Capitol was still under construction on March 4th, 1857, when photographer John Wood set up his wet plate collodion camera and captured the first known photograph of a US Presidential inauguration.

As President Donald J. Trump is being sworn in, thousands upon thousands of cameras are capturing the event for posterity (and Instagram likes). But in March of 1857, taking a picture was far more difficult than wresting that phablet out of your too-small pocket.

Wood had to use the still-nascent wet plate collodion process—a “photography process of great speed,” to use his words—to capture this photograph of the 15th President of the United States, James Buchanan, being sworn into office. He had to have a “portable” dark room handy to process the glass plate and produce the Albumen print you see above, but it only took a measly 4 seconds to expose—ludicrous speed by 1857 standards.

Interestingly, Wood wasn’t originally hired to photograph the inauguration. He was employed by the Architect of the Capitol under Montgomery C. Meigs to photograph drafts of the building while it was under construction. However, when Meigs was tasked with constructing a platform that people could stand on to watch the 15th president be sworn in, he took the opportunity to build another that Wood could use to photograph Buchanan’s inauguration.

Wood would go on to photograph maps during the Civil War, but he will always be remembered best for this photograph: a true first for the world of photography.

(via TIME)


Image credits: Photograph courtesy of the Library of Congress.

Photographer Uses 1800s Process for Ethereal Portraits of Kids

$
0
0

For her project titled “Nebula,” Spanish photographer Jacqueline Roberts shot portraits of youth in the limbo period between childhood and adolescence using the wet plate collodion process from the mid- to late-1800s. The resulting photos are haunting in their appearance.

“‘Nebula’ are portraits that I make on glass and metal plates,” Roberts says. “I use an old photographic technique called wet plate collodion. This process was the primary photographic method from the early 1850s until the late 1880s.”

“[Wet plate collodion] was introduced in 1851 by Englishman Frederick Scott Archer in 1851 and consists of coating a plate with collodion that is sensitized in silver nitrate. You then expose the plate, still wet, develop it and fix it.”

“It is crucial to go through the whole process while the plate is still wet, as once the collodion film has dried it will not react to the solutions.”

“The result is a negative image on a glass plate that, when backed with a dark background, forms what we call an Ambrotype, derived from the Greek word for ‘immortal’. Alternatively, on a black lacquered metal plate, the image appears directly as a positive. Collodion’s unique aesthetic produces timeless and ethereal images … Each plate is unique.”

The portraits in “Nebula” required the children to sit for long exposures.

“Another essential aspect in my work is to pause and take the time to create an image,” Roberts writes. “My portraits are about that, time. Time passed. Time elapsed. Time suspended. Time ahead or behind us.”

“The individuals in these portraits are neither children, nor adolescents,” says Roberts. “I wanted their portraits to emerge from that state of limbo to evoke the transitional stage that they are going through.

“‘Nebula’, Latin for mist, reflects on the turmoil of growing up with all its relational, psychological and emotional changes.”

You can find more of Roberts’ work on her website, Facebook, and Instagram. You can also purchase Nebula as a 144-page hardcover book with 87 illustrations for about $71 from Roberts’ website.

(via Jacqueline Roberts via DIYP)


Image credits: Photographs by Jacqueline Roberts and used with permission


Wet Plate Portraits of WWE Superstars

$
0
0

New York-based photographer James Weber recently shot a series of portraits of WWE wrestling superstars using the 1800s wet plate collodion process.

The photos were shot over two days in two different arenas where the stars were wrestling: one day it was at the Sun National Bank Center in New Jersey, and the second was at the PLL Center in Allentown, Pennsylvania.

Weber hauled all the gear to the locations in a cargo van and set up his temporary studio. The wrestlers visited the set in between wrestling for crowds, and posed in front of Weber’s massive 8×10-inch wet plate camera, which features a lens from 1875 — that’s just 10 years after the Civil War. It takes about 20 to 30 minutes of work for a single photo.

All these photos are courtesy WWE.com, which published a beautiful gallery of the portraits.

Bray Wyatt
Sasha Banks
Enzo Amore
Alexa Bliss
Finn Balor
Nia Jax
Roman Reigns
Maryse
Goldust
Samoa Joe
Bayley
Dean Ambrose
The Miz and Maryse
Sheamus
Sin Cara

Here’s a 2-minute behind-the-scenes video showing Weber in action:

You can find more of Weber’s work on his website, gallery, Facebook, Twitter, Tumblr, and Instagram.


Credits: Photography by James Weber and courtesy WWE.com. Photo Director: Christine Reilly. Hair and Makeup: Alex LaMarsh. Hair/Makeup Assistant: Emily Klein. Wet Plate Tech: Rico Elvina. Wet Plate Tech: Jesse Mata. Photo Assistant: Sebastian Beckman. Backdrops: Broderson Backdrops

Making Collodion From Scratch

$
0
0

A few days ago, for the first time ever in my experience with wet plate photography, I mixed up collodion from scratch. I thought I’d share about the experience.

First of all, plain USP (U.S. Pharmacopeia) Collodion is a mixture of ether, alcohol, and nitrocellulose (also known as nitrated or guncotton). It is the nitrocellulose that acts as a binder and carrier for photo-sensitive salts of silver while making wet collodion images.

The vast majority of the time, when people say they mix collodion from scratch, they buy USP Collodion premixed and then add various bromides and iodides. More ether and alcohol also need to be added in order to reduce the concentration of nitrocellulose from 4%, which is the USP standard, to about 2% in most modern collodion formulas.

However, during the 19th century, nitrated collodion could be purchased a lot more readily than today (it is highly flammable) so all of the old formulas assume you have it and just give measurements based on adding in raw guncotton.

Not long ago, I managed to procure a small quantity of raw nitrocellulose and was super excited to try it. I dug through a couple of historic texts and settled on a first formula given in the 1880 publication The Ferrotype And How To Make It. I also got more salts than needed for just that formula, so after I’m done with this batch I’ll try some others.

Converting the old grains to grams and anachronistic ounces to sensible milliliters took a minute or two and then I reduced the batch size to about 120ml total so that I could go through it in a timely manner and try something else. Here’s the formula I used (note that nitrocellulose concentration there only came out to be 1.3%):

  • 60ml Grain Alcohol (ethanol) 95% strength
  • 60ml Ether
  • 1.6g Nitrocellulose
  • 1g Ammonium Iodide
  • 0.5g Cadmium Iodide
  • 0.5g Cadmium Bromide

I added ether to alcohol first, then the salts and then guncotton.

As you’re adding nitrocellulose, constant stirring is required. I forgot about that part and ended up with a gelatinous mass at the bottom of the flask that was sticky and semi-transparent. Luckily I have a magnetic stirrer and so after helping the goo unstick from the bottom, I just left it on there for 20 minutes or so and, however unwillingly, the cotton eventually did dissolve.

In the book, it says that it’s ready to use “as soon as it has settles sufficiently clear.” Well, when I did it, it never clouded up, so it might have been good to go as soon as everything dissolved. My friend Race stopped by, though, and we went out for coffee while letting the mixture rest and mature a bit.

After 2 hours, I decided to give it a try and set up a quick still life of things found around the studio. Race stayed on to watch the experiment and to record it. Here’s a masterful shot by Race of yours truly pouring the first plate.

To my elation, the image came out rather well, though a bit overexposed and on the flatter side of contrast, but that’s explainable since fresh collodion always tends to be overly reactive and flat. Here it is being washed after development.

And here it is after fixing, still wet.

Note in the above image that on the top left there’s a black torn corner that wasn’t present there in the photo of the plate being washed after development. In that corner collodion layer lifted off the glass just a bit and was very fragile, so the action of water rushing over it while washing off the fixer put a tear in there. Normally I don’t see any lifting of collodion on my glass and this time I did nothing different in glass preparation, so I have to attribute this to the collodion.

I also have to note that this collodion seems to be on the thin side (perhaps it would be best to step up gun cotton concentration to 2%…?) and while wiping off some minor fog on the plate I did hours later and doing it in my usual manner with a wet loose cotton ball I did put a tiny tear into the emulsion, something that again almost never happens to me.

So yeah, this collodion might be a little more fragile than I’m used to, but I think I can easily get used to that.

Viewing alternative or even regular gelatin silver prints or plates on a computer screen is nearly pointless. There’s no way for the viewer to see the silver playing on the plate or how thick the collodion is… This surface was beautiful — the silver was dense with large crystals in highlight and seemed brighter than usual. I couldn’t resist and tried burnishing it.

Burnishing is a technique where one rubs the plate with something soft, essentially flattening silver crystals and making the image have a very shiny metallic appearance in the areas where it’s done. There’s no way to fully show it (even videos fall short), but below are similar close-up images of the plate before and after burnishing. The full plate after burnishing is the first image you saw in this post. Note below that along with reflective quality burnishing also changes the tone of the image to a cooler steel grey.

I waited another 4 hours and gave it another go with a new still life. By now the color has changed to a slightly deeper yellow and that was a good sign as that’s what collodion does as it matures. I did a few plates before I arrived at the one below. First one was still a bit overexposed, but the contrast was a lot better. I turned down the flash power and put in a smaller Waterhouse stop in my Dallmeyer 2B. 2nd plate was there exposure-wise, but I adjusted the composition a bit and so below is plate #3 of that batch done 6 hours after collodion was mixed.

Mixing up collodion from scratch was indeed somehow exciting and satisfying, so now I understand a lot better all the other folks who’ve been advising me to do so for a while. Now that I’ve had a taste of mixing it up with pure nitrated cotton, I will have to find me some more of that magic fluff or perhaps resort to making it myself as it’s really not that hard given proper precautions and equipment.

For now, I have enough to make maybe 6-7 more small batches, so I’m thinking of trying out a few more mixes and then zeroing in on one and making a few batches of it in a row to really get comfortable.


About the author: Anton Orlov is an analog photographer and the man behind The Photo Palace, a 35-foot school bus that has been converted into a darkroom and presentation area for educational and artistic purposes. He previously created a transparent camera and the world’s smallest tintypes. Visit his website for more of his work and writing. This article was also published here.

Creating a Wet Plate Collodion Photo in a Portable Darkroom

$
0
0

Adrian Cook is a wet plate collodion photographer based in Sydney, Australia. The Guardian made this 7-minute video in which Cook talks about his background and walks through the wet plate collodion process by shooting a photo of Sydney Harbor.

“I find [with] digital, there’s no surprises,” Cook says. “I spend more time in front of a computer, and that’s not why I started photography. I still love that kind of… not quite sure what you’re going to get.”

Here’s a collection of plates Cook has made over the course of his career:

You can find more of Cook’s work on his website, Twitter, Facebook, and Instagram.

(via The Guardian via ISO 1200)


Image credits: Photographs by Adrian Cook and used with permission

I Built the Largest Natural Light Wet Plate Studio in the US in Over a Century

$
0
0

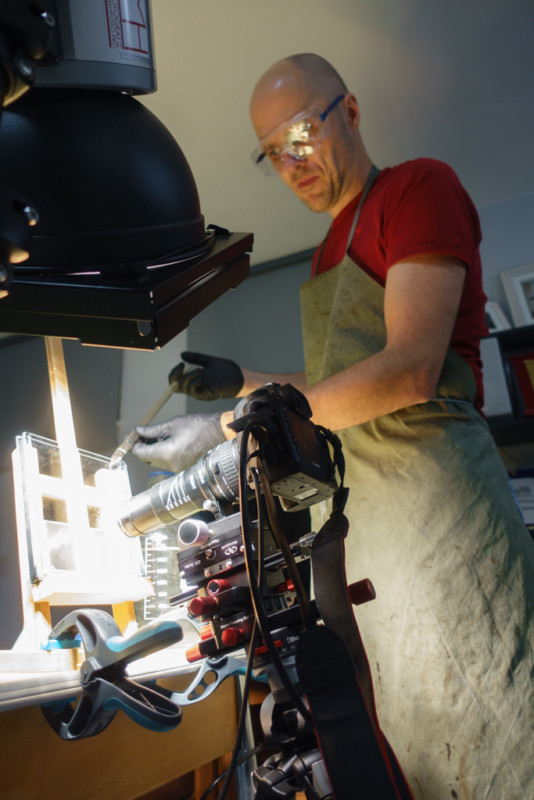
There are fewer than 1,000 wet plate collodion artists practicing around the world, and as far as I know, I am the only one in the state of North Dakota. 5 years ago, I didn’t own a camera and knew nothing about photography. I saw a wet plate online and I was immediately drawn to it, and thus my journey began.

I was told early on that there was no way a non-photographer who has never owned a camera can figure out this archaic process from 1848. 45 days after that conversation, I had made my very first wet plate photo.

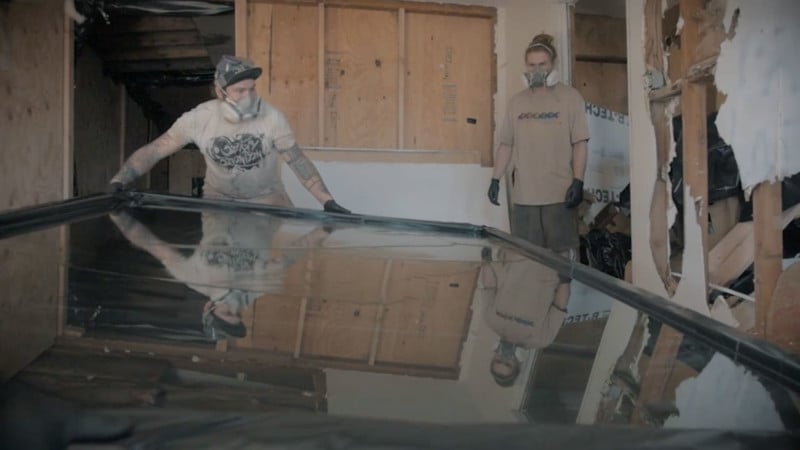
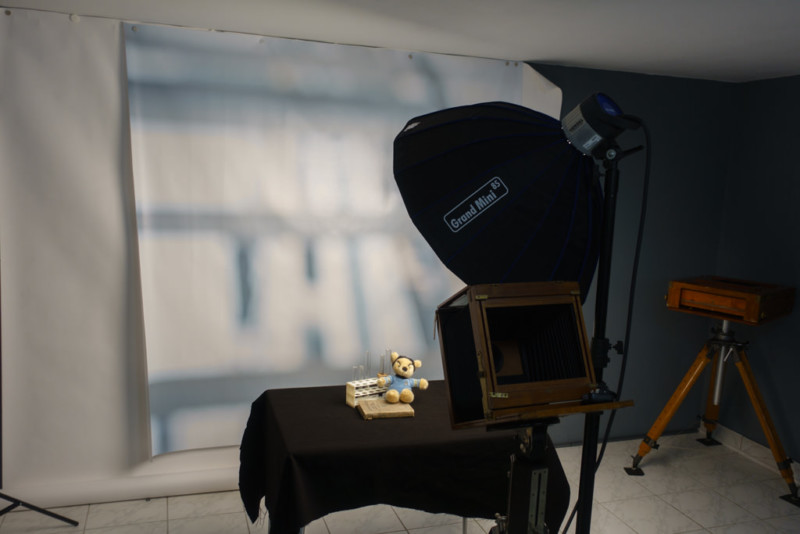
Fast forward 5 years, and I recently just completed construction of a natural light wet plate studio, built from the ground up.

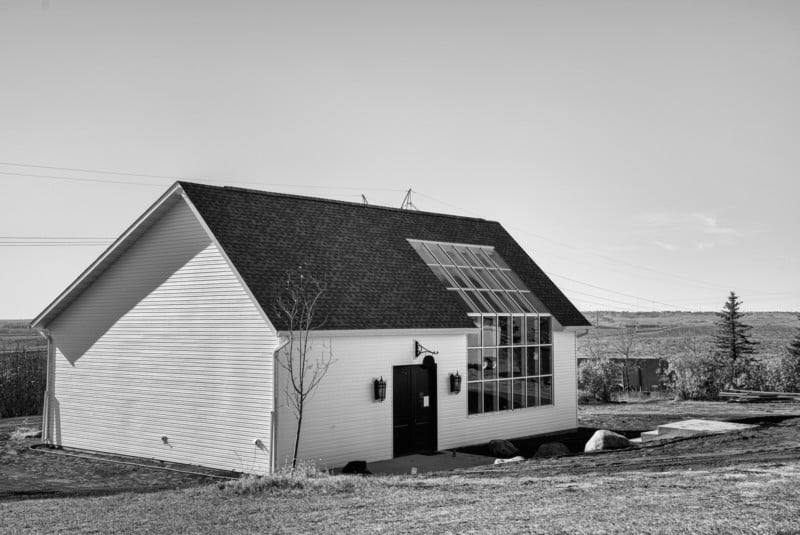
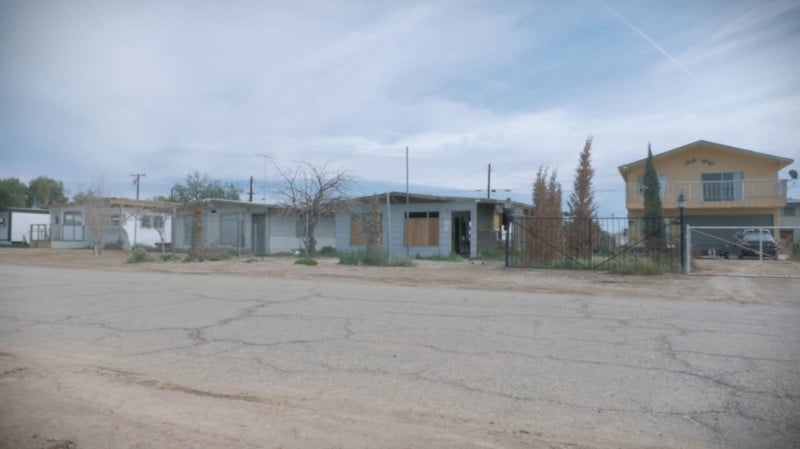
My new studio is surely the only one in this state. I also believe that it’s the first natural light wet plate studio constructed in the entire country in over 100 years. The name of my studio is Nostalgic Glass Wet Plate Studio and it is located in Bismarck, North Dakota.

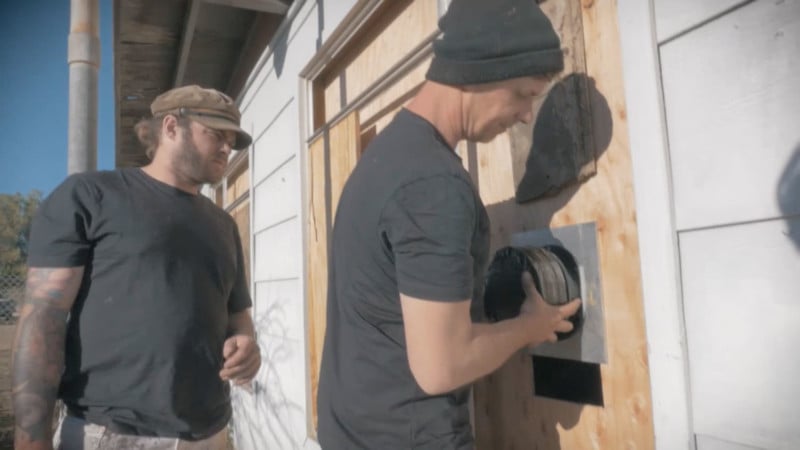
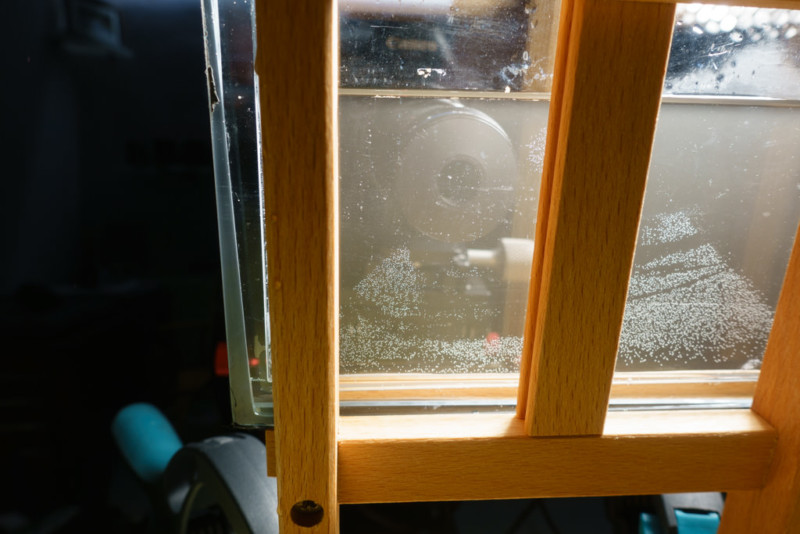
The new studio is 1,800 square feet in size and features a huge wall of glass and skylight, just as they used in the Victorian Era. In fact, I could not source proper glass for the studio and it took me 6 months to sort this one problem out.

All modern glass has either a film inside of it to block out U.V. or is two panes of glass with gas inside that also block out U.V. People don’t want the items in their houses and buildings to be damaged and faded by the sun, so you cannot usually find glass these days without this protection.

Wet plate collodion photography requires natural ultraviolet light in order to create an exposure. In fact, it requires a lot of natural light. If I did not solve this issue with the glass, I might as well have put up a brick wall instead of a window.

So I asked myself: what industry wants as much natural UV light as possible to be transmitted through glass into a space. I finally found my answer to that question: a greenhouse!

The windows’ dimensions and pitch were taken from a book written by Dr. Felix Raymer titled “Photo Lighting: A Treatise on Light and Its Effect Under the Skylight, Including Chapters on Skylight and Skylight Construction, Window Lighting and Dark Room Work.” It was published back in 1904.

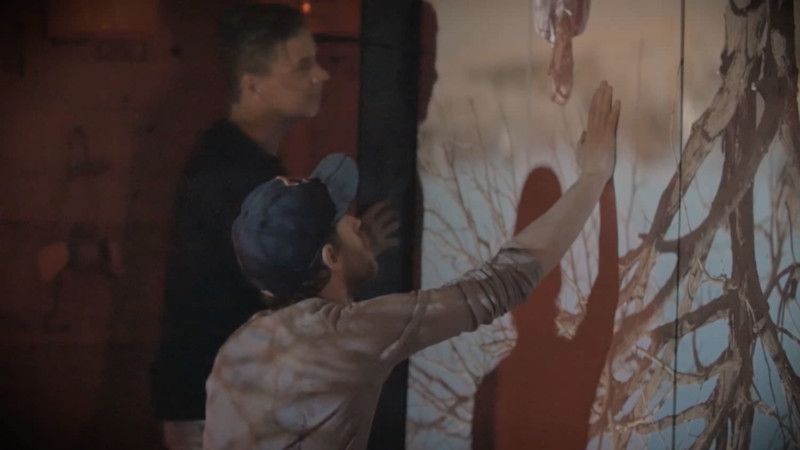
I initially designed the building on a napkin and then we were off and running. The entire build took 2 years of planning and 8 months of building. Instead of using artificial electric bulbs in the studio, I was going to harken back to the early days of photography, when the only light source ever used was the sun.

In the 19th century, there was no making of pictures at night — if it was overcast or in the dead of winter and the sun was not available, photographs were generally just not taken.

I built this new studio out of the love of history. I knew all those studio photographs that I adored from the 19th century were taken using a natural light studio and I was determined to bring this craft to my home state of North Dakota.

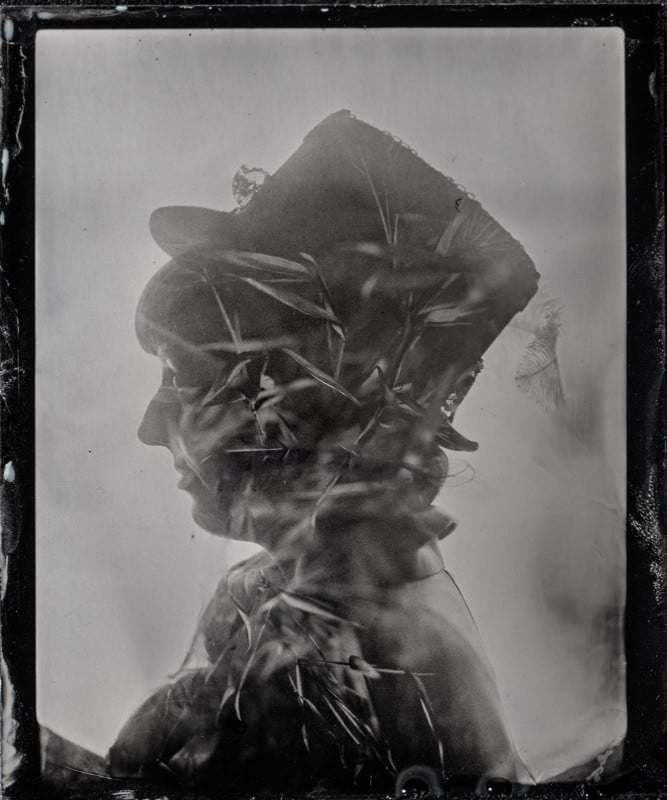
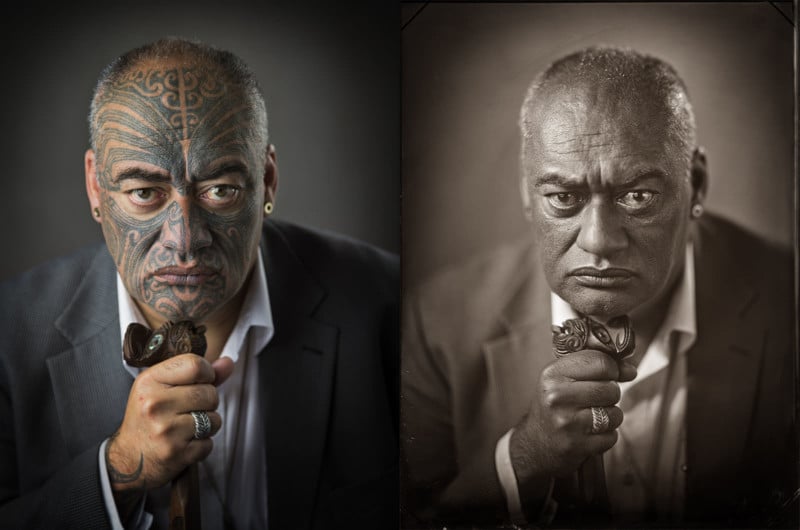
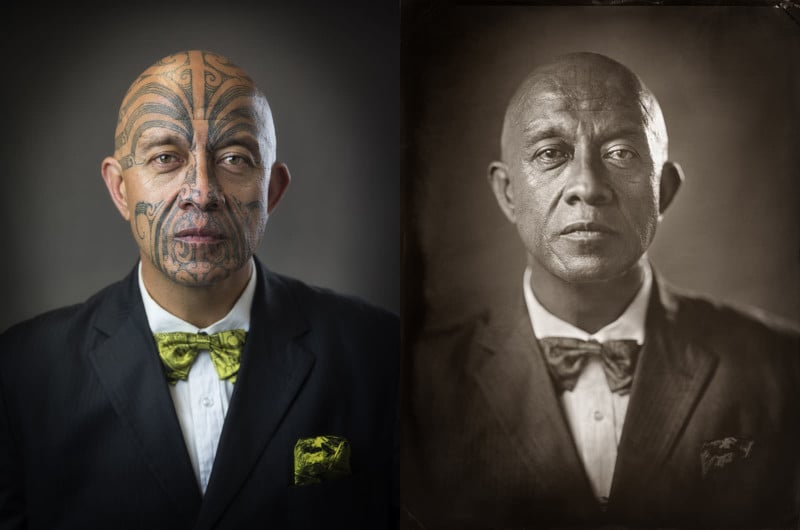
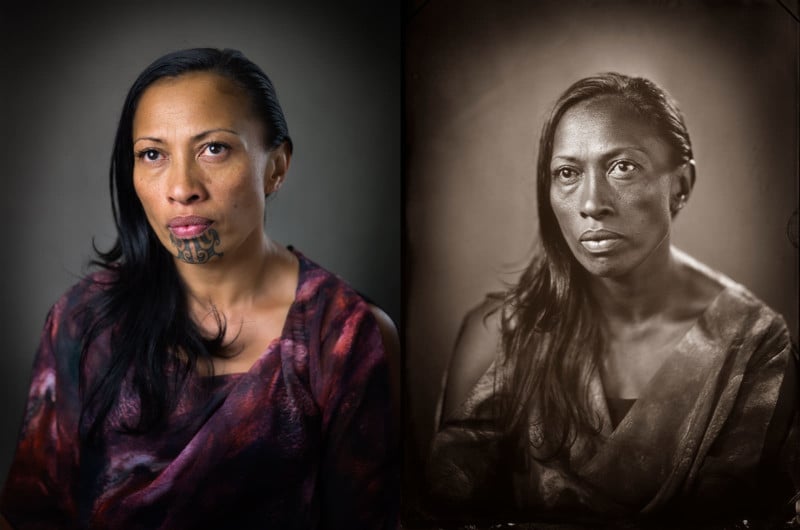
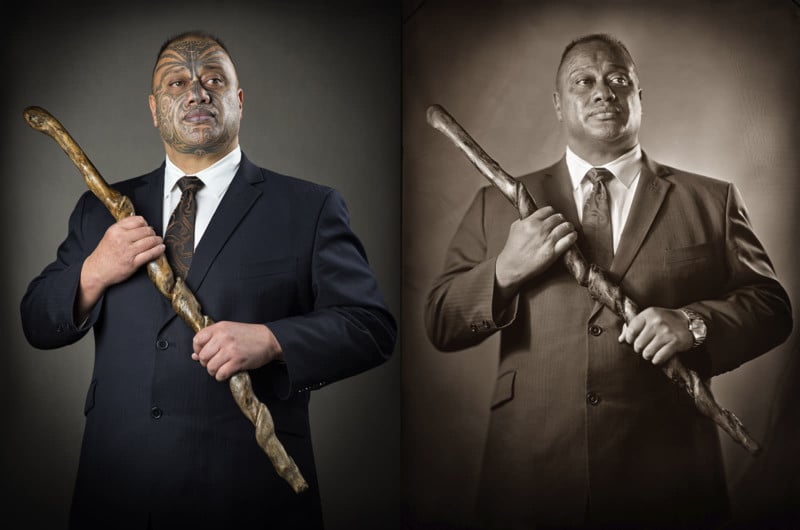
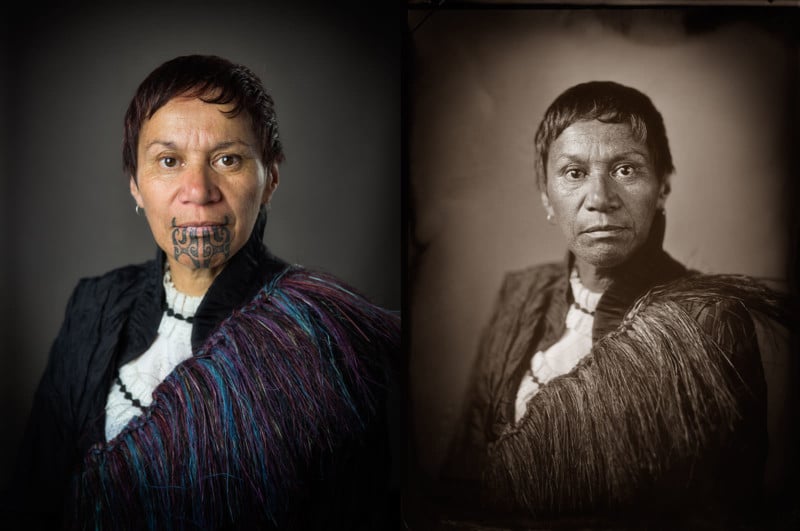
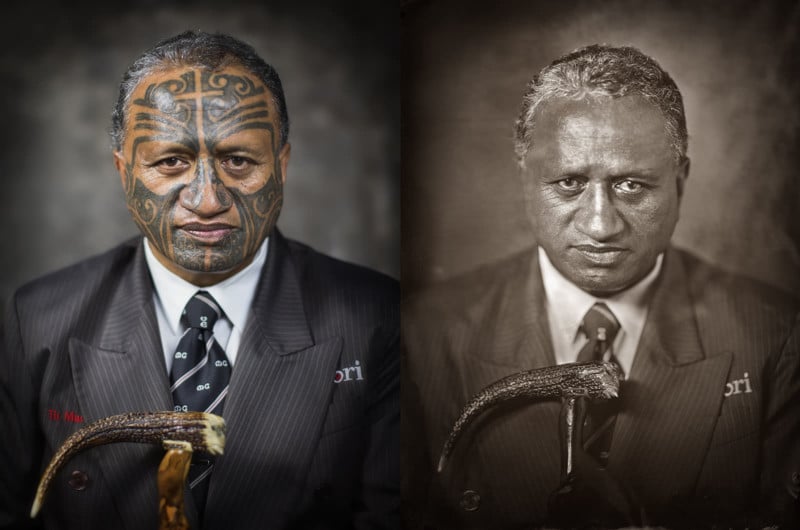
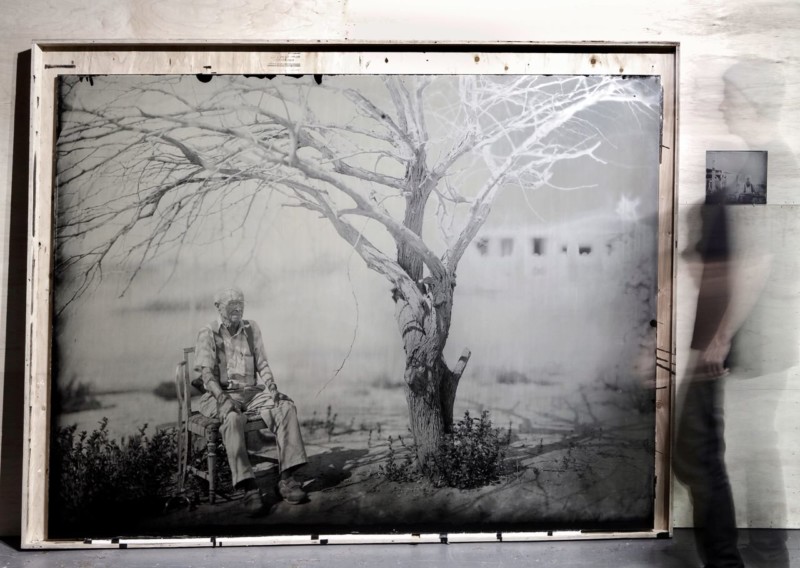
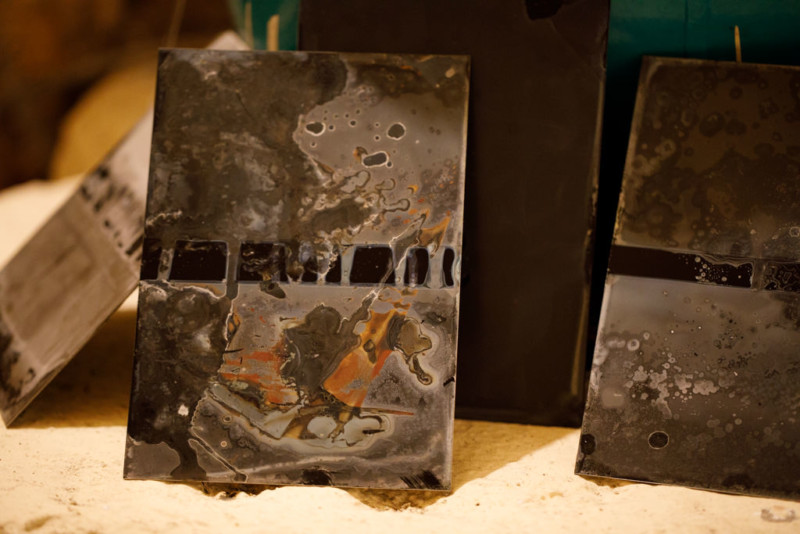
I’ve made over 2,500 wet plates in the past 5 years, have had numerous exhibitions, and have had my plates are curated by numerous museums in different parts of the world. My wet plate of Evander Holyfield is currently at the Portrait Gallery in the Smithsonian. I am presently working with the Heard Museum in Arizona, which is going to acquire 3 of my Native American plates.

I have been working on a series called “Northern Plains Native Americans: A Modern Wet Plate Perspective”, and have over 200 plates permanently curated by the Historical Society of North Dakota.

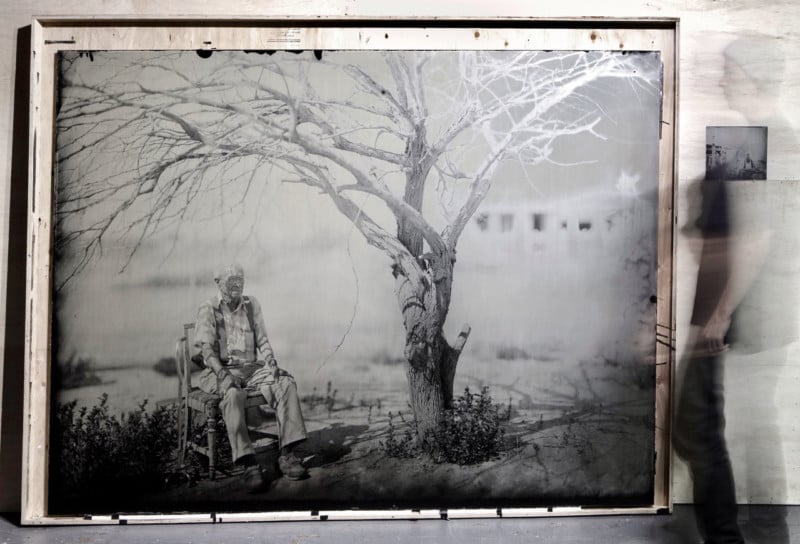
I have only been using the new space since November 1st, but the light and magic that is being brought by that natural light is incredible. It is amazing to be able to create and compose images.

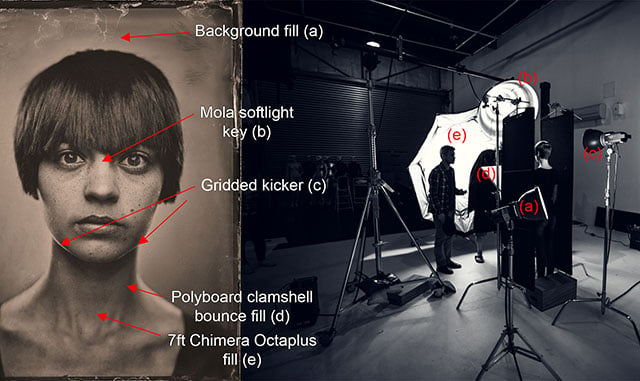
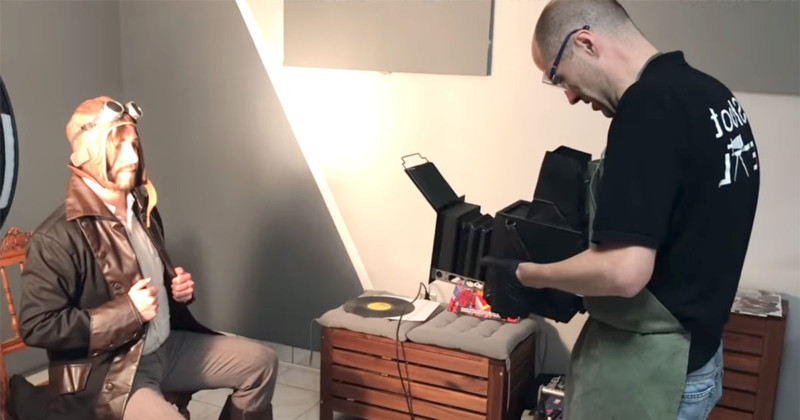
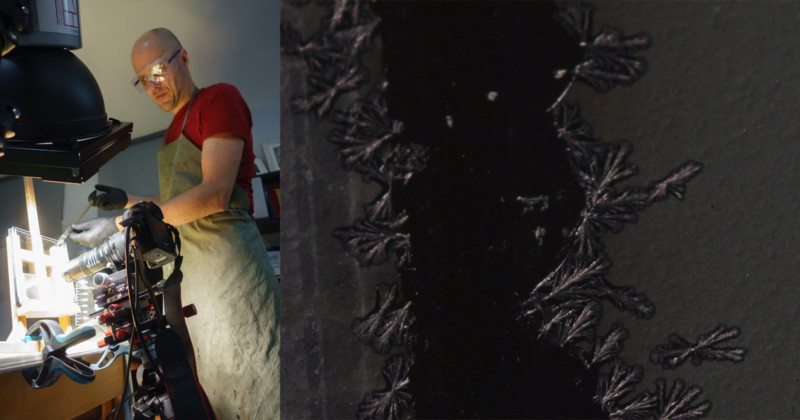
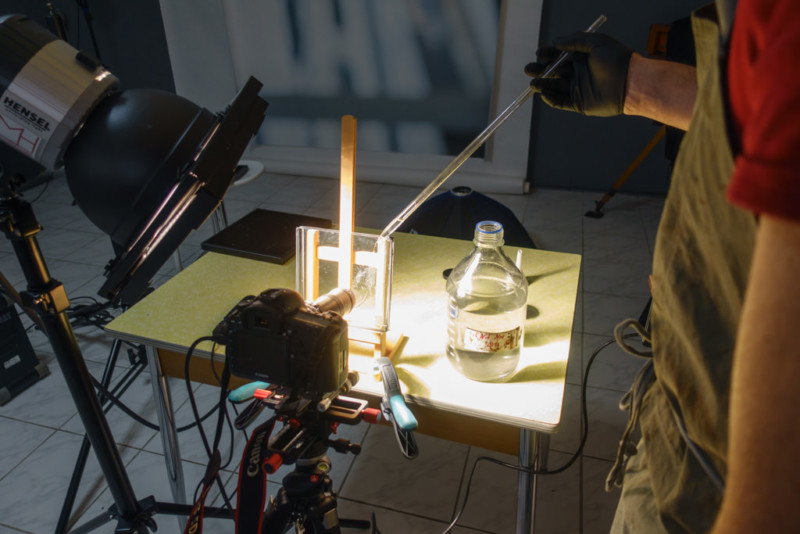
When you abandon the quick digital and film technology, something rather remarkable happens. It can take up to an hour to compose, expose, develop and fix a wet plate. We are not taking hundreds of images and picking the what we like the best. In one of my Friday afternoon sessions, I make about 5 plates over 4 hours. When you slow down, when you utilize a 160-year-old technology to makes works of art — things are just different.

By being slower and having to follow a very strict set of rules to make an image, you find a way to work around the limitations of the process and the process pays you back, tenfold.

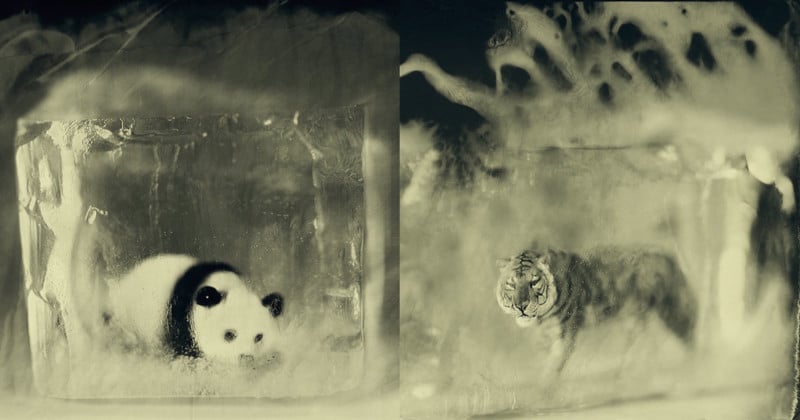
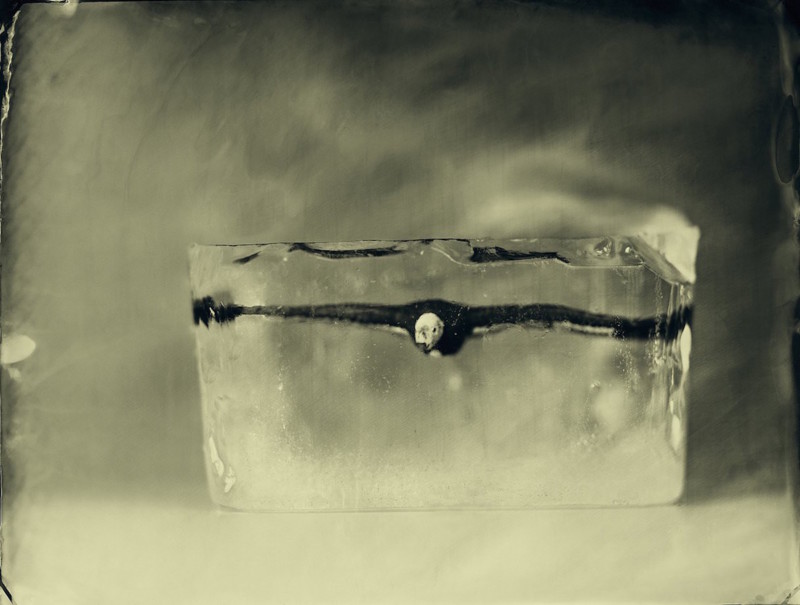
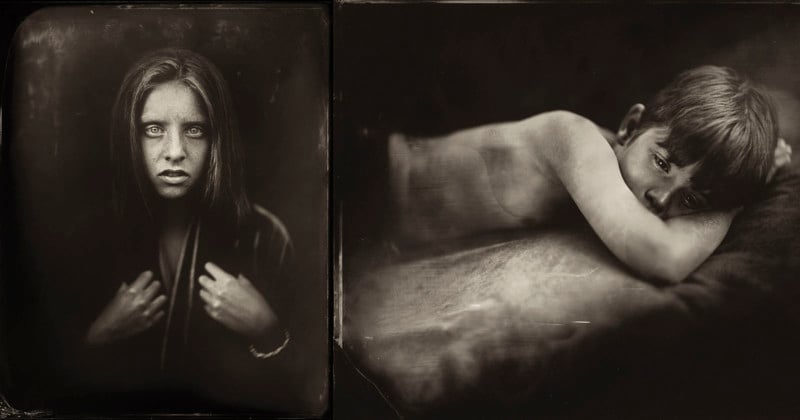
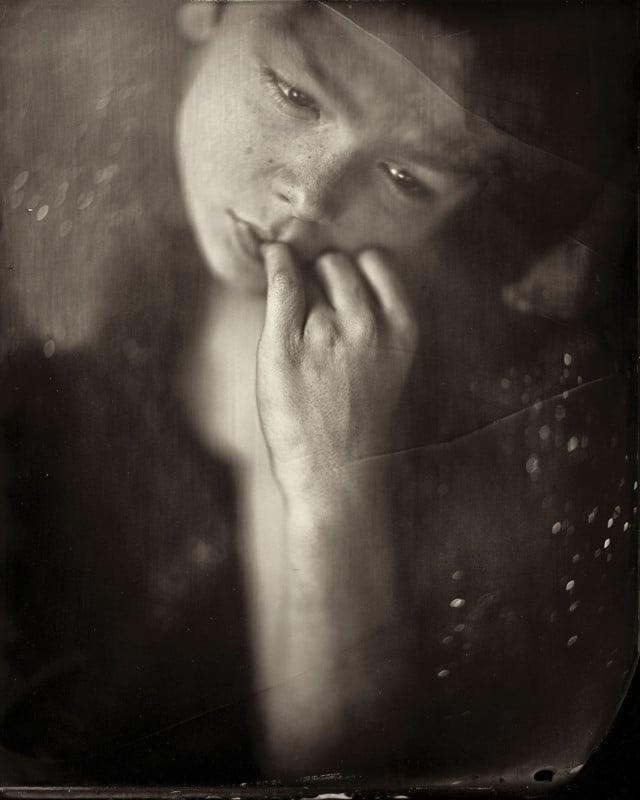
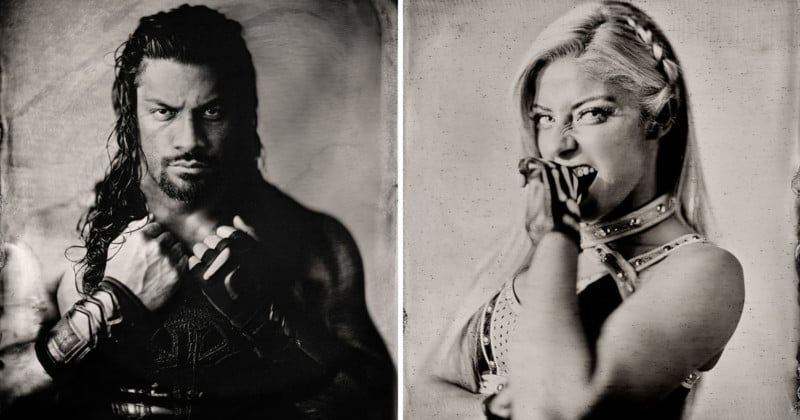
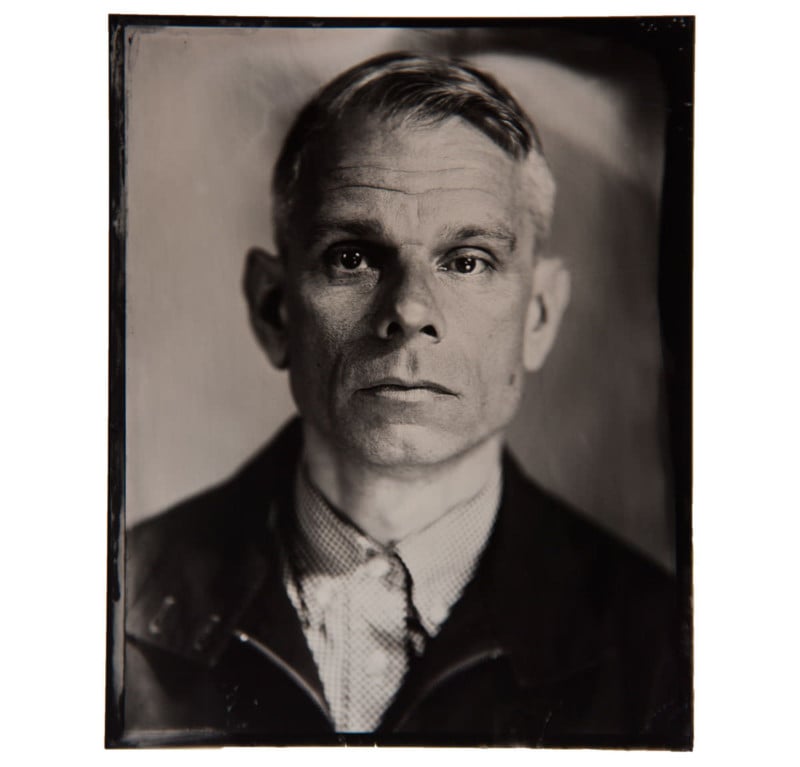
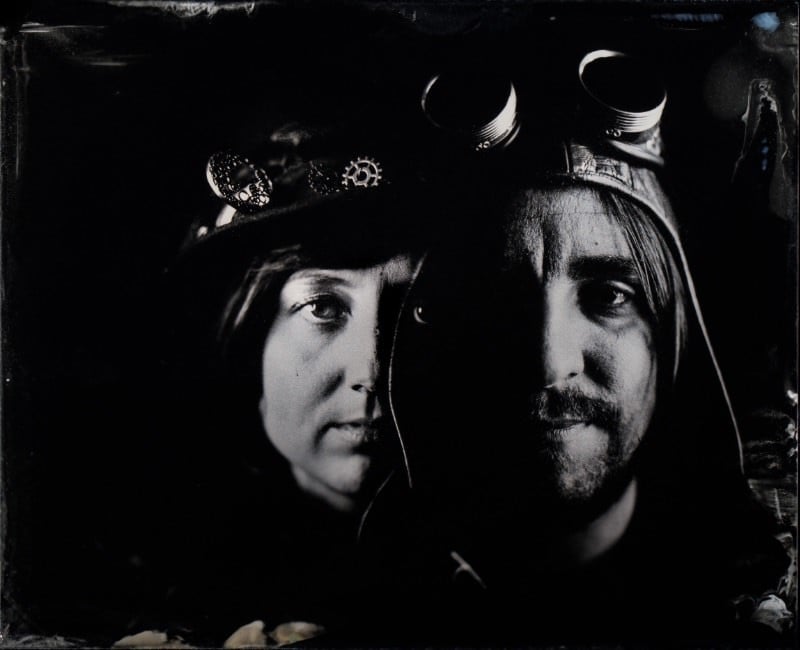
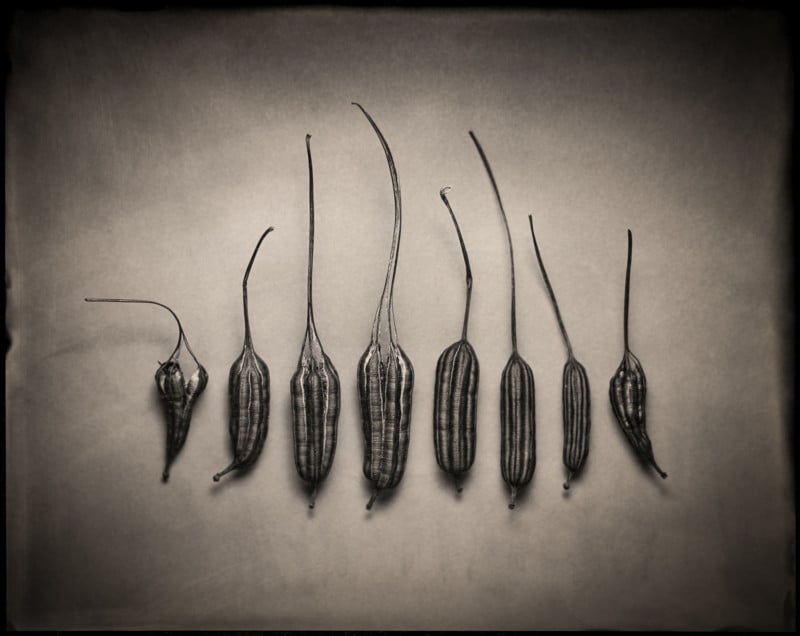
Here are some of my recent works that have been created in this new studio space:

The new studio is allowing me to light and shape the light like never before. The possibilities are endless and I look forward to spending the rest of my days creating in my little piece of heaven on Earth.

Life was simpler during the wet plate era, they were more difficult and tough, but they were simpler and when I create in my new space, I feel that I am transported back to another time. A time before the digital camera movement gave us information glut and excess, when images had to be made by hand and you got what you put into the image.

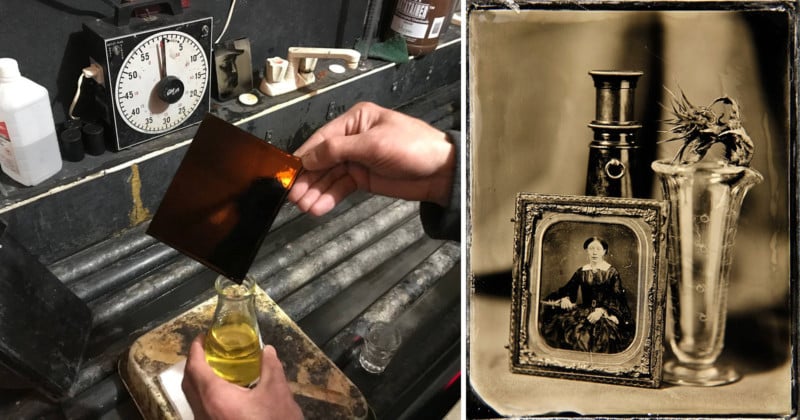
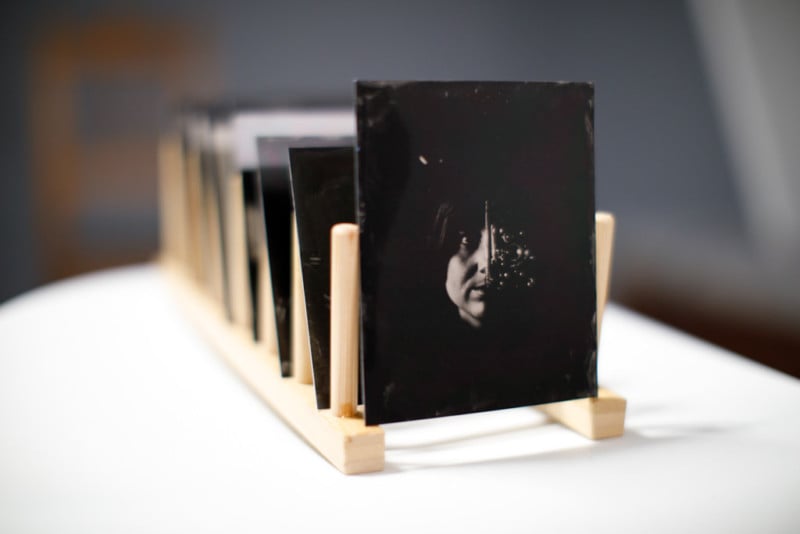
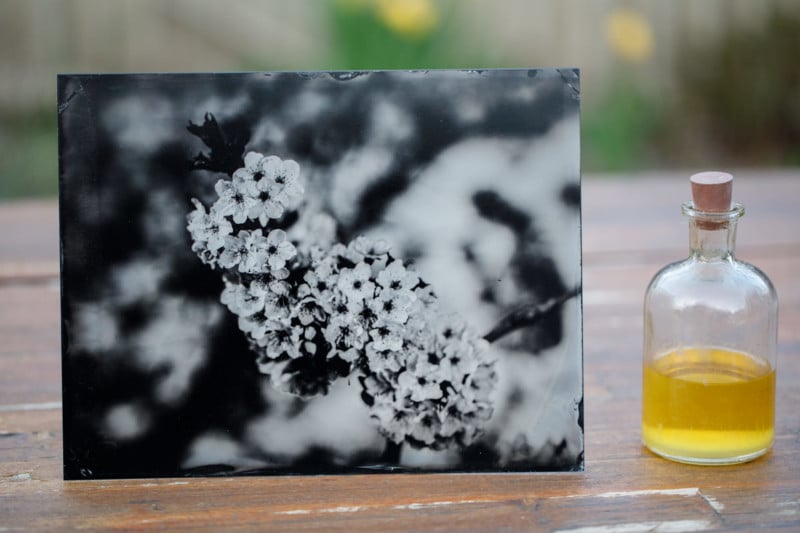
When I make a black glass positive ambrotype, that is the only one in the world. It is a one-of-a-kind and it cannot be duplicated. There is something special about that, but then again, I am a hopeless romantic who feels the world is a better place when the wet plate collodion process is still practiced by people like myself that really want to create something from nothing.

There is no finer photographic process in the world than the one that I hold so dear to my heart.


About the author: Shane Balkowitsch is a wet plate collodion photographer based in North Dakota. He is the owner of Nostalgic Glass Wet Plate Studio. You can also connect with Balkowitsch through Facebook.


Image credits: Black and white photographs by Tom Wirtz

Shooting Wet Plate Double Exposures with a Handheld Camera

$
0
0

Wet plate photographer Markus Hofstaetter recently tried his hand at tackling an unusual project: he wanted to shoot wet plate portraits handheld.

Hofstaetter started out by using his country’s equivalent of craigslist to hunt for and purchase a nearly 100-year-old camera that would be suitable for his project. The one he purchased came with a 250mm f/3.5 lens.

Hofstaetter then modeled out a custom plate holder on his iPad and used 3D printing to craft the part over 8 hours. Finally, he had to 3D print a hot shoe for a wireless flash trigger that would fire when the camera’s shutter is triggered.

“Even these are small plates, I had to use sometimes 6000-7000 Watts of Hensel strobe power to get enough light through the gridded softbox,” Hofstaetter writes.

The finished camera and lighting setup was exactly what Hofstaetter was aiming for. It allows him to get more creative with his wet plate portraiture — shooting things like double exposures, for example.

Here are a few of the steampunk-themed double-exposure portraits Hofstaetter created to try out his camera:

“But the camera is really heavy, so if you shoot a lot of plates in a row it’s very exhausting,” Hofstaetter says. Focusing through the mirror is also a challenge when using the camera handheld — Hofstaetter constantly held his breath during the shoot to keep the camera as steady as possible.

Here’s an 11-minute video in which Hofstaetter walks through the entire experience of doing this project:

(via Markus Hofstaetter via DPReview)

The Winning Photos of the First Annual Wet Plate Competition

$
0
0

This year, the wet plate supply brand Modern Collodion ran its first annual Wet Plate Competition. The 2018 contest received over 200 submissions from 75 wet plate photographers based in 19 countries. The grand prize winner is the photo above, titled “Aristolochia Pods,” by Paul Barden.

Here’s Barden’s description of the photo:

I’ve had a life-long fascination with plants of all kinds, and seed pod morphology is particularly fascinating to me. The Aristolochia elegans seed pods are a great example, with their matte black woody hulls. This is not the first time I have used these pods as the subject of a photograph, but this is the first time I have crafted a photo of them I consider to be nearly ideal in style and feel. Only the wet plate collodion process could deliver such a result.

This wet plate image was made in a makeshift studio at my house, simply arranging a selection of seed pods on a dark grey seamless paper backdrop, held on with masking tape. The scene was lit with a compact fluorescent softbox from above, with some reflector fill from below. The compact fluorescents provided enough light to let me expose this scene at f11, using a Schneider Symmar-S 240mm lens. The collodion used in this case was very well aged Old Workhorse.

The judges of this inaugural contest were Modern Collodion founder Michael Godek, giant van camera photographer Ian Ruhter, Penumbra Tintype Studio manager Jolene Lupo, veteran wet plate artist Dale Bernstein, and Intrepid Camera founder Max Grew.

Here are the other 4 top photos (called “finalists” in the contest) from the 4 major categories:

Portrait: Studio

Finalist: “Naomi on White” by Ed Gately

I have long been fascinated with the various ways the red pigmentation in our skin translates to collodion. Slightly under exposing skin tones can have dramatic effects. Pairing this with a high key background really shows off the the signature characteristics of the wet plate collodion process. Naomi was lit with 6’ diffused parabolic umbrella and the background was lit with a zoom reflector from above. This 8×10” tintype was captured with a Wollensak Vitax No. 5 on an E&HT Anthony 11×14” Studio camera using hand mixed chemistry.

I am self-taught and creates my work following the traditions of the 19th century masters. Utilizing chemistry, light, and a little magic, my portraits are able to capture the soul of the sitter preserving them for many generations. In an age of photoshop and manipulation, my images force us to face who we are and to graciously accept it. In addition to portraits, my landscape work connects the present to the past in vivid detail.

Portrait: Natural Light

Finalist: “Luis from Quincy WA.” by Angel Colmenares

I learned about Wet Plate in early 2016, I purchased an old Ansco 8×10 camera, found a Dallmeyer lens on eBay, searched for a workshop, and turned an old work trailer into a darkroom.

I met Luis when I was looking to photograph another group of people that are close to my heart, “Immigrants”. Since I’m an immigrant from Cuba that left because of political reasons, I knew that I wanted to capture the people that cross the border searching for a better life, the people that work the fields, the illegal aliens that take work that no other American would.

Still Life

Finalist: “Beetle” by Gary Geboy

I was working on a project called “Organics”, shooting found flora and printing primarily on platinum/palladium, when I came across this little gem: a rhinoceros beetle. He was quite fragile, having been lying in the street for some time before I came along. And what better way to preserve such fragility than through another fragile medium: wet plate collodion.

My experience was limited with collodion, but I had a beat-up, full plate camera and plenty of glass. Luckily, with my coke-bottle lens and just-long- enough bellows, I could get a nice enlargement. After a number of tries, I hit it and the result is this beautiful specimen preserved forever. The plates after that were ok, but this was the one. A little while later I had a solo show of my Organics series and a number of plates from the series as well. Unfortunately, on the last day of the show, someone ripped the beetle from the wall and it has never been seen since.

Landscape/Architecture

Finalist: “Empire State At Twilight” by Kevin Koepke

I started making wet plate images in late 2014 and was immediately enthralled with the process. I built my own portable darkboxes which eventually became mounted first on an old Cannondale M300; then to a workmans tricycle equipped with a darkbox that can handle an 8×10 plate. Recently I have made an 8×10 tintype using a pinhole camera made from cardboard box, tape, black paint, and a Coke can aperture.

The twilight image was taken during the “Magic 15”; the time that the lights on the Empire State Building were on after sunset but when there was enough blue light to show the background and surrounding buildings. The image was processed in the back of my Chrysler PT Cruiser and transported in a wash tank to my home. This was not the first twilight image but one that I am proud to have done.

The entry fee for this competition is $10. The grand prize winner receives a year’s worth of plates from Modern Collodion, a large bottle of UVP-4 Collodion and Varnish from UV Photographics, and an Intrepid Camera Co. 4×5 camera. The finalists win a $50 gift card to Freestyle Photographic Supplies and a $15 gift card to UV Photographics.

You can view all the photos from this year’s contest (including submissions) over at Modern Collodion (note: several of the photos aren’t work safe).

Shooting a Wet Plate Macro of a Cherry Blossom High on a Tree

$
0
0

After I recently saw cherry blossoms on my tree, I wanted to shoot one of them with my wet plate camera… while the blossom is still high on the tree.

When I was young, this tree was the location of my climbing adventures. This tree has seen better days – the weather during recent years has started to ruin some parts of it. But it is still beautiful in the springtime.

To make the blossom more steady, I clamped it onto a light stand:

Because the wind still moved it too much, I stopped the camera down to f/12 and placed a 1000W strobe pretty close to the blossom.

I could make my camera reach the tree with my maxed out Berlebach tripod (above 2 meters/6.5 feet). I initially thought I would an extra table underneath the tripod to reach the necessary height.

Because I didn’t give enough attention to securing my tripod, it nearly fell down two times. But after securing the legs and using a counterweight, the Berlebach tripod proved that it is built like a tank and it held my ultra large format camera in this extremely high position.

Here’s the final 21x27cm plate:

I created two plates — I’m keeping one, and the other is for sale through my store.


About the author: Markus Hofstaetter is a photographer who enjoys life and meeting people around the world. You can connect with him and find more of his work on his website, blog, Facebook, Twitter, and Instagram. This article was also published here.


Photographer Cuts His Own Wet Plates on a 75-Year-Old Machine

$
0
0

Photographer Markus Hofstaetter often gets asked about how he acquires the plates he uses for wet plate collodion photography. To answer that question, Hofstaetter made this 7-minute video showing how he has them custom cut on a 75-year-old machine.

The sheet metal sheer machine he uses was manufactured in 1942 and is owned by an old family business that makes and repairs electrical transformers.

After unboxing his aluminum sheets, Hofstaetter and photographer Christian Rusa carefully measure out the cuts and resulting plates to ensure that there isn’t too much wasted material in the end.

After 1.5 hours of work, the result is a pile of both standard and colored (red and blue) plates that are ready to be used for picture making.

You can find more of Hofstaetter’s work on his website and YouTube channel.

Wet Plate Photography Makes Tattoos Disappear

$
0
0

Here’s something you may not have known about the 1800s wet plate collodion photography process: it can make certain tattoos disappear in photos. It’s a curious phenomenon that photographer Michael Bradley used for his portrait project Puaki.

“The idea was first sparked when I saw some wet plate collodion images from photographers around the world who had shot people with tattoos,” Bradley tells PetaPixel. “I had been shooting on the wet plate collodion method for a few months and was looking for a long-term project when I saw these images of people with tattoo’s and noticed that some faded away depending on the color of that tattoo.

“I noticed that the green/blue shades looked like they were most likely to disappear, especially on someone with slightly darker skin, and this sparked the idea.”

Bradley decided to focus his camera on the indigenous Māori people of New Zealand, whose traditional tā moko tattoos have been making a resurgence.

Tā moko is different from ordinary tattooing because chisels (called uhi are used to carve the skin and opposed to using needles and puncturing. As a result, the skin is grooved rather than smooth in the tattoo areas.

Bradley realized that when photographs of traditional tā moko were captured back in the 1800s, the tattoos themselves barely showed up at all and where therefore lost to history.

“The wet-plate photographic method used by European settlers served to erase this cultural marker – and as the years went by, this proved true in real life, too,” the project’s statement reads. “The ancient art of tā moko was increasingly suppressed as Māori were assimilated into the colonial world.”

To capture the rebirth of tā moko, Bradley captured two portraits of Māori individuals who have facial tattoos: one with a digital camera to show the tattoos as it looks in real life, and one with the wet plate collodion process to show the same subject without the tattoos.

Bradley’s 48 resulting photos (and the videos that accompany them) are currently being exhibited at the Kōngahu Museum of Waitangi in the Bay of Islands, New Zealand, through September 2nd, 2018. You can also find more of Bradley’s work on his website.

(via Puaki via Fstoppers)


Image credits: Photographs by Michael Bradley and used with permission

This is the World’s Largest Wet Plate Collodion Photo

$
0
0

Wet plate collodion photographer Ian Ruhter has made a name for himself by pushing the boundaries of the medium. For his latest endeavor, Ruhter turned a 200-pound sheet of glass into the world’s largest wet plate collodion photo.

The photographer and his team visited a forgotten town called Bombay Beach, located on the edge of the Salton Sea in California’s Imperial Valley.

There, they found an abandoned house and got to work turning it into a giant camera for a giant wet plate collodion photo.

“Instead of focusing on the decay from the outside, this house camera allowed a view from the inside into someone’s dream,” Ruhter says.

He placed a giant lens over a hole in a wooden board on the front of the house, and the outside world was projected onto a plane inside the darkened room.

Ruhter’s subject for the largest photo was Ted, a 100-year-old resident of the town that recently became homeless.

“Images of Ted […] were projected in, breathing new life into this abandoned structure and once again making it a home,” Ruhter says. “During this brief moment in time when Ted’s photograph was captured, he was present in both places.

“In reality, he was homeless in the outside world. However, the projected image simultaneously allowed him to be sitting in the living room where he was once again home.”

The portrait was captured on a 66×90-inch (5.5×7.5ft/1.68×2.29m), 200-pound sheet of glass coated with collodion.

The resulting Ambrotype photo is now the world’s largest wet plate collodion photo.

Ruhter’s entire project was documented in this 30-minute documentary titled Obscura:

You can find more of Ruhter’s work on his website and Instagram.

I Shot Ultra-Macro Video of the Wet Plate Collodion Process

$
0
0

Normally I use videos to document my work. This time the video is the main outcome of my work — I shot an ultra-macro video that shows how the crystals/salts change during the wet plate collodion process.

I did this project because I got asked a lot about how the process works. Questions like “what happens during fixing?” or “what changes when the tintype runs dry?” and so on. As you can imagine, I tried to explain every aspect of this process, but a picture is worth a thousand words. That’s the reason for this video.

What I did not know was that the outcome would be this amazing — they’re mesmerizing pictures from another world. Our jaws dropped during the first video of the developer doing its work. I say “our” because my good friend Erich helped me capturing the process. Thanks again for everything! Another great guy who made this project possible is Reinhold of Glaserei who made the little glass containers I was filming the chemicals through. More information about that later.

First, I want to show you all the two videos that resulted. All closeup macro videos of the chemicals were done with the Laowa 5x ultra macro lens without any CGI!

This first one is about the whole wet plate collodion process:

This second one shows the mesmerizing chemical ultra macro animation with relaxing music in 4K — it’s something you can just run as a screensaver, or just if you want to slow down and relax.

It was much more work to get the job done than I thought it will be. The depth of field at this magnification is about 1/10th of a millimeter. For that reason, I used a self-modified macro focusing rail — actually three of them — partly made of laboratory equipment. The focusing on my Canon 5D Mark IV was done via HDMI on a bigger screen. The screen on the 5D would have been too small for that.

This was also the reason I consumed a lot of plates — it’s because I pre-focused before I put the plate in the glass tank to get a smooth video. If I misplaced the plate for only 2/10th of a millimeter, I had to do the shot again. But even these plates look kind of cool. I started to do scratches on the plates before I put them into the tank, so it was easier to focus.

Beside the tiny depth of field, every tiny vibration was a huge problem. If you see some tiny movements during the video, this is because we were not standing as still as we should have. I never thought the tiles on the floor move, but they do, even when we stand 2 meters away. That’s also the reason our making-of material is limited.

The next issue was the light, it heated up the chemistry and that resulted in little bubbles that showed up. So we had to clean the tanks pretty often to move them away.

A short explanation of the whole process:

In the beginning, I pour a mixture of ether, alcohol, collodion, cadmium bromide and ammonium iodide on the plate. After I put the plate in the silver bath, this cadmium bromide and ammonium iodide turn to silver bromide and silver iodide – which are light sensitive. From now on I have to work under safelight when I put the plate into the plate holder.

After the plate holder is mounted on the camera I do the exposure. Now it’s time to go back into the darkroom and develop the plate. The developer contains ferrous sulfate that sticks to all the crystals that are charged with light. After stopping the development process with water I start to fix the plate. The fixer contains sodium thiosulfate that washes away the unexposed silver and the image appears.


About the author: Markus Hofstaetter is a photographer who enjoys life and meeting people around the world. You can connect with him and find more of his work on his website, blog, Facebook, Twitter, and Instagram. This article was also published here.

Ice Crystals Captured in a Wet Plate Portrait

$
0
0

New York photographer Justin Borucki has been documenting his city with a pop-up tintype studio out of the back of his car. While shooting a portrait for a client recently, Borucki unexpectedly captured a beautiful leaf-like pattern across the photo due to the frigid wind chill causing ice crystals to form.

Borucki’s pop-up tintype studio in New York City. Photo by Chris Polinsky.

Borucki often uses a flame to dry plates after washing them, but on this particular day, ice beat fire to the punch.

“On this shoot at my NYC pop-up studio, the temperature was about 35 degrees F but with the wind chill at times it was apparently below freezing,” the photographer writes in an article at EMULSIVE. “The water on the surface of this plate froze before I could get it over the flame, forming the most beautiful patterns on the surface.”

Borucki quickly rushed the plate back to the water bath to defrost it, fearing that the ice would damage the collodion. But luckily for him, the photo survived just fine and emerged with the unusual pattern across the shot.

The photographer tells PetaPixel that this photo is just one example of the strange and unusual things that can happen out in the field while doing wet plate collodion photography.

Borucki with his camera.

“I have certainly have never seen the surface of the collodion effected like this in the past,” Borucki writes. “Perhaps I’ll never see it again.”

Viewing all 67 articles
Browse latest View live